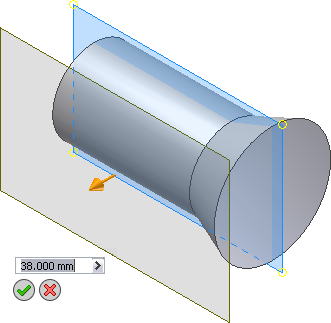
In the next part of the tutorial, you create a work plane which is offset from the default XY plane of the part origin. The work plane is the base for a new sketch.
-
 Click the down arrow of the Model tab
 Work Features panel
 Plane command on the ribbon. Then select Offset from Plane from the Plane drop-down menu
  .
. - Once again, direct your attention to the Model browser at the side of the graphics window. The Origin folder should still be in an expanded state. If not, click the + button to expand the part Origin folder.
- As you did previously, move your cursor over the YZ Plane, the XZ Plane, and the XY Plane in the browser. As each Origin plane highlights in the graphics window, make a point of identifying which browser element corresponds to which origin plane in the graphics window.
- Click the XY Plane. Next, you create a work plane parallel to the default XY plane (highlighted in blue), but at a specified distance.
- Click the gold distance arrow manipulator and drag the parallel work plane in a positive direction (towards you) approximately 38 mm. Alternatively, you can directly enter 38 in the value input box. It is not necessary to include the mm if you choose this method.
- Click the green Ok button to create the parallel offset work plane and end the command.

The new feature, Work Plane1, is added to the Model browser.