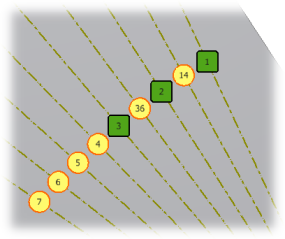
If you were happy with the sequence you obtained, you can right-click and select Done, then right-click again and select Finish Bend Order. Alternatively, pressing Esc twice is equivalent to selecting Done and Finish Bend Order from the pop-up context menu.
Since this is an exercise, you will not keep the directed sequence that you created.
- Right-click, and select Remove All Overrides from the pop-up context menu. Notice that the green squares revert to yellow circles and the numbering sequence returns to the initial sequence generated by Autodesk Inventor.
- Right-click again, and select Sequential Reorder from the pop-up context menu.
Use sequential reordering to pick bends manually in the order that you need them to be manufactured.
- Beginning again with the upper-most bend, click every other bend. As you click a bend, notice that the yellow circle again changes to a green square. The numbers change to correspond to the selected sequence. Click two or three more bends until you get the feel of this technique.

As explained previously, when you are happy with the reordered sequence, press Esc twice, or use Done followed by Finish Bend Order from the context menu.
- Since this is an exercise, right-click again and select Remove All Overrides from the context menu followed, by Finish Bend Order to exit the command.
Note: In a third method of editing the bend order, you select a single, individual bend and change the bend order identification.
Next, you explore converting lines sketched on your flat pattern into cosmetic centerlines.