Import the first model

The first step in modeling a family mold is to import the first model that is to be included.

Note: Before developing a family mold, it is important that for each model:
  • The gate location has been optimized.
  • The melt and mold temperatures specified in the process settings, as well as the molding window, is comparable for all models.
  1. Click New Project, Get Started tab (Get Started tab > Launch panel > New Project). The Create New Project dialog appears.
  2. Enter family in the Project name text-box.
  3. Click OK.
  4. Select Import, Home tab (Home tab > Import panel > Import). The Import wizard-Model selection dialog appears.
  5. Click Browse and navigate to the Autodesk Simulation Moldflow Adviser tutorial files (typically C:\Program Files\Autodesk\Simulation Moldflow Adviser xxxx\tutorial).
  6. Select mouse_top.stl and then click Open.
  7. Step through the Import Wizard dialog, accepting the defaults.
  8. Right-click on mouse_top_study in the Project View pane and select Rename from the menu that appears.
  9. Enter mouse_family in the text-box, then press Enter to accept the change.
  10. Rotate the model to investigate the model geometry.
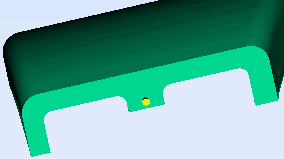
  11. Click Injection Locations, Home tab (Home tab > Molding Process Setup panel > Injection Locations) and click on the model to set the location as shown.

  12. Right-click in the Model pane and select Finish Set Injection Locations from the context menu.
  13. Right-click on the injection location and select Properties from the context menu. The Edit properties dialog appears.
  14. Enter the following coordinates in the relevant text box:

    Y: 45

    Z: 28

    Note: The X value should not be changed here, as the injection point is on a YZ plane that is important to the final family mold.
  15. Click Apply, and then Close to exit the Edit properties dialog.

In the next task you will add the second model.