Layers are an organizational tool that allow you to isolate components of your model. They assist in visualizing, manipulating, and editing your model more efficiently.
Layers Panel
The Layers Panel allows you to add, activate, delete, and modify the layers associated with your active model. Each layer can be displayed either individually or with other layers.
The Layers Panel is located in the bottom left of the graphics user interface.
If this panel is not showing, click  and select Layers from the drop-down menu.
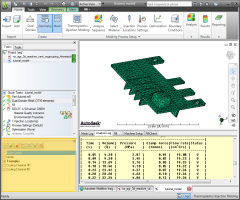
Ensure the working model from the previous task is open. If this model is not open, click . Navigate to the Tutorial folder found typically at C:\Program Files\Autodesk\Simulation Moldflow Insight 20xx\tutorial, click tutorial_model and click Open.
Although they are not displayed, there are two cooling channels and an injection point defined in the model. Each of these features, along with the visible triangles and nodes (to be explained in the Meshing tutorial), are represented by an entry in the Layers Panel.
- Experiment by ticking different check boxes in the Layers Panel and observing the effect in the Model pane.
You may want to rotate the model to view the two cooling channels.
- Tick Triangles in the Layers pane to return the model to its original form.
Click the Next topic link below to move on to the next task of the tutorial.