Enabling worksharing involves creating a master project model, known as a central model, from an existing model.
The central model stores the current ownership information for all worksets and elements in the project, and acts as the distribution point for all changes made to the model. All users should save their own local copy of the central model, edit locally in this workspace, and then synchronize with central to publish their changes to the central model so that other users can see their work.
To enable worksharing and create a central model
- Open the Revit project file (RVT) you want as the central model.
- Click Collaborate tab
 Worksets panel
 (Worksets).
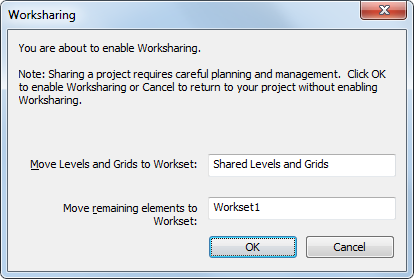
 The Worksharing dialog displays, showing the default user-created worksets (Shared Levels and Grids, and Workset1).

- If desired, rename the worksets.
- In the Worksharing dialog, click OK.
The Worksets dialog displays.
- In the Worksets dialog, click OK.
You do not need to create worksets at this point. For more information, see Setting Up and Managing Worksets.
- Click

 Save As
 (Project).
 - In the Save As dialog, specify a file name and directory location for the central model.
When specifying a name for the central model, use a naming convention that identifies it as the central model (for example, OfficeBuilding_CentralModel.rvt).
Note: Because legacy versions of Revit appended backup file names with a decimal point and a numerical string, you should not end your file name in this manner. Otherwise, a proper backup directory will not be created. For example, if you want to name your central model hotel.2010.rvt, consider naming it hotel_2010.rvt.Attention: When you save the central model, be sure that it is saved to a network drive to which all team members have access. If you are using server-based worksharing, Revit Server must be installed on any machine hosting a central model, and the Host role must be enabled in the RSN.ini file on that machine. For more information, see How Revit Server Works. - In the Save As dialog, click Options.
- In the File Save Options dialog, select Make this a Central Model after save. Note: If this is the first time you have saved after enabling worksharing, this option is selected by default and cannot be changed.
- Select a default workset for local copies. See File Save Options. For Open workset default, select one of the following.
Workset Default Description All Opens all worksets in the central model. Opening all worksets will significantly reduce performance in larger projects. Editable Opens all editable worksets. Depending on how many editable worksets are in the central model, this option may significantly reduce performance in larger projects. Last Viewed Opens worksets according to their state from a previous Revit session. Only worksets open in the last session open. If you are opening the file for the first time, all worksets open. Specify Opens specified worksets. When you click Open, the Opening Worksets dialog displays.
Initial status is based on when the file was last opened. Specify different worksets or click OK to confirm the default.
Press Ctrl+A to select all worksets in this dialog.
- Click OK.
- In the Save As dialog, click Save.
The file is now the central model for the project. Revit creates the file in the directory you specified and creates a backup folder for the file. For example, if your central model is called OfficeBuilding_CentralFile, you see the Revit project file and the backup folder (OfficeBuilding_CentralFile_backup) in the directory.

The backup folder contains the backup information and editing permission information for the central model. For more information on backup files and folders, see About Workshared Project Rollback.
The Revit_temp folder contains files that provide progress information on operations (such as Synchronize with Central) to the Worksharing Monitor. For more information, see About Worksharing Monitor.
Now that worksharing has been enabled, you can use the worksharing display modes.
Related topics