When you enable worksharing, several default worksets are created (two default user-created worksets, and worksets for the families that are loaded in the project, project standards, and project views). For more information, see Default Worksets.
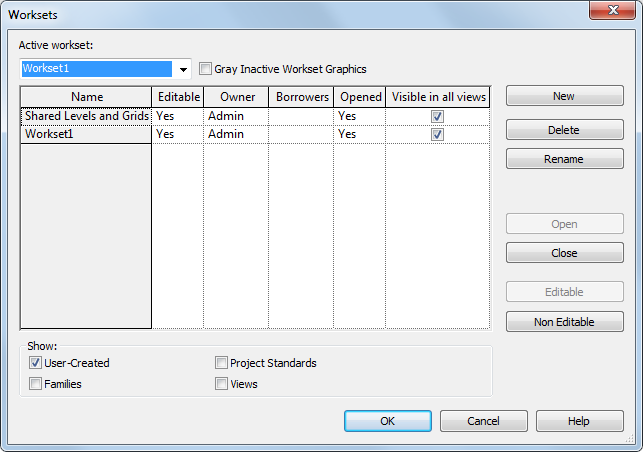
The following image shows the Worksets dialog, with the two default user-created worksets, Shared Levels and Grids and Workset1.

The Worksets dialog provides the following information:
- Active workset designates the workset to which new elements are added. The active workset can be a workset that is editable by you or one that is owned by another team member. You can add elements to worksets you do not own. Note: The active workset name also displays on the Collaborate tab
 Worksets panel and the status bar.
 - Gray Inactive Workset Graphics. Displays all elements in the drawing area that are not part of the active workset as gray. This has no effect on printing.
- Name. Indicates the name of the workset. You can rename all user-created worksets.
- Editable. Indicates the editable status of a workset. You cannot change editable status until you synchronize with central.
- Owner. Indicates the owner of the workset. If the Editable status of the workset is Yes, or you change the Editable status of the workset to Yes, then you are the owner of the workset.
The Owner value is the user name that is listed on the General tab of the Options dialog. For more information on the Options dialog, see Options.
- Borrowers. Lists the users who are currently borrowing an element from the workset. If there is more than one borrower, you can view the list of borrowers from the drop-down list.
- Opened. Indicates if a workset is open (Yes) or closed (No). Elements in open worksets are visible in the project, elements in closed worksets are not.
- Show. Allows you to show or hide the different types of project worksets (User-Created, Families, Project Standards, Views) that display in the Name list.
Worksets and Element Borrowing
Generally, it is recommended that you work in your local copy of the central model and not make worksets editable. When you edit an element that is not being edited by another team member, you automatically become the borrower of the element and can make the changes you need. It is recommended that you synchronize with central frequently as you work. Synchronizing relinquishes borrowed elements by default, allowing other team members to edit them.
Use worksets when you want to reserve parts of a project so that only the assigned user can edit the elements in that workset. Also consider these benefits for creating worksets:
- Convenience for editing
Dividing a project into worksets makes it easier to make whole sections of a project editable at once.
- Visibility control
You can control overall visibility in a project when you link Revit models into other Revit projects. For example, it is often convenient to turn off visibility of the Shared Levels and Grids workset when linking Revit models so that you do not have to turn off levels and grids individually in each view.
You can assign a display mode to worksets so that you can visually identify and differentiate them in your model. See Visually Distinguishing Model Worksets .