Using the tools in the Reinforcement Settings dialog, you can do the following.
Determining rebar shape matching by referencing rebar hooks
- Click Structure tab
 Reinforcement panel drop-down
 Reinforcement Settings.
 - In the Reinforcement Settings dialog, click General.
- Clear Include hooks in Rebar Shape definition. This is selected by default in new projects.
You can specify rebar hooks to not influence rebar shape matching.
| Hooks included (selected default) | Hooks not included (cleared) | |
|---|---|---|
 |
Shape 01 | Shape 00 |
 |
Shape 00 | Shape 00 |
Setting the hosting of rebar within area and path reinforcement
- Click Structure tab
 Reinforcement panel drop-down
 Reinforcement Settings.
 - In the Reinforcement Settings dialog, click General.
- Select the Host Structural Rebar within Area and Path Reinforcement option.
- Open a new file - the option is set by default, but you can choose which area and path mode to use in the project. After creating area or path reinforcement, the possibility to change the mode is disabled.
- Open an existing file with the previously-defined area and path reinforcement - the option is available after you delete previously-defined reinforcement objects from the project.
- Display independent rebar elements in floors, walls and foundation slabs.
Hosting of rebar is turned on (default) Hosting of rebar is turned off 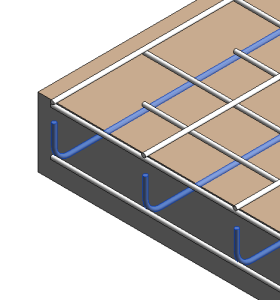
You can specify the visibility of rebar elements in the Graphics section of Area or Path Reinforcement Properties palette.
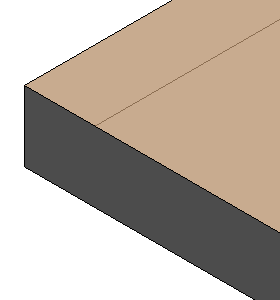
Rebar elements are not visible unless you create a section view of the host element.
- Schedule every rebar in a project.
Hosted Structural Rebar creates rebar sets if possible. This allows scheduling elements like rebar sets where adjacent bars of the same length are grouped in one row of the schedule.
- Remove the area or path system from a project and leave rebar or rebar sets in place. See Remove Area Reinforcement System or Remove Path Reinforcement System.
Setting the reinforcement rounding for a structural rebar
- Click Structure tab
 Reinforcement panel drop-down
 Reinforcement Settings.
 - In the Reinforcement Settings dialog, click Reinforcement rounding.
- Select Use reinforcement rounding.
- Selected, then calculated Bar lengths and Bar segment lengths are rounded
- Cleared, then calculated Bar lengths and Bar segment lengths display their exact values.
This option determines if reinforcement rounding applies to the project. If Use reinforcement rounding is:
- Specify values for Bar length and Bar segment length for Structural Rebar. You can also specify Fabric Sheet dimension values for Structural Fabric Reinforcement. Select Custom from the list and enter an unlisted value in the Rounding increment field. Note: Units are inherited from the Project Units setting, however reinforcement rounding will override Project Units rounding settings for rebar instances.
- Click OK to accept the rounding change.
Reinforcement rounding simplifies organization and annotation when tagging, filtering, or scheduling rebar.
Rounding values defined in the Reinforcement Settings dialog are propagated to the Rebar Type Properties and the Rebar Instance Properties dialogs. Rebar length displayed in the Instance Properties palette will display in a dual format: exact length and rounded length in brackets. You can manually override these values for the bar type and the bar instance by editing the exact length properties.
Changing the tagging abbreviations for area or path reinforcement
- Click Structure tab
 Reinforcement panel drop-down
 Reinforcement Settings.
 - In the Reinforcement Settings dialog, click either Area Reinforcement or Path Reinforcement.
Along the left side of either dialog is a list of possible annotation abbreviations (Setting). Along the right side are the editable abbreviations (Value).
- Select and highlight a value.
- Edit the abbreviation as it should read in annotation.
- Click OK to accept the abbreviation change.
The following illustrations show the default abbreviations and modified examples as they display in a project.
Default Abbreviations Modified Abbreviations Area Reinforcement 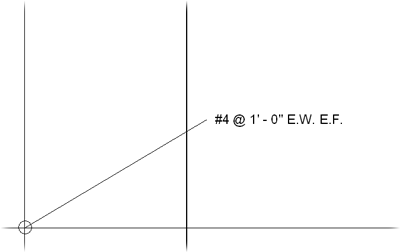
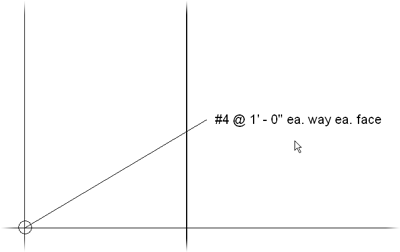
Path Reinforcement 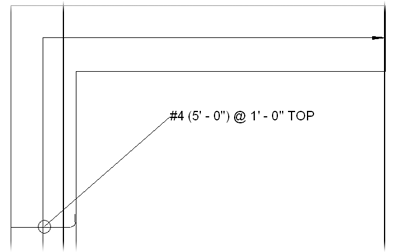
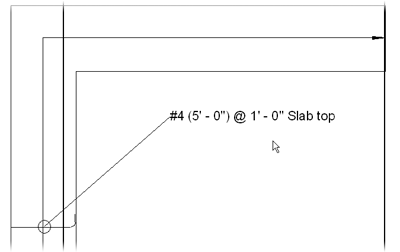
For more information on tagging reinforcement, refer toTagging Area Reinforcement and Tagging Path Reinforcement.