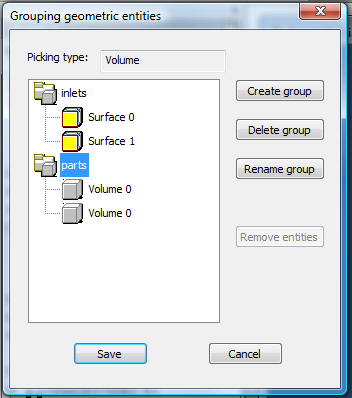
CAD Entity groups are collections of parts or surfaces, and are created in the CAD system using a dialog installed with the Autodesk Simulation CFD Connection. They provide a convenient way to automate the assignment of settings and the building of the design study. After launching into Autodesk Simulation CFD, CAD Entity groups are added to the scenario, and appear in the Groups branch of the Design Study bar as Autodesk Simulation CFD groups.
CAD Entity Groups are essential to automation:
- The most versatile type of Rule, the Group Rule, associates a Autodesk Simulation CFD setting (such as a boundary condition or material) to objects in a CAD Entity group. Group rules work closely with CAD Entity groups to automatically apply settings when Autodesk Simulation CFD is launched.
- An important part of the Design Study Builder process is to associate entities from the CAD model with Autodesk Simulation CFD settings. By associating each setting in the design study to a CAD Entity group, settings are automatically assigned to CAD entities contained in the group as the design study is launched.
To create a CAD Entity group

- In CAD, click the icon or command to open the Autodesk Simulation CFD grouping dialog.
- Click Create group.
- Set the Picking type to either Volumes or Surfaces.
- Enter a group name. (Use something descriptive as this name appears in Autodesk Simulation CFD.)
- Highlight the group name, and select entities.
For an example of using CAD Entity Groups...
CAD Entity groups = Autodesk Simulation CFD groups
When the model is launched into Autodesk Simulation CFD, CAD Entity Groups and their contents are listed in the Groups branch of the Design Study bar. They behave as traditional groups, and can be modified as necessary.
If entities are added or removed from a CAD Entity group in the CAD model after the model was initially launched into Autodesk Simulation CFD, the group in Autodesk Simulation CFD is automatically updated the next time the model is launched. To disable automatic group updating:
- Right click on the group name in the Design Study bar.
- Uncheck Update when launch from CAD.