The Material Library Manager stores material data in centralized databases for use by all analyses. It includes the Autodesk Simulation Material Library, which contains material property values drawn from standard engineering references for a variety of common materials. You can also create multiple custom material libraries comprised of material data that you use often.
The library manager lets you organize the materials in each library into folders for easier retrieval. For example, you may want to put all ceramics into one folder, all coppers into another folder, and so on.
How to Access the Material Library Manager:
- In Autodesk Simulation, click Tools
 Options Manage Material Library command. The Material Library Manager will appear.
 - From this dialog, you can view material data stored in the default material library or a customized material library. For example, select the Autodesk Simulation Material Library tab and select the AISI 1018 Steel, cold drawn item from the list. The properties for that material are shown (see Figure 1).
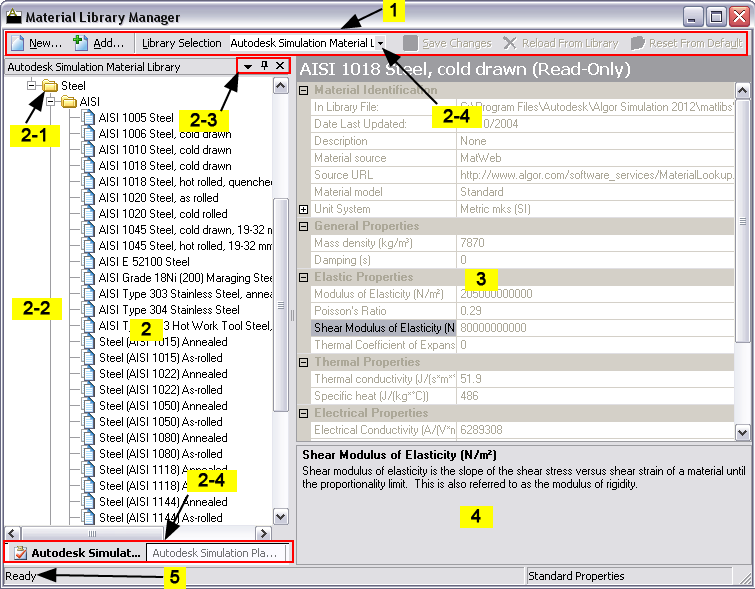
Figure 1: The Material Library Manager
The sections of the Material Library Manager are as follows:
- Toolbars with often used commands.
- The Tree View which shows the list of libraries and materials. The Tree View is further broken down into the following area:
- Material Category (or a folder) is used to hold similar groups of materials.
- List of materials contained in each category (folder).
- Tree View or Library toolbars, consisting of the Menu toolbar (
 ), the Auto Hide toolbar (
 ), and the Close toolbar (
 ).
). - The tabs at the bottom of the tree view and the Library Selection pull-down show the material libraries available. Other library files may exist but are not linked to the software. See How to Access Existing Material Libraries on the page Customizing a Material Library.
- The Property Grid, which shows the material properties for the selected material and permits them to be changed.
- The Help Area shows message and explanation for the selected material property.
- The Status Bar, which gives additional explanations for the commands as the mouse passes over it.
The tree view can be docked at four locations: top, bottom, left, or right. All the tree views can be dragged to a new location by clicking and holding the left mouse button in the tree's title bar (item 2c), and then dragging it to a new location. Using the same technique but dragging an individual tab (item 2d), each library's tree view can be moved to a different location. If the tree view is taking up a lot of space on the screen, it can be hidden by clicking the Auto Hide button (![]() ). When the toolbar is hidden, only the library's tab will appear at the edge of the window. Clicking the tab will cause it to temporarily expand into view so that you can choose a material and so on.
). When the toolbar is hidden, only the library's tab will appear at the edge of the window. Clicking the tab will cause it to temporarily expand into view so that you can choose a material and so on.