Note: This feature is available in Autodesk Vault 2014 Subscription Release 1.
- Click Import from Vault on the Revit Vault Ribbon.
- Select the file to be imported from Vault.
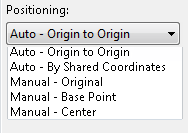
- Select your positioning preference from the Positioning drop-down.

- Click the Import button.
- The file is imported based on your positioning selection.
Important: When a file is inserted using Auto–By Shared Coordinate, the position is correct but the shared site must be manually configured. Follow the steps in Manually Configure a Site to configure the shared site for the import position.