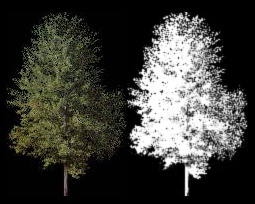
Civil View tree objects are created using a proprietary parametric tree object plug-in.
Tree objects in Civil View are created by means of two bitmaps projected onto a flat rectangular plane. The first of these bitmaps, the diffuse map, gives the tree object its natural color. The second is an opacity map that defines which parts of the rectangular plane can be seen and which areas are transparent. In white areas, the diffuse map shows through. In black areas, the object appears to be transparent.

Left: Diffuse map
Right: Opacity map
This type of tree object avoids the use of complex meshes to represent tree objects, and provides huge improvements in rendering time and viewport performance, especially when large quantities of trees are placed in a 3ds Max Design scene.
Civil View applies the CivilViewTrees material to all tree objects.
Object previews for tree objects are derived directly from the diffuse bitmap.
Object INI File Structure
|
Tree Object INI File |
|
[Parameters] Width= Height=
[Maps] Diffuse= Opacity=
[Tree Defaults] Style=
[Group] Name=
|
[Parameters]
- Width / Height
-
Set the width and height of the tree rectangle. Both dimensions must be positive values.
In addition to this basic Width and Height, Civil View applies a randomization factor to tree objects, to achieve a variation in tree size among a group of trees. This improves realism. You set the percentage variation factor on the Civil View Preferences panel.
[Maps]
- Diffuse
- Names the bitmap that defines the color and appearance of the tree. This bitmap file must exist within the /matlibs/treemaps folder within any current Civil View resource kit.
- Opacity
-
Names the bitmap (typically black and white or grayscale) that defines the shape of the resulting tree at render time. This map should always depict the same tree as the diffuse map. Black areas of the bitmap are rendered as transparent portions of the object. This bitmap file must exist within the same /matlibs/treemaps folder as the diffuse map.
[Tree Defaults]
- Style
-
The type of tree object. This setting should be "1" or "2" (no quotation marks are necessary):
- 1: A standard Civil View tree object, as described above.
- 2: A 3ds Max Design Foliage object.
Foliage objects use detailed geometry, so we don't recommend them if there will be many trees in your scene.
When option 2 is active, Civil View ignores the Width/Height and Diffuse/Opacity parameters.
[Group]
- Name
- The name of the category sub-group in which this object should be listed. If no name is specified, the object will be listed as ungrouped.
Adding Custom Trees to the Library
Create the diffuse and opacity bitmaps, then add them to the /matlibs/treemaps folder in any current Civil View resource kit. Then create an associated INI file, in the format described above, and place it in the /objlibs/trees folder of the same resource kit. Multiple INI files can reference the same bitmaps.
Please also refer to the general instructions on object library customization in Civil View Object Library Overview.