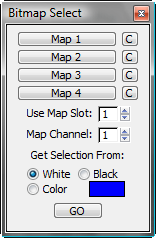
With Bitmap Select you can select sub-objects in the model based on a bitmap image. Bitmap Select applies the chosen bitmap for selection purposes based on the model’s UVW mapping (it need not be part of a material applied to the object), and uses it to select parts of the mesh that correspond to a defined color. For example, you can select all polygons that have the color white in the chosen bitmap.
This way you can save a sub-object selection that will survive any topology changes, and quickly select hard-to-reach areas of the model. You can also have many selections stored in the same bitmap, because every color in the bitmap can be defined as a separate selection. It is recommended that you use lossless formats for the bitmap, such as Targa or or BMP, because a format such as compressed JPEG can lose color information in the compression.
Bitmap Select works at all sub-object levels. The software uses the following guidelines to determine a sub-object’s color:
- At the Vertex level, the vertex must have the specified color to be selected.
- At the Edge level, the center of the edge must have the specified color to be selected.
- At the Polygon level, the center of the polygon must have the specified color to be selected.
Procedure
To use Bitmap Select:
- Use the map slot buttons to choose from one to four bitmaps to use for selection. Tip: To see a bitmap on the object, apply it as a Diffuse map to an unused material and apply the material temporarily to the object. Leave the Tiling values at their defaults (1.0, 1.0).
- Set the Use Map Slot value to the number of the map slot to use for selection. Also, if necessary, change the map channel value.
- Set Get Selection From to the color to use for making the selection. Any sub-objects with that color will be selected.
- Select an editable poly object and access the sub-object level, such as Vertex or Polygon, at which you want Bitmap Select to work.
- Click GO to make the selection.
Interface

- Map1 – Map4
- Use these map buttons to specify bitmaps to use in getting the selection. Clicking a button opens the Material/Map Browser.
You can also drag and drop a map from a Material Editor sample slot. If the Slate Material Editor is open, you can drag from a map node's output socket, then drop onto one of these buttons. You can also drag and drop from a map button in the Material Editor or anywhere else in the 3ds Max interface. When you drop a map onto one of these buttons, a dialog asks if you want the map to be a copy (independent) or an instance of the source map.
To adjust the map's parameters (for example, to assign a bitmap or change the coordinate settings), drag the map button to the Material Editor, and be sure to drop it as an instance. In the Compact Material Editor, drop the map over an unused sample slot. In the Slate Material Editor, drop it over the active View.
Use the C button next to a map button to clear the map assigned to that button.
- Use Map Slot
-
The map slot (1–4) Bitmap Select uses for making the selection.
- Map Channel
-
The map channel to use in making the selection.
- Get Selection From
-
Determines which bitmap color Bitmap Select uses for getting the selection. For example, if you choose White at the Polygon sub-object level, all polygons that have a corresponding white color in the bitmap, based on the UVW layout, will be selected.
To use a color other than white or black, choose Color and then click the color swatch. Use the Color Selector to choose the color to use in getting the selection.
Note: There is a slight tolerance for the color so the color does not have to be exact but is allowed to differ slightly. - GO
-
Makes the selection based on the supplied criteria.