Final gathering is a technique for estimating global illumination for a given point by either sampling a number of directions over the hemisphere over that point (such a set of samples is called a final gather point), or by averaging a number of nearby final gather points since final gather points are too expensive to compute for every illuminated point. In the former case, the hemisphere orientation is determined by the surface normal of the triangle on whose surface the point lies.
-
Note: The Global Illumination panel appears only when the mental ray renderer is the active renderer.
For diffuse scenes, final gathering often improves the quality of the global illumination solution. Without final gathering, the global illumination on a diffuse surface is computed by estimating the photon density (and energy) near that point. With final gathering, many new rays are sent out to sample the hemisphere above the point to determine the incident illumination. Some of these rays strike diffuse surfaces, and the global illumination at those points is then computed by the material shaders at these point, using illumination from the photon map, if available, and from other material properties. Other rays strike specular surfaces and do not contribute to the final gather color (since that type of light transport is a secondary caustic). Tracing many rays (each with a photon map lookup) is very time-consuming, so it is done only when necessary. In most cases, interpolation and extrapolation from nearby final gathers is sufficient.
Final gathering is also useful without photon tracing; in fact, this is the recommended method of indirect lighting for non-expert users. By default it takes only first-bounce indirect light into account, but you can obtain physically accurate results by increasing the number of bounces to between 3 and 7 and using a high values for density and ray count.

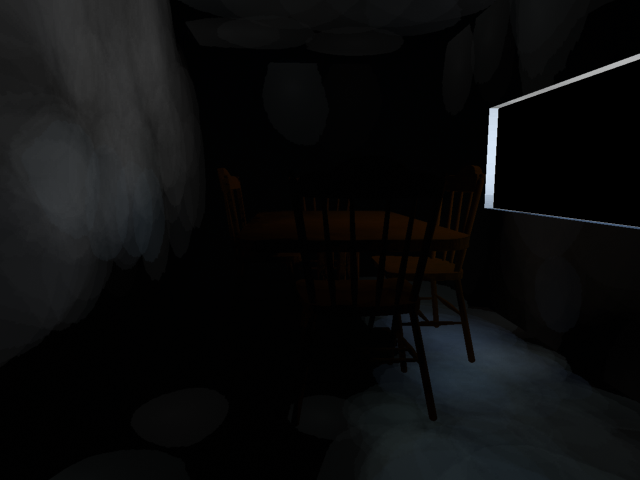
Interior rendered with final gathering only, lit by daylight only
Final gathering is useful in scenes with slow variation in the indirect illumination, such as purely diffuse scene s. For such scenes, final gathering eliminates photon map artifacts such as low-frequency noise and dark corners. With final gathering, fewer photons are needed in the photon map and, because each final gather averages over many values of indirect illumination, lower accuracy is sufficient.
In film production work, final gathering increasingly replaces photon mapping, except for caustics. Without multiple-bounce effects, which are performed by photons by default and by final gathering only if the shaders adjusts the trace depth, tends to have far less impact on the final image than the first bounce that final gathering supports by default. Although physical correctness is lost, this is often sufficient for film production, and final gathering is easier to control than photons emanating from distant light sources. However, for accurate indoor illumination simulations and other CAD-related applications, photon mapping is still the method of choice.
Procedure
You can find additional procedures for using final gather in rendering animations here.
To use an environment map as a final gather light source:
- Add a skylight to the scene.
- Do either of the following:
- On the Skylight Parameters rollout, make sure Sky Color (the default) is chosen, click the map button (“None”) to open the Material/Map Browser dialog and then choose a map.
- On the Skylight Parameters rollout, choose Use Scene Environment. Use the Environment panel controls to assign an environment map.
Thereafter, rendering with final gather enabled take the skylight map into account when calculating final gather illumination.
Illumination from which final gathering is derived can be provided by an actual light source, of course, but it can also be provided by an object to which a self-illuminated material is applied, or even an environment map. In the latter case, follow this procedure:
Interface

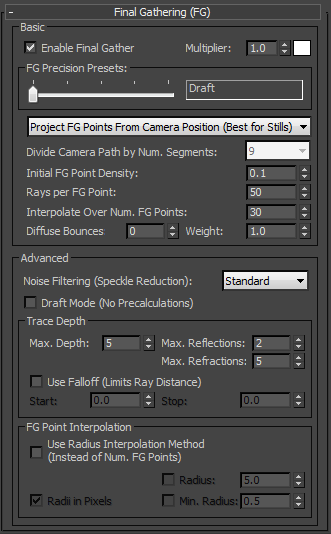
Basic group
- Enable Final Gather
- When on, the mental ray renderer uses final gathering to create global illumination or to improve its quality. Default=on.
The leftmost position of the Final Gather Precision slider on the lower panel of the Render Frame Window also turns off Enable Final Gather.
Tip: Without final gathering, global illumination can appear to be patchy, but final gathering increases rendering time. Leave Enable Final Gather off to preview the scene, and then turn it on for the finished rendering. (Increasing the number of photons used to calculate global illumination can also improve global illumination.) - Multiplier / [color swatch]
- Adjust these settings to control the intensity and color of the indirect light accumulated by final gathering. The default values, 1.0 and white, produce physically correct rendering.
These settings are useful for adjusting the contribution of the final gather effect, thus improving the quality of an image.
- FG Precision Presets slider
- Provides a quick, easy solution for final gather. The default presets are: Draft, Low, Medium, High, Very High, and Custom (the default choice). Available only when Enable Final Gather is on.
The presets affect the following settings:
- Initial FG Point Density
- Rays per FG Point
- Interpolate Over Num. FG Points
The preset settings are defined in the text file mentalray_fg_presets.ini, found in the \plugcfg folder in 3ds Max installation. You can modify the existing presets and add new ones by editing this file.
This setting is also available on the Rendered Frame Window, as Final Gather Precision.
- [drop-down list]
- Choose a method for avoiding or minimizing the final-gather “flickering” that can result from rendering an animation with a still or moving camera, especially when the scene also contains moving light sources and/or moving objects.
- Project FG Points From Camera Position Distributes final gather points from a single viewpoint. Use this when the camera from which you’re rendering the animation does not move, thus saving rendering time.
- Project Points from Positions Along Camera Path Distributes final gather points across multiple viewpoints. Use this when the camera from which you’re rendering an animation moves, especially if you’re seeing flickering in areas that are lit mainly by final gathering. This method can result in slightly longer rendering times.
Also, when using this method, set the Divide Camera Path by Num. Segments parameter to an appropriate value, and increase the Initial FG Point Density setting (see following).
Note: This method is most effective for relatively brief shots from a camera that doesn’t move very quickly. If you’re rendering an animation in which the camera moves a significance distance between frames, such as 30-frame dolly shot of a large stadium, you might achieve better results by using the Final Gather Map feature, generating a map for every frame, by itself, or combined with “Project Points ...”.For procedures that describe how to achieve flicker-free animations in different situations, see this section.
Note: When you use this method, before rendering each animation frame, the Rendered Frame Window shows the final-gathering precalculation for all segments.
- Divide Camera Path by Num. Segments
- Choose from the drop-down list the number of segments into which to divide the camera path when using the Project Points from Positions Along Camera Path option (see preceding).
The available values are squares of the numbers 1 to 10. You’ll need to determine the best value experimentally, but as a rule of thumb, set the number of segments to at least one per 15 or 30 frames.
Also, when increasing this setting, be sure to set Initial FG Point Density higher. Again, you’ll need to experiment, as the optimal setting depends very much on the scene contents, lighting, and so on. Start with a low value and increase until the results look good.
- Initial FG Point Density
- A multiplier for the density of final gather points. Increasing this value increases the density (and thus the quantity) of final gather points in the image. The points will therefore be closer together and more numerous. This parameter is useful for solving geometry problems; for example, near edges or corners. Default=1.0. Tip: When adjusting final render settings it's often helpful to visualize the final gather points; to do so, turn on Diagnostics and choose the Final Gather option.
- Rays per FG Point
- Sets how many rays are used to compute indirect illumination in a final gather. Increasing this value makes global illumination less noisy, but also increases rendering time. Default=250.
- Interpolate Over Num. FG Points
- Controls the number of final gather points that are used for an image sample. It is useful for solving noise problems and getting smoother results.
For each final gather point, mental ray interpolates (averages) indirect light values over the nearest N final gather points, with N specified by the value of this parameter, as opposed to points within the specified radii as with the alternate method. Increasing the value increases the smoothness of the result, and the required number of calculations, hence the render time (but not as much as you might expect).
This setting is unavailable when Use Radius Interpolation Method is enabled.
- Diffuse Bounces
- Sets the number of times mental ray calculates diffuse light bounces for each diffuse ray. Default=0.
Like Maximum Reflections and Maximum Refractions, this value is subject to the restriction of Max Depth. If you set Diffuse Bounces higher than Max Depth, the latter setting is automatically raised to the Diffuse Bounces value in the MI output file, but this is not reflected in the 3ds Max interface.
This setting is also available on the Rendered Frame Window, as FG Bounces.
Note: When Global Illumination is on, changing this setting has no effect. - Weight
- Controls the relative contribution of the diffuse bounces to the final gather solution. The value scales from "using no diffuse bounces" (value=0.0) to "use full diffuse bounces" (value=1.0). Default=1.0.
Advanced group
- Noise Filtering (Speckle Reduction) drop-down list
- Applies a median filter using neighboring final gather rays that are shot from the same point. This parameter lets you choose a value from a drop-down list. The options are None, Standard, High, Very High, and Extremely High. Default=Standard.
The practical effect of increasing the Noise Filtering value is to make the scene illumination smoother, at a cost of render time. However, increasing filtering can also make the illumination somewhat darker.
Noise Filtering works by eliminating stray rays that are considerably brighter than most of the rest. For example, in a situation in which most of the rays are within 10 percent of each others’ brightness, but a few are 50 percent brighter than the rest, using Noise Filtering will tend to disregard the latter rays in computing the Final Gather solution.
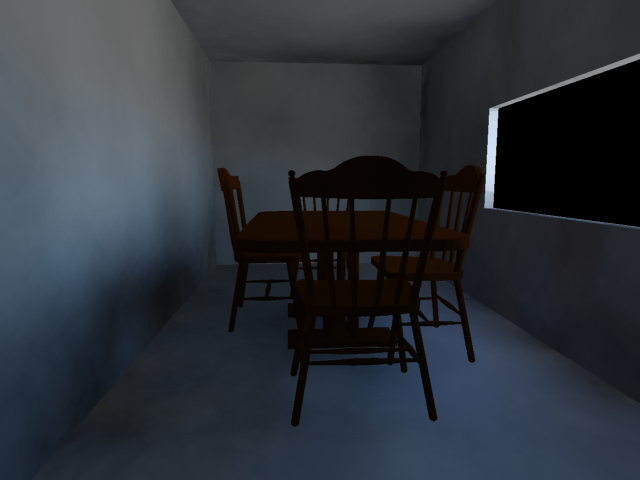
As a result, in low-light situations, setting Noise Filtering=None can greatly increase the overall illumination. In the following rendered image, an interior scene, lit only by skylight entering through the window, is very dark with Noise Filtering set to Standard (Diffuse Bounces=1).

Noise Filtering=Standard
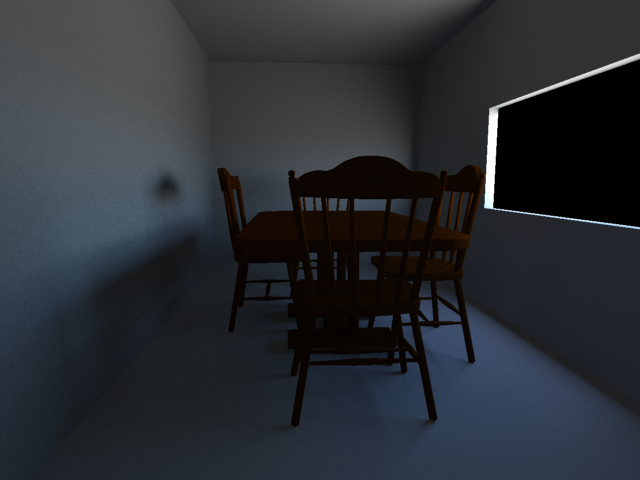
In the next illustration, the same scene renders much brighter with Noise Filtering set to None. Note, however, the unevenness of the illumination.

Noise Filtering=None
In cases like this, you can achieve superior results with slightly longer rendering times by setting Noise Filtering to Standard and using a sky portal in the window opening, as shown in the following illlustration:

Noise Filtering=Standard + Sky Portal
The above illustration is also improved by the realistic shadows cast by the chair and table legs from the Sky Portal light.
- Draft Mode (No Precalculations)
- When on, final gathering skips the precalculation phase. This results in a rendering with artifacts, but begins rendering more quickly, so it can useful when you want to do a series of trial renderings. Default=off.
Trace Depth group
The Trace Depth controls are similar to those for calculating reflections and refractions, but they refer to the light rays used by final gathering, rather than to rays used in diffuse reflection and refraction.
- Max. Depth
- Limits the combination of reflection and refraction. Reflection and refraction of a light ray stop when the total number of both equals the Maximum Depth setting. For example, if Maximum Depth equals 3 and the trace depths each equal 2, a ray can be reflected twice and refracted once, or vice versa, but it can’t be reflected and refracted four times. Default=2.
- Max. Reflections
- Sets the number of times a ray can be reflected. At 0, no reflection occurs. At 1, the ray can be reflected once only. At 2, the ray can be reflected twice, and so on. Default=5.
- Max. Refractions
- Sets the number of times a ray can be refracted. At 0, no refraction occurs. At 1, the ray can be refracted once only. At 2, the ray can be refracted twice, and so on. Default=5.
- Use Falloff (Limits Ray Distance)
- When on, uses the Start and Stop values to limit the length of light rays used for regathering before using the environment color. This can help improve regathering time, especially for scenes that are not fully enclosed by geometry. Default=off.
- Start Specifies the distance, in 3ds Max units, at which rays begin. You can use this value to exclude geometry that is too close to the light source. Default=0.0.
- Stop Specifies the maximum length, in 3ds Max units, of a light ray. If the ray reaches this limit without encountering a surface, then the environment is used for shading. Default=0.0.
FG Point Interpolation group
These settings provide access to the legacy method of final gather point interpolation.
- Use Radius Interpolation Method
- When on, makes the remaining controls in this group available. Also makes the Interpolate Over Num. FG Points checkbox unavailable, indicating that these controls override that setting.
- Radius
- When on, sets the maximum radius within which final gathering is applied. Reducing this value can improve quality at a cost of rendering time. If Radii In Pixels is off, the radius is specified in world units, and defaults to 10 percent of the maximum circumference of the scene. If Radii In Pixels is on, default=5.0 pixels.
If both Radii In Pixels and Radius are off, the maximum radius is the default value of 10 percent of the maximum scene radius, in world units.
- Radii in Pixels
- When on, the radii values are specified in pixels. When off, radii units depend on the value of the Radius toggle. Default=off.
- Min. Radius
- When on, sets the minimum radius within which final gathering must be used. Decreasing this value can improve render quality but increase rendering time. Unavailable unless Radius is turned on. Default=0.1. If Radii In Pixels is on, default=0.5. Tip: In general, increasing the point density is better than decreasing Min. Radius.Tip: To minimize flickering in animations, keep the two Radius values as close to each other as possible.