For the Nitrous display driver, the Visual Style & Appearance panel of the Viewport Configuration dialog sets the rendering method for either the current viewport or all viewports. The visual style can include non-photorealistic styles.
Nitrous requires Direct3D, and works best when used with a professional graphics board with plenty of dedicated graphics memory. See the Autodesk certified recommendations at http://www.autodesk.com/max-hardware and the System Requirements at http://www.autodesk.com/3dsmax-systemreq-2015-enu.
For more information, see the MAXScript help  MAXScript Language Reference
  3ds Max Objects
  Interfaces
  Core Interfaces
  Core Interfaces Documentation
  N,O
N,O  Interface: NitrousGraphicsManager
  "Depth of Field and Bokeh Effects" section.
Interface
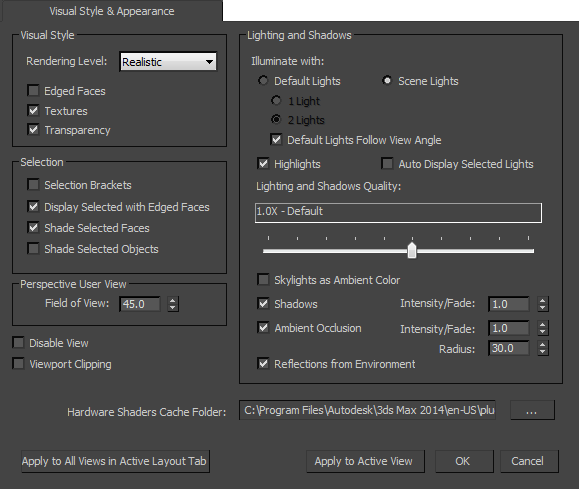
Visual Style group
- [visual style drop-down list]
- Chooses the visual style of viewports.
- Realistic (The default.) Textures geometry realistically with high-quality shading and lighting.
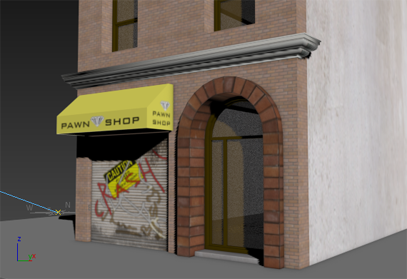
Realistic viewport
- Shaded Smoothly shades geometry using Phong shading.
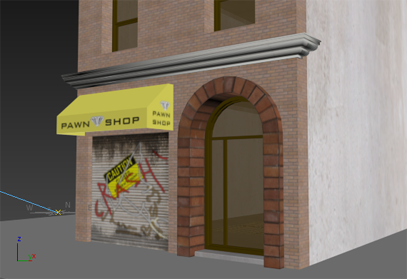
Shaded viewport
- Facets Displays geometry as faceted, regardless of its smoothing group settings. This option is provided as a convenience to modelers, especially character modelers, who want to see the precise geometry they work with.
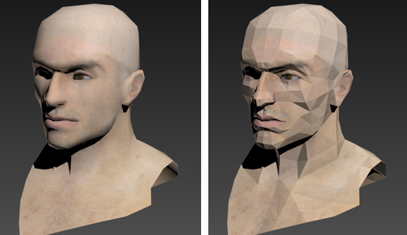
Left: Head with smoothing
Right: Head with facets
- Consistent Colors Shades geometry with "raw" color, disregarding the lighting. Shadows are available.
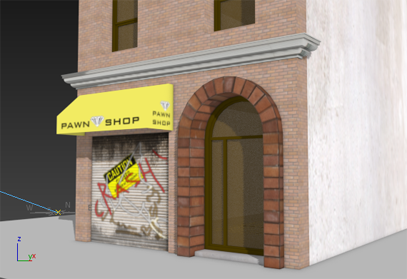
Consistent Colors
- Hidden Line Hides faces and vertices whose normals point away from the viewpoint, as well as any parts of objects that are obscured by closer objects. Shadows are available.
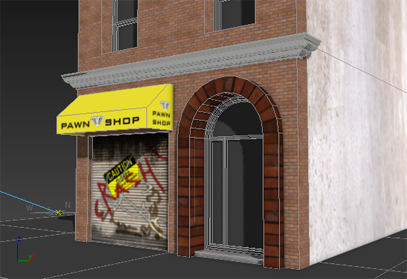
Hidden Line display
- Wireframe Displays geometry in wireframe mode.
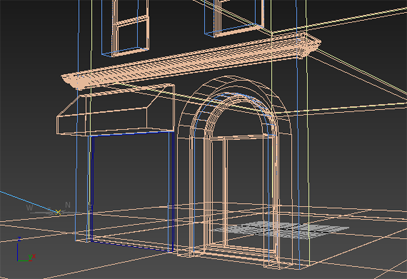
Wireframe display
- Bounding Box Displays only the edges of each object's bounding box.
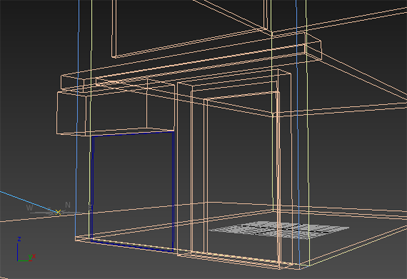
Bounding-box display
When Bounding Box is active and you also turn on Display Selected
 Display Selected With Edged Faces, selected objects appear as wireframes. This option is on the Shading viewport label menu.
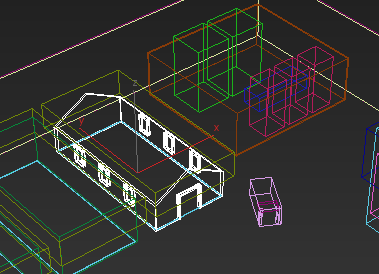
When selected, building walls appear as a wireframe in a bounding-box viewport.
Display Selected with Edged Faces is turned on.
Similarly, when Bounding Box is active and you also turn on Shade Selected Objects, selected objects are shaded. This option is in the Selection group on this panel—see below—and on the Views menu; or for enhanced menus, Scene menu
 Configure Views.
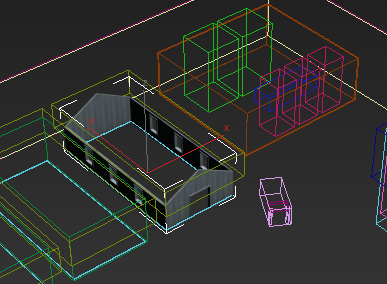
When selected, building walls appear shaded in a bounding-box viewport.
Shade Selected Objects is turned on.
- Clay Displays geometry as a uniform terracotta color. This option is provided as a convenience to modelers, especially character modelers, who don't want to be distracted by the texture of an object.
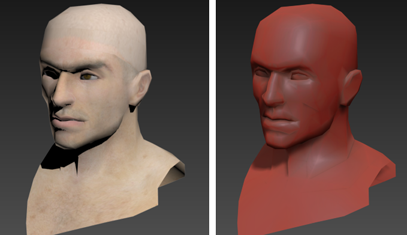
Left: Realistically shaded head
Right: Head with Clay shading
-
_____
The styles that appear below the horizontal rule are non-photorealistic styles.
- Realistic (The default.) Textures geometry realistically with high-quality shading and lighting.
- Edged Faces
- When on, viewports show face edges. Default=off.
- Textures
- When on, viewports show texture maps. Default=on.
- Transparency
- When on, objects with transparent materials are displayed as transparent. Default=on.
Lighting And Shadows group
Controls how lights are displayed in viewports other than wireframe views.
The default setting and availability of these controls depend on the visual style you have chosen.
- Default Lights (The default.) Illuminates the viewport using the default lights. If no lights exist in the scene, the default lighting is used automatically, even when Scene Lights is chosen.
Sometimes the lighting you create in the scene can make objects difficult to see in the viewport. The default lighting displays the objects with even illumination. You can use either one or two lights. By default, 3ds Max uses one default light.
- 1 Light Provides an over-the-shoulder light with 20% faster redraws at the expense of less natural illumination.
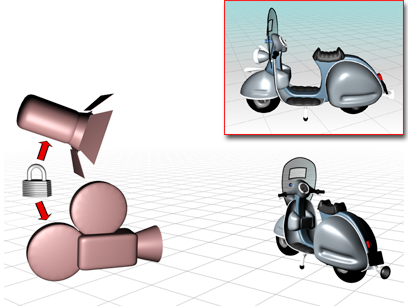
A single default light is linked to the camera and moves when you change your viewport point of view.
- 2 Lights (The default.) Provides more natural illumination, but slower viewport performance.
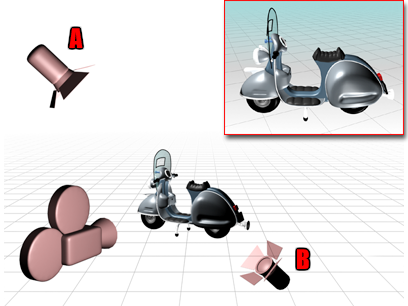
Two default lights are placed opposite to each other.
The key light, A, is in front of the object, on the upper-left side, while the fill light, B, is behind on the lower-right side.
- 1 Light Provides an over-the-shoulder light with 20% faster redraws at the expense of less natural illumination.
- Scene Lights Illuminates the viewport using light objects in the scene.
- Default Lights Follow View Angle
- When on, two default lights track changes to the viewport position. (A single default light always tracks the viewport position.)
Your choice depends on the nature of the scene:
- If lights follow the view angle, this provides good character or object lighting with a main head lamp and a rim fill light.
- If lights don't follow the view angle, you get good lighting for interior scene walkthroughs (as in previous versions of 3ds Max).
- Highlights
- When on, viewports include highlights that come from the lighting. Default=on.
- Auto Display Selected Lights
- When on, light from selected lights is automatically displayed in shaded viewports. Default=off.
Some default settings and the availability of these controls depend on the visual style you have chosen.
- Lighting & Shadows Quality
- Sets the style of lighting used to generate shadows, and the kind of shadows generated. Range: From Point Lights/Hard Shadows to 16.0X - Very High Quality. If the setting is higher than Point Lights/Soft-Edged Shadows, area lights are taken into account. Default = 1.0X - Default.
- Skylights as Ambient Color
- When on, sky lights contribute ambient color to the Realistic viewports, but are not treated as shadow-casting lights.
Fully shadow-casting sky lights are accurate and give good results with outdoor scenes, but can cause problems in interior scenes.This option is not as physically accurate as treating sky lights as fully shadow-casting lights, but It can improve the appearance of interior scenes.
- Shadows
- When on, the scene is rendered with shadows.
- Intensity/Fade Controls the intensity of shadows. The higher the value, the darker the shadows. Default=1.0.
- Ambient Occlusion
- When on, enables ambient occlusion (AO). AO improves shadow quality by taking into account the proximity of objects. When AO is enabled, the controls for it become available.
- Intensity/Fade Controls the intensity of the AO effect. The higher the value, the darker the shadows. Default=1.0.
- Radius Defines the radius, in 3ds Max units, within which the Nitrous driver looks for occluding objects. Larger values cover larger areas. Default=10.0.
Note: Ambient occlusion is based on geometry, so when it displays faceted objects, shadows can appear at the edges of the facets even when the Smooth option (available for many primitives) is turned on. The Smooth option interpolates normals to give the illusion of smoothness, but it doesn't affect geometry. (Direct3D viewports reduce this effect by averaging the AO shadows, which become more even but less accurate.) To reduce the "streaking" effect, increase the number of segments in the geometry and don't rely on the Smooth option.For more information about ambient occlusion, see Built-in Ambient Occlusion (the version of AO used by the Architecture & Design Material has somewhat different controls).
- Reflections from Environment
- When on, glossy materials in Realistic viewports reflect the environment map. This gives good results with outdoor scenes (for example, with a shiny car body), but high dynamic range (HDR) images can cause problems in indoor scenes; for example, with shiny floors. Turning off this toggle avoids such problems.
Selection group
- Selection Brackets
- When on, an object selected in a shaded viewport shows brackets at the corner of its bounding box. Default=off.
Keyboard shortcut: J
- Display Selected with Edged Faces
- When on, an object selected in a shaded viewport shows edged faces. In a bounding-box viewport, the object appears as a wireframe. Default=on
- Shade Selected Faces
- When on, a face selected in a shaded viewport is shaded in semitransparent red. This makes it easier to see Face sub-object selections. Default=on.
Keyboard shortcut: F2
- Shade Selected Objects
- When on, a selected object in a shaded viewport is shaded in semitransparent red. Default=off.
Perspective User View group
This control applies only to Perspective viewports.
- Field Of View
- Sets the field of view angle for a Perspective viewport. Default=45.0 degrees. Tip: For a Camera viewport, you can change the field of view on the Modify panel.
- Disable View
- Disables the active viewport. While it is active, a disabled viewport behaves like any other viewport. However, when you change the scene in another viewport, the view in the disabled viewport does not change until the next time you activate it. Default=off.
Use this option to speed up screen redraws when you are working on complex geometry.
- Viewport Clipping
- When on, interactively sets a near and far range for viewport display. Two arrows at the edge of the viewport allow you to determine where the clipping occurs. Tick marks correspond to the extents of the viewport, the lower tick is the near clipping plane, and the upper tick sets the far clipping plane. This affects only the viewport display; it does not affect renderings. Default=off.
- Hardware Shaders Cache Folder
- Manages the location of hardware shaders on your computer.
-
[cache folder path]
Displays the path of the folder used to save hardware shaders.
The default location is in your user settings: /users/<username>/appdata/local/autodesk/3dsmax/2015 - 64bit/enu/plugcfg/ (or "3dsmaxdesign" for 3ds Max Design).
 Open Configure System Paths Click to display the Configure System Paths dialog, which lets you choose an alternate location for saving hardware shaders.
-
[cache folder path]
- Apply to All Views in Active Layout Tab
- Click to apply the current Visual Style settings to all viewports in the active layout.
- Apply to Active View
- Click to apply the current Visual Style settings to the active view only.