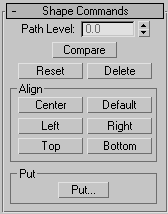
Shape Commands let you align and compare shapes along the loft path.
Interface

- Path Level
-
Adjusts the shape's position on the path.
- Compare
-
Displays the Compare dialog in which you can compare any number of cross-section shapes.
- Reset
-
Undoes rotation and scale of the shape performed with the Select and Rotate or Select and Scale.
- Delete
-
Deletes the shape from the loft object.
Align group
The six buttons in this group let you align the selected shape in relation to the path. Looking down at a shape from the viewport in which it's created, the orientation is left to right along the X axis, and top to bottom along the Y axis.
You can use a combination of these buttons for placements such as corner alignment. The operations are additive. In other words, you can use both Bottom and Left to place the shape in the lower-left quadrant.
- Center
-
Centers the shape on the path, based on the bounding box of the shape.
- Default
-
Returns the shape to its position when first placed on the loft path. When you use Get Shape, the shape is placed so that the path goes through its pivot point. This is not always the same as the center of the shape. Therefore, clicking Center is different than clicking Default.
- Left
-
Aligns the left edge of the shape to the path.
- Right
-
Aligns the right edge of the shape to the path.
- Top
-
Aligns the top edge of the shape to the path.
- Bottom
-
Aligns the bottom edge of the shape to the path.
Put group
- Put
-
Puts the shape into the scene as a separate object.