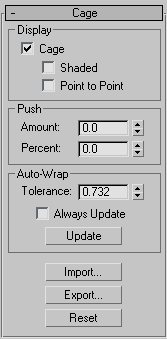
These settings adjust the cage and its display. The cage is the nonrenderable geometry that the Projection modifier uses as the surface from which it ray-traces normals.
Procedures
To use Export and Import with a cage:
- Create a cage:
- Create low-resolution and high-resolution objects. In most cases, for best results they should be arranged concentrically.
- Apply the Projection modifier to the low-resolution object.
This creates the cage with the same shape and position as the low-resolution object.
- Use the Reference Geometry rollout controls to specify one or more high-resolution objects.
- On the Cage rollout, click Update.
This reshapes the cage, roughly enveloping the high-resolution object(s).
- On the Cage rollout, click Export.
This creates a separate geometrical object in the same shape as the cage, with the same type and topology as the low-resolution object. We'll call this the cage object.
For example, if the low-resolution object is an editable poly, or has an Edit Poly modifier at the top of the modifier stack, the resultant cage object is of editable poly type.
- Use standard object-editing tools to modify the cage object's shape. Do not alter its topology by adding or removing vertices, edges, etc., because that would invalidate its usage for reshaping the cage. Also, for best results, do not move the cage object. If you wish, you can temporarily hide any overlapping objects.
- Select the low-resolution object.
- On the Cage rollout, click Import and then select the cage object.
If the cage object type and topology are the same as the low-resolution object, 3ds Max reshapes the cage to match the cage object's shape. Alternatively, if the cage object can be converted to the same type as the low-resolution object without a change in topology, it is also accepted. If not, a warning appears and no reshaping takes place.
Attention: The resultant cage matches the imported cage object's shape, position, orientation, and size exactly.If the import is successful, the cage object can be deleted, or retained for possible future cage modification.
Interface

Display group
- Cage
-
When on, the cage is displayed. When off, the cage is hidden except at the Cage sub-object level. Default=on.
The cage is always displayed at the Cage sub-object level, regardless of this toggle's setting. See Selection Rollout (Projection Modifier).
- Shaded When on, the cage is shaded with a transparent gray. When off, the cage is displayed as a blue lattice. Default=off.
The Shaded option can be useful when you need to tell whether or not high-resolution source geometry is within the cage, and when you need to expand the cage to include more geometry.
- Point to Point When on, additional lines connect vertices in the cage to points on the target object, showing how the projection will be done. Default=off.
- Shaded When on, the cage is shaded with a transparent gray. When off, the cage is displayed as a blue lattice. Default=off.
Push group
These controls let you adjust the size of the cage as a whole, or on a sub-object selection if one is currently chosen (see Reference Geometry Rollout (Projection Modifier)).
- Amount
-
Change to adjust the size of the cage in 3ds Max units. Positive values increase the size of the cage; negative values decrease the size. Default=0.0.
- Percent
-
Change to adjust the size of the cage as a percentage. Positive values increase the size of the cage; negative values decrease the size. Default=0.0.
Auto-Wrap group
By default, the Projection modifier does not automatically create a cage that wraps around the geometry. To change the cage, use the settings in this group or the Push group, or adjust cage vertices manually at the Cage sub-object level.
- Tolerance
-
The distance in 3ds Max units, between the cage and the target geometry. Positive values are outside the high-res source geometry; negative values are inside the source geometry. Default=varies, depending on the geometry.
- Always Update
-
When on, the cage automatically expands around high-res geometry as it is added to the list (see Reference Geometry Rollout (Projection Modifier)). When off, the initial cage is not updated automatically. Default=off.
- Update
-
Click to update the cage. Use this when Always Update is off.
- Import
-
Lets you specify a mesh object to define the cage shape. This is typically an object that was created with Export (see following) and then modified using standard mesh-editing methods. After clicking Import, select the object to import. After importing the object, the cage conforms to its shape. You can then delete the imported object if you wish.
Attention: The imported object should be of the same type (for example, editable mesh) as the projection object (that is, the object with the Projection modifier), or be convertible to that type without topology change, and must have the identical topology. If it doesn't meet either or both of those criteria, an alert appears requesting that you select an object of the same type and identical topology. - Export
-
Creates a geometry object from the cage, with the same type and topology as the modified object. Clicking Export causes the Export Cage dialog to open. Accept the default “Export as” object name or enter a new one, and then click OK.
For a detailed description of the export/import process, see To use Export and Import with a cage:.
- Reset
-
Click to reset the cage to a wrapping that is the same size as the low-resolution target geometry.