The menu bar is located directly under the main window’s title bar. The title of each menu indicates the purpose of the commands on the menu.
Interface
3ds Max includes two menu systems. The default menu, known as the Standard menu, is the one you're familiar with if you've versions of 3ds Max prior to 3ds Max 2014. Alternatively, you can use the Enhanced menu, described in the Enhanced Menu section.
Common Menu Features
The default Standard menu follows standard Windows conventions, as described in this section. The Enhanced menu follows the same conventions and offers additional features as described in Enhanced Menu.
To open a menu from the menu bar, click its name, such as Edit or Customize. The menu opens as a list of commands and submenus or panels. To open a submenu, point at its name. To invoke a command, click its name.
As an alternative to using a mouse or other pointing device, most menu names includes an underlined character when you hold down the  key. Pressing
  + that character key opens the menu, unless that particular key combination is assigned to a keyboard shortcut.
Some commands in the open menu have an underlined character as well. While the menu is open, pressing that character key invokes the command. While navigating menus with the keyboard, you can also use the arrow keys to move the highlighting and the  key to activate a command.
An ellipsis (…) after a command name indicates that invoking the command opens a dialog.
A right-pointing triangle after a command name indicates that pointing at the name will cause a submenu to open.
If a command has a keyboard shortcut, the menu shows it to the right of the command name.
If a menu command is an on/off toggle, such as Render Setup, and the panel is set to display text only (Enhanced menu only), a check mark indicates its status: When the check mark is present, the command is active.

The Render Setup menu entry shows a check mark, indicating that the Render Setup dialog is open, as well as the keyboard shortcut: F10.
Global Menu Search
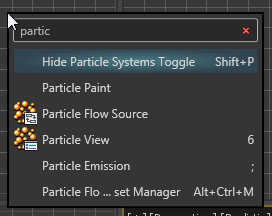
To search the entire 3ds Max system (menus and actions) for a particular command, press the X key with no menus open. This opens a small "Search All Actions" dialog at the mouse cursor location. As you enter the search text, a drop-down list opens from the search dialog showing matching actions. To choose an action, click its name. To clear the search field, click the X icon at the right end of the search box. To exit the search, choose a command, click outside the search interface, or press  .
.

Entering text in the global search field shows all matching actions.
This function is also available as Search 3ds Max Commands on the Help panel of the Help menu in the Enhanced menu system.
Enhanced Menu
The optional Enhanced menu system features improved organization of the default layout, configurable display, detailed tooltips that link to relevant help topics, drag-and-drop menu categories, and the ability to search for menu commands from the keyboard.
To access the Enhanced menus, open the Workspaces drop-down list on the Quick Access toolbar and choose Default With Enhanced Menus. For a list of the menus, see Enhanced Menus.

Following is a list of functions available with the Enhanced menu system:
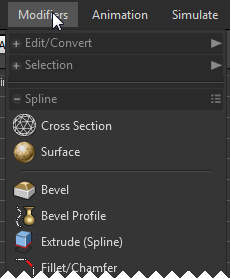
- Each panel can be collapsed or expanded, whether docked or floating. When a panel is collapsed, a + icon appears at the title bar's left end and a right-pointing triangle at the right end. When expanded, a - icon appears at its left end. To toggle a panel's state, click the title bar anywhere except the right end.

In this partial view of the Modifiers menu, the Edit/Convert and Selection panels are collapsed, and the Spline panel is expanded.
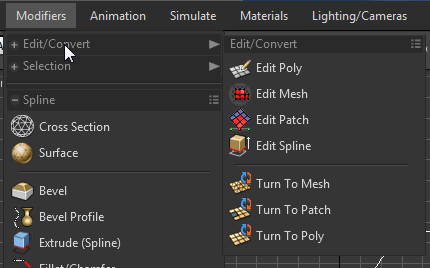
Note: 3ds Max remembers the collapsed or expanded state of all panels when you exit the program and restores them upon restarting. - When collapsed, you can open a panel's contents as a submenu by pointing at the panel title bar.

Pointing at the title of a collapsed panel opens it as a submenu.
- You can view each panel's contents as icons, text, or icons + text. To change a panel's view mode, click the icon at the right end of the title bar (see video, following). Each panel's setting is stored upon exiting the program and restored upon restarting.
- Similarly, to view the top-level menus (Objects, Edit, and so on) as icons, text, or icons + text, right-click anywhere on the menu bar and choose the corresponding command. When set to Show Icons Only, positioning a mouse over a menu icon opens a tooltip showing the menu name. This setting is stored upon exiting the program and restored upon restarting.
- If the 3ds Max window isn't wide enough to display all menu titles, a scroll bar appears just below the menu bar. To access hidden parts of the menu bar, drag the scroll bar or click the arrows at the left and right ends.

Use the scroll bar to view hidden parts of the menu bar.
- To view a tooltip that provides a brief description of a menu command, hover the mouse pointer over the command briefly. While a tooltip is visible, you can open the help to a topic about the command by pressing function key F1.
- To float a menu panel or submenu, drag its title bar away from the menu in any direction. To dock a floating panel with another, drag it over the other panel. Then, when a blue line appears, indicating where the panel will dock, release the mouse button. Depending on where you position the panel while dragging, you can dock it above or below the host panel (see video, following). Note: A floating panel also remains in its original location on the menu. Also, all floating panels are saved upon exiting the program and restored upon restarting.
- To move a floating panel or panel group, drag the bar at the top of the group.
- To restore a floating panel group to the menus, click the icon at the right end of the bar at the top of the group (see video, following).
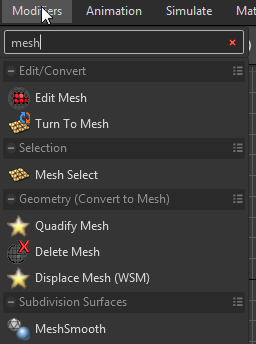
- To search a menu for a particular command, open the menu and then use the keyboard to type part of the name. When you start typing, a search field opens at the top of the menu, and as you type, the menu shows only matching commands. To clear the search, click the X icon at the right end of the search box or press
 .
. 
Searching the Modifiers menu for commands matching "mesh"
- When a command name is too long to fit in the allotted space, the center of the name is elided. The beginning and end of the name are shown, and the middle part is replaced by an ellipsis (...).

The name Particle Flow Preset Manager is shortened with an ellipsis.
To see how to float and dock Enhanced menu panels and change the display mode, play the following video.