The Layer Controller dialog provides commands and options related to the Layer controllers in your scene, which the system automatically assigns for you when you enable animation layers on an object.
Unlike other controllers, you cannot assign a Layer controller explicitly to a track; you first need to enable layers via the Animation Layers toolbar or the Enable Layers command on the Track View  Edit menu
  Controller submenu.
The Layer controller dialog has similarities to the List controller dialog. For complementary information on some of the options, see List controller.
Interface
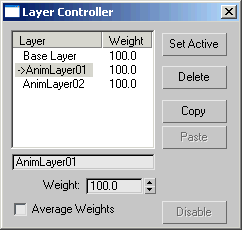
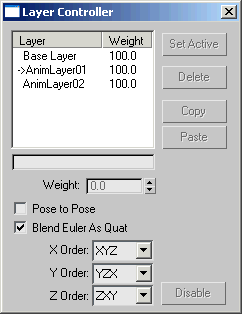
The dialog for a Layer controller depends on whether you’re using it with a Position or Scale track (left, following), or with a Rotation track (right, following).
 Layer Controller dialog with Position and Scale tracks |
 Layer Controller dialog with Rotation tracks |
- [List Window]
-
Shows all Layer controllers for the selected object, along with their respective weight values.
- Set Active
-
To specify the layer to receive subsequent animation keys, as well as adjust its weight, highlight a layer in the list and then click Set Active. The active layer is marked with an arrow in the list.
Tip: You can also change the active layer by double-clicking it in the list, and with the drop-down list on the Animation Layers toolbar . - Delete
-
Deletes the highlighted controller. A dialog prompts you to confirm the deletion.
- Copy
-
Copies the highlighted controller's data and enables Paste.
- Paste
-
Applies the copied controller data onto the highlighted controller.
- Weight
-
Sets the relative effect of the highlighted Layer controller.
- Average Weights
-
When on, averages the Weight values of all controllers in the list. Available only when you assign a Layer controller to a Position track. Default=off.
- Pose to Pose
-
Enables blending among controllers in the list. Available only when you assign a Layer controller to a Rotation track. Default=off.
See List controller for more information on this option.
- Blend Euler As Quat
-
When on, exposes the rotation axis order for blending the Euler controllers, which can prove useful for controlling gimbal. Available only when you assign a Layer controller to a Rotation track. Default=off.
- X/Y/Z Order
-
Sets the order in which the system calculates each rotation axis. Available only when Blend Euler As Quat (see preceding) is on.
- Disable
-
Removes the Layer controller from the select object and reverts the animation keys on the Base Layer to the original controller.
Note: Disable is available only when the Base Layer is the only animation layer. That is, you need to have first deleted or collapsed (available on the Animation Layers toolbar) all layers above the Base Layer.
 Motion panel