The mr Proxy object is intended for use in large scenes to be rendered with mental ray.
This object type is useful when scenes contain many instances of an object, such as an auditorium with hundreds or thousands of instances of a seat model. It is also particularly useful for objects with extremely high polygon counts, in that it obviates both the conversion to mental ray format and the presence of the source object at render time, thus saving time and freeing up a great deal of memory for rendering. The only drawbacks are the reduced fidelity of the proxy object in the viewports and the inability to edit proxies directly.
The basic usage of the mr Proxy object is that you create and optionally animate the “source” object, apply a material, and then save a copy to disk for possible future modification. Next, you convert the object to mr Proxy format and write the proxy to a disk file or series of files, after which it appears in the viewports as a point cloud (a set of vertices showing the object size and approximate shape). Finally, you delete the source object, as its presence in the scene is no longer necessary. You can then use the mr Proxy object like any object in the scene, instancing it, transforming it, and so on. When you render, mental ray loads the disk files and uses the geometry defined therein. However, if you need to modify it (such as changing a modifier parameter, or editing a sub-object), you need to load the source object, modify it, reconnect it to the proxy object, and rewrite the files.
Procedures
To use the mr Proxy object:
- Make sure mental ray is the active renderer.
- Create or load the object that is to serve as the source object. Apply any necessary modifiers and material. Be sure to save a copy for future reference.
- Add an mr Proxy object.
Until you define the source object, the mr Proxy object appears in the scene as a wireframe cube.
- Go to the Modify panel.
The mr Proxy object requires that you specify the source object from the Modify panel.
- Click the source object button, which currently reads “None,” and then select the source object.
The name of the source object appears on the button.
Tip: If you plan to modify the source object, do so before converting it to mr Proxy format. Because the mr Proxy geometry is loaded by mental ray at render time, the renderer ignores any modifiers that change the geometry. The one exception is the Skew modifier, which affects the object’s transformation matrix rather than its sub-object geometry, and thus can modify a proxy. - Click the Write Object To File button, enter a file name, and click Save.
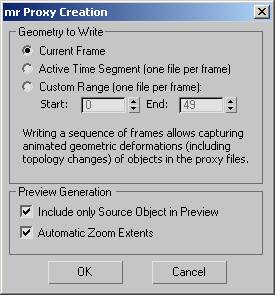
This opens the mr Proxy Creation dialog, which lets you set parameters for the proxy object file, including animation frames and preview settings. Change settings as necessary and then click OK to continue.
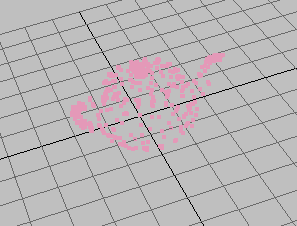
The file is saved in the MIB format and its path and file name are placed in the Proxy File field. After you save the file, the Display group shows the proxy geometry and the viewport shows the object, by default, as a point cloud: a group of vertices that roughly defines the object’s shape. You can change the number of points in the cloud and use a bounding box to represent the object, with or without the point cloud. (When the point cloud is on, you can toggle the bounding box, but when you turn off the point cloud, the bounding box always displays.)

mr Proxy object represented as a point cloud
If you like, you can now delete the original object.
Tip: To select an mr Proxy object when represented as a point cloud, click one of the vertices. - If the object is difficult to visualize in the viewports, increase the Display group
 Viewport Verts value.
 You can now use this object as any other object in 3ds Max, applying materials, copying it, animating with it, and so on.
To use materials with the mr Proxy object:
- Create or load the object that is to serve as the source object. Apply any necessary modifiers and material, and then save a copy.
- Create the mr Proxy object and then convert the source object, as described in the preceding procedure. Delete the source object.
- Apply an XRef material to the proxy object.
- Set the material to use the material from the source object file you saved in step 1.
Then, to modify the material on the proxy, load the source object, edit its material, and save the file. Because the material on the proxy object is externally referenced, it updates automatically.
When you convert an object to mr Proxy format, the proxy does not inherit the object’s material. An efficient way to handle this is with the XRef material.
Example: To use an animated source object:
- Create a source object and add vertex-level animation. For example, you could apply the Bend modifier and then set keys for different values of the Angle parameter.
- Add an mr Proxy object.
- Go to the Modify panel, click the source object (“None”) button and then select the object from step 1.
- Click the Write Object To File button, enter a file name, and click Save.
On the mr Proxy Creation dialog, choose either animation option (Active Time Segment or Custom Range) and, if you like, toggle the Preview Generation switches. Click OK to continue.
3ds Max writes a pair of files (geometry and thumbnail) for each animation frame.
- You control animation playback in the Proxy object with the Animation Support group settings. When you save or load an animated Proxy, 3ds Max automatically enables the On checkbox in this group and sets Frames to the number of frames in the animation. You can change the value to the number of frames you want to use from the animation. Also, you can adjust the rate at which the animation appears in the proxy object by adjusting the Replay Speed value, and change the frame at which the playback begins with the Frame Offset parameter. Last, to have the animation play back and forth, turn on Ping-Pong Replay.
The mr Proxy object supports vertex-level animation as well as topological changes in the source object. For example, you could create a fluid simulation with a particle system to which BlobMesh is applied, and then bake it out to a series of mr Proxy files. This procedure gives an example of how to use this feature.
Interface
Parameters rollout

Source Object group
- [source object button]
-
Shows the name of the source object, or, if you haven’t assigned one, the text “None.” To assign an object, click the button and then select the source object. The name of the source object then appears on the button, unless you delete the source object subsequently. In that case, the button label returns to “None,” although the mr Proxy object still functions normally, assuming you’ve saved the object to an MIB file.
-
 Clear source object slot
 -
Restores the source object button label to “None,” but doesn’t otherwise affect the proxy object.
- Write Object to File
-
Lets you save the object as an MIB file, which you can then load into another mr Proxy object using the Proxy File controls.
Clicking the button opens a File Name dialog, where you can navigate to the desired folder and enter a file name. Then, when you click Save, 3ds Max opens the mr Proxy Creation Dialog. Set parameters as desired and then click OK.
This saves a file named [file name].mib, containing the geometry data, and another named [file name].mib.bmp, which contains the thumbnail image that appears on the Parameters rollout.
Note: The MIB file contains only geometry, not materials. You can apply different materials to each instance or copy of an mr Proxy object.If Animation Support is on, 3ds Max writes a sequence of both types of file, with a four-digit frame number appended to the base file name for each file. For example, if you use the file name Test and set Animation Support group
 Frames to 10, then the first pair of files are named Test0000.mib and Test0000.mib.bmp, the second pair are named Test0001.mib and Test0001.mib.bmp, and so on.
Proxy File group
- Proxy File
-
This editable field shows the location and name of the base MIB file stored with the Write Object To File command. To use a different file you can edit the field manually or click the [...] button and use the File Name dialog to choose a new file.
- ... [browse]
-
Click this button to choose an MIB file to load into the proxy object. You can use this button to load an existing MIB file into a new proxy object, allowing you to easily transfer objects between different scenes.
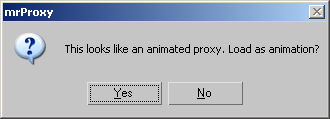
Note: If you load an MIB file that’s part of an animated sequence, you’re given the opportunity to load the entire sequence. Confirming automatically turns on animation support and sets the animation parameters to appropriate values. For details, see Animation Support group.
- Scale
-
Adjusts the size of the proxy object. Alternatively, you can use the Scale tool to resize the object.
Display group
- Viewport Verts
-
The number of vertices displayed in the point cloud for the proxy object. For best performance, display only enough vertices to make the object recognizable.
- Show Point Cloud
-
When on, the proxy object appears as a point cloud (group of vertices) in the viewports. When on, you can combine this with Show Bounding Box (see following).
Note: When the object is selected, the point cloud always displays. - Show Bounding Box
-
When on, the proxy object appears as a bounding box in the viewports. Available only when Show Point Cloud is on. When Show Point Cloud is off, the bounding box always displays.
- [preview window]
-
Shows the thumbnail image stored for the current frame of the MIB file. The thumbnail is generated when you click Write Object To File. The image includes the current scene background. Also, if you turn off Exclude Other Objects on the Preview Generation Options rollout, it includes other objects in the scene.
Animation Support group
These settings control animation playback; animation recording is controlled by the mr Proxy Creation settings (see following) when you save the Proxy object.
- On
-
When enabled, plays animation in the proxy object if the current MIB file is part of an animation sequence. When off, the proxy object remains in the state of the last animation frame.
Saving or loading an animated Proxy object automatically enables animation playback.
The remaining Animation Support settings are available only when animation is enabled.
- Frames
-
The number of frames to use from the animation, starting at the first frame of the animation + the Frame Offset value.
After the last frame plays, the animation repeats, either from the first frame forward again, or, if Ping-Pong Replay is on, back and forth.
Saving or loading an animated Proxy object automatically sets Frames to the correct value.
- Replay Speed
-
Lets you adjust the playback speed as a multiplier. For example, if you load a 100-frame animation and then set Replay Speed to 0.5 (half speed), 3ds Max plays back each frame twice, so the animation takes 200 frames to play back fully. Default=1.0 (full speed).
- Frame Offset
-
Lets you start the animation playback at a frame other than the first. Add this value to the start frame (see Geometry to Write) to determine at which frame the animation starts playing back.
- Ping-Pong Replay
-
When on, the animation plays forward, then in reverse, then forward again and so on. When off, it plays forward only.
mr Proxy Creation dialog
This dialog opens when you click Write Object To File and then enter a file name and click Save. They determine whether and how animation is saved to the proxy file, and how to display the preview.

Geometry To Write group
Choose the option that specifies how to save deformation animation, such as that produced by modifiers, in the proxy file. Transform animation, such as rotation of the entire object, is not saved.
- Current Frame Saves no animation; only the state of the object in the current frame.
- Active Time Segment Saves all animation in the active time segment.
- Custom Range Saves animation only in the frame range you specify with the Start and End values.
Preview Generation group
These settings determine how to display the object preview, and are saved with the proxy file.
- Include only Source Object in Preview
-
When on, the preview image contains only the geometry in the proxy object. When off, the preview shows any additional geometry in the scene within the extent of the image zoom (see Automatic Zoom Extents, following). Default=on.
- Automatic Zoom Extents
-
When on, zooms the preview image to the bounding box of the proxy object before rendering the image. Default=on.