Although NURBS surfaces are analytically generated, in order to generate and display them they must be approximated by faces. You use the controls described in this section to set the type of approximation used and its parameters.
The Surface Approximation rollout controls how surface sub-objects in the NURBS model are approximated for purposes of rendering and viewport display. NURBS can be approximated differently in viewports and in the renderer. Typically you want viewport display to be clear and quick, while you want rendered display to be smooth, accurate, and "realistic." However, the approximation you choose for viewports creates a mesh, and the kind of mesh you choose can affect the behavior of modifiers that you later apply to the NURBS model.
The first two controls on this rollout are radio buttons for selecting the kind of display output, viewport or renderer, these parameters control.
Surface approximation parameters are not animatable.
Surface Approximation Per Surface
By default, surface sub-objects use the same approximation settings as the top-level NURBS model. You can override these settings. Each surface sub-object now has a Surface Approximation rollout of its own. The controls on this rollout are disabled unless you turn off the Lock to Top Level toggle. With this toggle turned off, you can choose approximation settings specific to this surface sub-object.
Interface
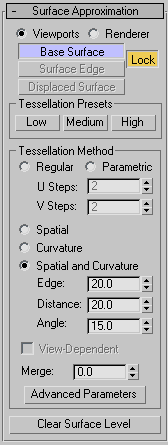
- Viewports When chosen, the rollout affects how surfaces in the NURBS object are displayed interactively in viewports, including shaded viewports, and by the preview renderer.
The Viewports surface settings are also used when you apply a mesh modifier such as Mesh Select to the NURBS object. This is important because the modifier can affect the scene's geometry.
- Renderer When chosen, the rollout affects how surfaces in the NURBS object are displayed by the renderer.
The next cluster of buttons lets you choose which portions of the geometry are affected by the surface approximation settings.
- Base Surface
-
Settings affect the entire surface. This is the default.
- Surface Edge
-
Turn on to set approximation values for tessellating surface edges that are defined by trim curves. With Lock turned off, the surface and edge tessellation values are independent of each other.
For object-level surfaces, this is unavailable unless Lock (described below) is turned off.
- Displaced Surface
-
Turn on to set a third, independent approximation setting for surfaces that have a Displacement map applied to them. Available only when Renderer is chosen.
Using a preset approximation setting (in the Presets group box) should give you faster results for displaced surfaces.
- Lock
-
(for object-level surfaces only) Locks the Base Surface settings to the Surface Edge settings. In other words, surfaces and surface edges have a relational tessellation setting unless Lock is turned off. Default=on.
Tessellation Presets group
Lets you choose a preset low, medium, or high quality surface approximation. While a preset is chosen, the values it uses are displayed on the Tessellation Method rollout.
Preset values are saved in the 3dsmax.ini file. You can customize the preset values by using the Surface Approximation utility.
- Low
-
Selects a (comparatively) low-quality surface approximation. These are the default values:
Viewports, Base Surface:
Method=Spatial and Curvature Edge=50.0 Distance=50.0 Angle=50.0 Merge=0.0 Advanced Parameters
 Minimum=0, Maximum=3
 Renderer, Base Surface:
Method=Spatial and Curvature Edge=20.0 Distance=20.0 Angle=15.0 Merge=0.01 Advanced Parameters
 Minimum=0, Maximum=3
 Renderer, Displaced Surface:
Method=Spatial and Curvature Edge=20.0 Distance=20.0 Angle=10.0 Merge=(Unavailable) Advanced Parameters
 Minimum=0, Maximum=2
 Keyboard shortcut:
 +1
+1 - Medium
-
(The default for both viewports and rendering.) Selects a medium-quality surface approximation. These are the default values:
Viewports, Base Surface:
Method=Spatial and Curvature Edge=20.0 Distance=20.0 Angle=15.0 Merge=0.0 Advanced Parameters
 Minimum=0, Maximum=3
 Renderer, Base Surface:
Method=Spatial and Curvature Edge=10.0 Distance=15.0 Angle=10.0 Merge=0.01 Advanced Parameters
 Minimum=0, Maximum=4
 Renderer, Displaced Surface:
Method=Spatial and Curvature Edge=10.0 Distance=10.0 Angle=4.0 Merge=(Unavailable) Advanced Parameters
 Minimum=0, Maximum=3
 Keyboard shortcut:
 +2
+2 - High
-
Selects a high-quality surface approximation. These are the default values:
Viewports, Base Surface:
Method=Spatial and Curvature Edge=5.0 Distance=15.0 Angle=10.0 Merge=0.0 Advanced Parameters
 Minimum=0, Maximum=3
 Renderer, Base Surface:
Method=Spatial and Curvature Edge=5.0 Distance=5.0 Angle=3.0 Merge=0.01 Advanced Parameters
 Minimum=0, Maximum=4
 Renderer, Displaced Surface:
Method=Spatial and Curvature Edge=5.0 Distance=5.0 Angle=2.0 Merge=(Unavailable) Advanced Parameters
 Minimum=0, Maximum=4
 Keyboard shortcut:
 +3 Note: The keyboard shortcuts for surface approximation presets don't require that the Keyboard Shortcut Override Toggle be on. You can change the surface approximation of NURBS objects by selecting them in a viewport, and then using
 +1,
+1,  +2, or
  +3. This works for sub-objects as well, but the surface sub-object's Lock To Top Level toggle must be turned off.
Tessellation Method group
The controls in this group affect the display of the NURBS surface in viewports if you have chosen Viewports above, or by the renderer if you have chosen Renderer above. You can choose between five algorithms. Each approximates NURBS surfaces by tessellating them in a different way.
Generally speaking, if the preset values you have chosen give good results, you don't need to adjust the controls on this rollout. Adjust them if you encounter problems with the preset alternative.
Tips
- Viewport Tessellation: The tessellation method creates the mesh. If you modify the NURBS object with Mesh Select, choose the method that gives the result you need. If you use modifiers heavily, Spatial or Parametric might be better than Curvature, because of their regular tessellation. Curvature-dependent tessellation can cause problems with some modifiers.
- Renderer Tessellation: Spatial and Curvature usually obtains the most accurate rendering. Curvature can be the more efficient choice when you render animated surfaces.
- Lock to Top Level
-
(for sub-object surfaces only) When on, the surface sub-object uses the same surface approximation settings as the top-level NURBS model, and other controls on this rollout are disabled. When turned off, you can set the sub-object approximation to differ from the top-level model. Default=on.
- Regular
-
Generates a fixed tessellation across the surface based on U Steps by V Steps. Increasing these parameters increases accuracy at a cost of speed, and vice versa, but in general this can be the quickest and least accurate way to approximate a NURBS surface. Very low values for U and V Steps using the Regular method usually doesn't provide good results. Model complexity increases slowly as U and V Steps values increase.
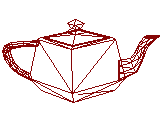
Regular mesh of the NURBS teapot
- Parametric
-
Generates an adaptive tessellation based on U Steps by V Steps. Low values for U and V Steps using the Parametric method often provide good results. Model complexity increases rapidly as U and V Steps values increase, so take care when you switch from Regular, which generally requires higher U and V values, to Parametric, where lower U and V values generally suffice.
For example, if you convert a teapot to NURBS and set the U and V steps to 15, the Regular method generates 4470 faces but the Parametric method generates 204960 faces.
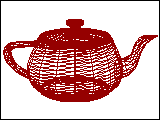
Parametric mesh of the NURBS teapot
- Spatial
-
Generates a uniform tessellation made of triangular faces.
The Edge parameter specifies the maximum length of a triangular face in the tessellation. The value is a percentage of the object's bounding box. Decreasing this value increases accuracy but increases rendering time.
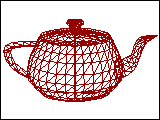
Spatial mesh of the NURBS teapot
- Curvature
-
(The default.) Generates a variable tessellation based on the curvature of the surface. The tessellation has a finer grain where the surface is more curved. Changing surface curvature dynamically changes the curvature tessellation.
The Distance parameter specifies how far the approximation can deviate from the actual NURBS surface. Distance is a percentage of the diagonal of each surface's bounding box. Each surface in an object is tessellated based on its size, independently of other surfaces. Scaling a surface doesn't change its tessellation. Decreasing this value increases accuracy but increases rendering time. When you set Distance to 0.0, 3ds Max ignores this parameter and uses the Angle to control accuracy.
The Angle parameter specifies the maximum angle between faces in the approximation. Decreasing this value increases accuracy but increases rendering time. When you set Angle to 0.0, 3ds Max ignores this parameter and uses Distance to control accuracy.
When both Distance and Angle are 0.0, the surfaces degenerate and can become flat surfaces.
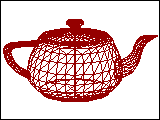
Curvature mesh of the NURBS teapot
- Spatial and Curvature
-
Combines the spatial (edge-length) method and the curvature (distance and angle) methods, using all three values.
The Edge parameter specifies the maximum length of a triangular face in the tessellation. The value is a percentage of the object's bounding box. Decreasing this value increases accuracy but increases rendering time. When you set Edge to 0.0, the effect is equivalent to the Curvature method.
The Distance parameter specifies how far the approximation can deviate from the actual NURBS surface. Distance is a percentage of the diagonal of each surface’s bounding box. Each surface in an object is tessellated based on its size, independently of other surfaces. Scaling a surface doesn’t change its tessellation. Decreasing this value increases accuracy but increases rendering time. When you set Distance to 0.0, 3ds Max ignores this parameter and uses the Edge and Angle values to control accuracy.
The Angle parameter specifies the maximum angle between faces in the approximation. Decreasing this value increases accuracy but increases rendering time. When you set Angle to 0.0, 3ds Max ignores this parameter and uses the Edge and Distance values to control accuracy.
When Distance, Angle, and Edge are all 0.0, the surfaces degenerate and can become flat surfaces.
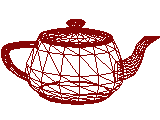
Spatial and Curvature mesh of the NURBS teapot
- View-Dependent
-
(for the Renderer only) When on, takes the object's distance from the camera into account while calculating tessellation. This can improve rendering time by not generating fine-grained tessellations for objects in the distance of the rendered scene. The view-dependent effect works only when you render camera or perspective views. It doesn't work in orthographic views. This control is disabled while Viewports is active.
For the Spatial, Curvature, and Spatial and Curvature methods, the Distance and Edge values specify pixels instead of 3ds Max units when View-Dependent is on.
Note: When View-Dependent is on, tessellation quickly reaches the maximum subdivision limit. You might want to increase this value to 7 (the greatest value allowed). See the description of Advanced Parameters, below. - Merge (sub-object surfaces only)
-
Controls the tessellation of surface sub-objects whose edges are joined or very nearly joined. When input to a modifier (such as Mesh Select) requires a mesh, and when NURBS surfaces are tessellated for production rendering, by default 3ds Max adjusts the tessellation of adjoining surfaces to match each other, in terms of the number of faces along the edges. The Merge parameter controls how this is done. If Merge is zero, adjoining faces are unchanged. Increasing the value of Merge increases the distance 3ds Max uses to calculate how edges should match, guaranteeing no gaps between the surfaces when they are rendered. Default=0.0.
In most cases, you don't need to adjust Merge. If rendering shows gaps between nearly adjoining faces, increase Merge to eliminate them.
Technically, the Merge value is 0.1 percent of the diagonal of the object's bounding box. In other words, a Merge value of 1.0 (higher than necessary for most purposes) is 0.1 percent of the length of the diagonal. Because Merge is based on the object's dimensions, you can scale the NURBS model without affecting the Merge setting.
- Advanced Parameters
-
Click to display the Advanced Surface Approximation dialog. The parameters in this dialog apply to the Spatial, Curvature, and Spatial and Curvature approximation methods.
- Clear Surface Level
-
(Appears only for top-level surfaces.) Clears all surface approximation settings assigned to individual surface sub-objects. When you click this button, all surface-specific approximations are lost, and Lock to Top Level is on for surface sub-objects.