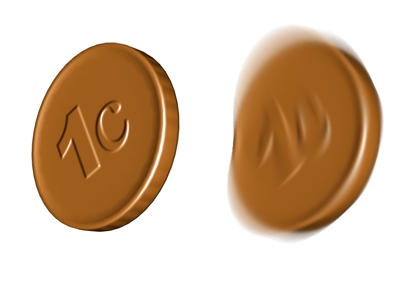
Motion blur can enhance the realism of a rendered animation by simulating the way a real-world camera works. A camera has a shutter speed, and if significant movement occurs during the time the shutter is open, the image on film is blurred.

Image motion blur has been applied to the falling coin on the right.
3ds Max provides a couple of ways to generate motion blur. Image motion blur is one. Scene motion blur, a Video Post Scene Event effect, is another. For most purposes, image motion blur gives better results than scene motion blur. Scene motion blur is a more exaggerated effect. You can use both image and scene motion blur in the same rendering.
Image Motion Blur is available for the scanline, mental ray, and iray renderers. Image Motion Blur controls are on the Render Setup dialog  Renderer panel. For the mental ray and iray renderers, go to the Renderer panel and enable Motion Blur. For the Default Scanline Renderer, first use the Object Properties dialog to enable Image Motion Blur for the objects you want to blur, then go to the Renderer panel and enable Image Motion Blur.
You can also apply image motion blur as a render effect.
(Another option, object motion blur, is not meant to simulate a camera, but to improve the rendered appearance of fast-moving objects.)
Tips and Limitations: Image Motion Blur with the Scanline Renderer
Image motion blur smudges the object by creating a smearing effect, instead of superimposing multiple images the way object motion blur does. It considers camera movement. Image motion blur is applied after scanline rendering is complete.
- Because image motion blur is applied after rendering, it can't account for object overlap. When blurred objects overlap, blurring doesn't work correctly and there are gaps in the rendering. To fix this problem, render each blurred object separately, to a different layer, and then composite the two layers using the Alpha Compositor in Video Post or another compositing tool.
The overlap problem also applies to objects behind an object rendered with raytrace refraction.
- Image motion blur doesn't work with objects that change topology. This includes NURBS objects that are animated so their tessellation (surface approximation) changes. Regular tessellation doesn't change in this way. This also includes Displacement mapping and Optimization.
- Image motion blur can yield strange results with objects that have a MeshSmooth modifier applied to them. If you see this happening, turn of the MeshSmooth modifier's Keep Faces Convex toggle (in the Settings rollout). This will fix the problem.
- Image motion blur is not applied to reflections of objects. It is applied only to actual geometry.