A Muscle Strand is a non-rendering helper object used for skinning characters that acts like a Bezier curve between two points. Strands provide more precision than CATMUscles, and give better results when the skin must be twisted.
While CATMuscles are best for skinning shoulders and pectorals, muscle strands work better for skinning arms and legs.
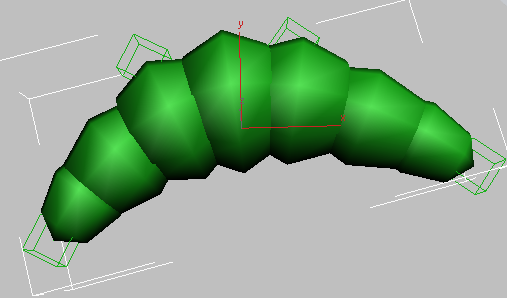
The following illustration shows a muscle strand intended for use a bicep.

Freshly created muscle strand, suitable for shaping into a bicep
While the Create panel is open, you have some ability to shape the Muscle Strand with your mouse. But the Modify panel is where you set most of its properties.
Once you are satisfied with your bicep:
- Attach (parent) one end to the top of the upper arm (that is, to the CATBone).
- Attach the other end a bit below the top of the forearm.
- Use the muscle strand rather than the CATBones to drive the skinning.
Once you are satisfied with the behavior of one arm, you can easily create a copy of the arm (including all the CATBones, the muscle strands, the skin, and so forth) that is a mirror of the original.
Procedures
To create a Muscle Strand:
- On the
 Create panel, click
  (Helpers) and then, from the drop-down list, choose CAT Objects. On the Object Type rollout, click Muscle Strand.
 - Click in the viewport to set one endpoint, and then move the mouse.
You’re now setting the angle of the first endpoint handle. You can adjust this later as well.
- Click to set the handle angle.
- Move the mouse again.
You’re now setting the overall length of the Muscle Strand, as well as the size of the handles. You can adjust this later as well.
- Click to create the second endpoint, thus setting the length.
- Move the mouse again to set the second endpoint handle angle, and then click to finish the Muscle Strand.
Thereafter you can adjust the muscle length by moving the endpoint helpers, and the curvature of the muscle spline by moving the handles.
Creating a Muscle Strand requires four clicks (after the initial button click to start the object):
To use Muscle Strand:
- Create or load a character rig to attach muscles to, and determine where you’ll attach the muscles.
- Add a Muscle Strand object and position it on the rig. Note: The Muscle Strand object does not render, so even if it shows through the skin in the viewport, it won’t affect the final output.
- Set the muscle strand parameters as desired. In particular, set Type to Bones if you’ll be using it with the Skin modifer, or set it to Mesh when intended for use with Skin Wrap.
- On the main toolbar, click
 (Select And Link), and then drag from an endpoint helper on the muscle strand to the bone to which it should be attached.
 - Repeat the preceding step for the other endpoint helper. Optionally, also link the endpoint handles to objects whose motion should affect the muscle curvature.
- For any additional muscle strands, repeat steps 2–5.
- Skin the character and be sure to include the muscles as bones (with Skin) or control objects (with Skin Wrap).
Interface

Type group
Choose Mesh or Bones. Both types have in common the ability to move the handles to reshape the muscle strand, with each handle having its own name while remaining a part of the strand. The differences are as follows:
- Mesh The muscle strand acts as a single piece. This mode is best when used in conjunction with the Skin Wrap modifier (see Usage).
- Bones Each sphere acts as a separate bone and has its own name. As a result, you can attach a subset of the spheres to the Skin modifer when you don’t need all of them. Note: You can select individual spheres of a bones-type Muscle Strand object, but moving any sphere moves the entire muscle.
Muscle Properties group
This also applies to a Muscle Strand object with Type set to Bones, when you rename the first sphere (default name: MuscleStrand01). However, renaming the first sphere does not affect the names of the other spheres, nor does renaming any other sphere in the muscle strand affect the object’s other components.
-
 Copy Strand Settings
 - Copies the settings for the selected muscle strand to a memory buffer, ready for pasting to another strand.
-
 Paste Strand Settings
 - Pastes settings copied from another muscle strand to the selected strand.
- L/M/R
- Left/Middle/Right: The side of the rig the muscle strand is on. For example, you can set up a strand on the left side, choosing the L option, and then mirror the strand across the center axis and specifying the R option.
- Mirror: X/Y/Z
- The axis along which the muscle strand lies. This helps the mirroring system work.
Handles group
The Muscle Strand object has a box-shaped helper at endpoint, and each of those helpers has a handle that act like a handle of a Bezier-curve knot. You can alter the muscle shape by moving these handles, and you can also link any handle as the child of another object, such as a bone in a character rig. Thereafter, moving the parent object (the bone) also moves the handle, causing the muscle to deform accordingly.
- Visible
- Toggles display of the muscle handles.
Normally, handles are depicted in the viewports as wireframe cubes surrounding the muscle; to disable the display of the handles, turn off Visible.
This can be useful for simplifying the viewport display after connecting the muscles to their bones, and selecting the handles is no longer necessary.
- Handle Size
- The size of each handle; changing this affects all handles. Normally, the handles are sized proportionally to the overall muscle size when you create it; use this setting to make the handles larger or smaller.
Sphere Properties group
- Num Spheres
- The number of spheres that make up the Muscle Strand. The higher this value, the greater the resolution of the muscle.
- Show Profile Curve
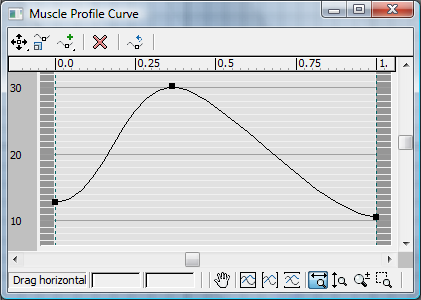
- Opens the Muscle Profile Curve dialog containing a graph that you can edit to control the profile, or outline, of the Muscle Strand. By default, the muscle is thick in the middle and thin at the ends, but you can change this by moving the three points on the curve (it’s not possible to add points to the curve).

To finish editing the curve, close the dialog or click Show Profile Curve again.
Squash/Stretch group
- Enable
-
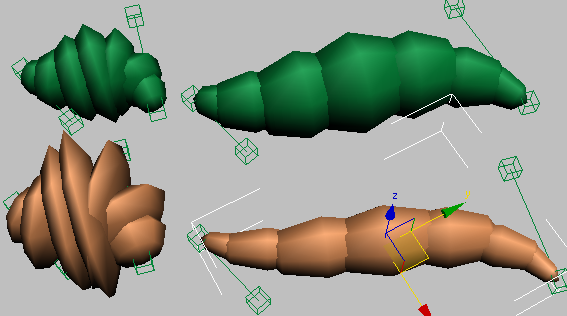
When on, changing the muscle length affects the profile: Shortening the muscle makes it thicker (squash) while lengthening it makes it thinner (stretch). When off, the profile is not affected by the length.

Top: With Squash/Stretch off, Muscle Strand profile stays the same whether the muscle is shorter (left) or longer (right).
Bottom: With Squash/Stretch enabled, Muscle Strand becomes thicker when short (left) and thinner when long (right).
- Current Scale
- This read-only field shows the scaling amount of the muscle based on the relaxed state (see following) and the length as adjusted by moving the endpoints.
When Current Scale is 1.0, the muscle is in its relaxed state. When Current Scale is greater than 1.0, the muscle is squashed, and when less than 1.0, the muscle is stretched.
- Multiplier
- Increases or decreases the amount of squash and stretch. Increase this value for an exaggerated effect.
- Relaxed Length
- The length of the muscle when relaxed; that is, when Current Scale = 1.0.
- Current
- This read-only field shows the current length of the muscle.
- Set Relaxed State
- Click to set the relaxed state. This sets Relaxed Length to the current length, and Current Scale to 1.0.
Thereafter, making the muscle shorter than the Relaxed Length causes squashing, and making it longer causes stretching.
[sphere settings group]
The remaining controls on the Muscle Strand rollout let you set the length of each sphere in the muscle by adjusting its extent. Set Current Sphere to the sphere to adjust and then change the U Start and U End values.
- Current Sphere
- The sphere to adjust. This can be any value from 1 to [Num Spheres].
- Radius
- This read-only field shows the radius of the current sphere.
- U Start / U End
- The extents of the current sphere, measured in relation to the full length of the sphere, which in this context extends from 0.0 to 1.0. Essentially, you’re setting the percents along the muscle length at which the sphere starts and ends.
To make the sphere shorter, increase U Start or decrease U End, and to make the sphere longer, decrease U Start or increase U End.
For example, to make a sphere start 25 percent along the muscle length and end at 28 percent, set U Start to 0.25 and set U End to 0.28.