The mr Physical Sky shader is intended primarily for use in the mental ray Sun & Sky combination. This topic mainly provides information on parameters unique to this component. A number of mr Physical Sky parameters are common to all three Sun & Sky components. For some of those parameters, this topic provides a brief explanation plus a link to the main topic with additional details.
Procedures
The main difference between the mr Physical Sky Parameters rollout described here and the mr Sky on the command panel is that this rollout lets you apply maps or shaders to the various parameters. However, this version of the rollout isn't quite as accessible; you must use the Material Editor to get at the controls.
To access the mr Physical Sky rollout:
- Add an mr Sky component to the Daylight system (and confirm the addition of the mr Physical Sky environment map), or apply an mr Physical Sky shader as an environment map or in the Camera Shaders group of the Camera Effects rollout.
- Open the

 Material Editor.
 If you are using the
 Compact Material Editor, click an unused sample slot to make it active, then click
  (Get Material) to open the Material/Map Browser. Locate the Scene Materials group, find the "mr Physical Sky map," and double-click it to open the map in the sample slot.
 If you are using the
 Slate Material Editor, locate the Scene Materials group in the Material/Map Browser panel at the left, drag the "mr Physical Sky" entry into the active View at the center of the window (or just double-click the map entry). When prompted, make sure to choose Instance, then double-click the "mr Physical Sky" node to display the map parameters in the Parameter Editor panel at the right.
 Now you can use the rollout to edit the "mr Physical Sky" parameters and apply maps and shaders.
Map Buttons
You can apply a map to several of the parameters on the "mr Physical Sky Parameters" rollout: to the Background, Haze, Ground Color, Night Color, Red/Blue Tint, and Saturation.
To assign a map, click the map button and use the Material/Map Browser to choose a map.
You can also drag and drop a map from a Material Editor sample slot. If the Slate Material Editor is open, you can drag from a map node's output socket, then drop onto this button. You can also drag and drop from a map button in the Material Editor or anywhere else in the 3ds Max interface. When you drop a map onto the map button, a dialog asks if you want the map to be a copy (independent) or an instance of the source map.
Interface
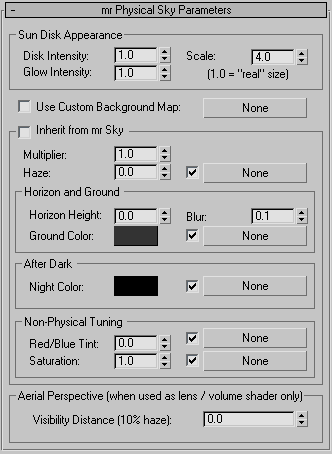
Sun Disk Appearance group
Use these settings to adjust the visible appearance of the sun in the sky.
- Disk Intensity
- The brightness of the sun.
- Glow Intensity
- The brightness of the glow surrounding the sun.
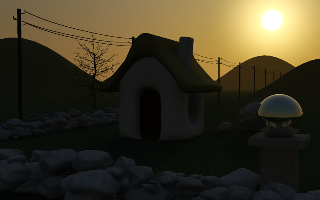
Glow Intensity=5
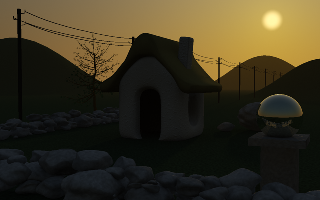
Glow Intensity=0.1
- Scale
- The size of the sun disk.
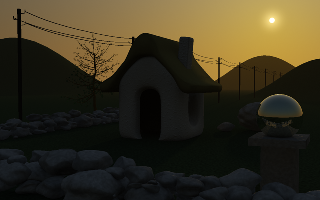
Scale=1
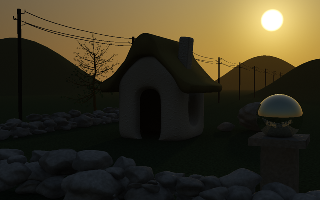
Scale=4
- Use Custom Background Map
- When on but no background map is specified, the background of the rendering is transparent black, suitable for external compositing. If you supply a background shader by clicking the button and then specifying a map or shader, the background of the rendering will come from that shader (for example, a texture map that uses a background photograph). In either case the mr Physical Sky will still be visible in reflections and refraction.
To apply a map or shader to this parameter, click the map button (labeled "None" by default). See Map Buttons.
Note: The background area in the rendered image's alpha channel is always fully transparent, as is the case in general in 3ds Max. - Inherit from mr Sky
-
Uses the equivalent settings from the mr Sky Parameters rollout for the remaining mr Physical Sky Parameters rollout settings, except for Aerial Perspective. Default=on.
For further information, see Common Parameters.
- Haze
-
The amount of particulate matter in the air. Possible values range from 0.0 (a completely clear day) to 15.0 (extremely overcast, or a sandstorm in the Sahara). Default=0.0.
For details, see Haze.
To apply a map or shader to this parameter, click the map button (labeled "None" by default). See Map Buttons.
Horizon and Ground group
- Horizon Height
- The vertical position of the horizon. Default=0.0.
For details, see Horizon Height.
- Blur
- The “blurriness” with which the horizon is rendered. Default=0.1.
At 0.0 the horizon is completely sharp. Generally only values lower than 0.5 are useful, but the full range is up to 10.0 for a horizon that consists of blur only, with no actual horizon at all.
- Ground Color
- The color of the virtual ground plane. Note that this is a diffuse reflectance value (that is, albedo). The ground appears as a Lambertian reflector with this diffuse color, lit by the sun and sky only, and does not receive any shadows.
To apply a map or shader to this parameter, click the map button (labeled "None" by default). See Map Buttons.
Tip: Some sky models neglect the influence of bounce light from the ground, assuming only the sky is illuminating the scene. To compare the output of mr Sky with, for example, the IES Sky model, one must therefore set Ground Color to black.
After Dark group
- Night Color
- The minimum color of the sky: The sky will never become darker than this value. It can be useful for adding things like moon, stars, high-altitude cirrus clouds that remain lit long after sunset, etc. As the sun sets and the sky darkens, the contribution from Night Color is unaffected and remains as the base light level.
To apply a map or shader to this parameter, click the map button (labeled "None" by default). See Map Buttons.
Non-Physical Tuning group
- Red/Blue Tint
- Provides artistic control over the redness of the sky light. The default value of 0.0 is the physically correct value (calculated for a 6500K whitepoint), but can be changed with this parameter, which ranges from –1.0 (extremely blue) to 1.0 (extremely red).
To apply a map or shader to this parameter, click the map button (labeled "None" by default). See Map Buttons.
- Saturation
- Provides artistic control over saturation of the sky light. The default value of 1.0 is the physically calculated saturation level. Possible values range from 0.0 (black and white) to 2.0 (extremely high saturation).
To apply a map or shader to this parameter, click the map button (labeled "None" by default). See Map Buttons.
Aerial Perspective group
- Visibility Distance
- Aerial Perspective is a term used by painters to convey how distant objects are perceived as hazier and tinted towards the blue end of the spectrum. mr Sky emulates this with the Visibilty Distance parameter. When nonzero, it defines the “10% distance”, that is, the distance at which approximately 10% of haze is visible at a Haze level of 0.0.