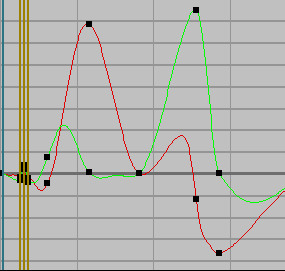
The Analyze panel provides tools to evaluate the curves for the selected biped parts, and review them for certain error conditions. It can spot spikes and noise in the curves, and locate specific keyframes that are responsible for discontinuous motion.
The errors are displayed as brown lines over the curves, and are also listed at the bottom of the Analyze panel. You can then use the Fix panel to automatically fix errors, or you can fix errors by manually adjusting keys and curves in Curve view.

Brown lines on the curve show the errors.
Procedures
To analyze a curve:
- On the Select panel, choose the biped object whose curve you want to correct.
You can select the object from the Select list, in a viewport, or from the Controllers hierarchy.
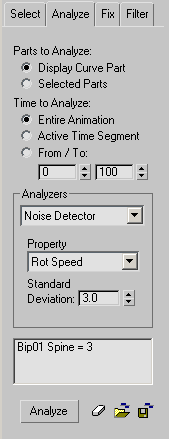
- Click the Analyze tab, then on the Analyze panel, choose the analyzer you want to use from the drop-down list.
By default, there are two choices: Noise Detector and Spike Detector.
- If you chose Noise Detector, choose the appropriate Property from the Property drop-down list.
- Click Analyze.
Any errors found are displayed in the error result list at the bottom of the panel. The errors also appear in Curve View as brown lines.
- If no errors are found, try lowering the standard deviation value or make sure you have used the appropriate property when using the noise detector. For example, if you have a problem with the rotation of a leg, but you choose a Pos property, that error will not be detected.
Interface

- Parts to Analyze
- These options choose which parts to analyze:
- Display Curve Part When this is turned on, the curve displayed is analyzed.
- Selected Parts When this is turned on, the parts selected in the list or viewport are analyzed. Use this when you want to analyze an entire biped without displaying all of the curves in Curve View.
- Time to Analyze
- Sets the range to be analyzed. You can choose either:
- Entire Animation Analyzes the entire animation. Note: This is independent of the active 3ds Max time segment.
- Active Time Segment Choose this to use the active time segment, as set by the 3ds Max Time Configuration dialog.
- From / To These values let you specify a range with a particular start and end frame.
- Entire Animation Analyzes the entire animation.
Analyzers group
- [analyzers drop-down list]
- Lets you choose which analyzer will be used to evaluate the curves. Each analyzer can present its own individual settings. The default choices are Noise Detector and Spike Detector.
- Noise Detector Finds any large change in the animation, either rotational or positional as determined by the standard deviation value. Can operate on specific curves as determined by the selection in the Property drop-down list, regardless of what’s currently visible in the Workbench. Note: It's important to understand that noise isn't always bad. For example, in an animation of a person waving his hand, then suddenly punching: the movement from the wave to the punch, plus the pullback from the punch might be analyzed as noise, but it is noise that you want. The Workbench will identify the magnitude of these changes by showing you the acceleration and the jerk curves. By being selective with the fixers, you can smooth out only what you want to improve, and maintain the rest.
- Spike Detector Finds any large change in the animation that also contains a change in direction (in quaternion space or position space). Can operate on all curves in the animation, regardless of what’s currently visible in the Workbench. The analysis can be adjusted for Standard Deviation, which is the degree to which the animation departs from its overall pattern.
- Knee Wobble Finds knees that wobble or shake when a foot is planted. Uses Frame and Fluctuation parameters to determine what is a wobble error.
- Knee Extension Finds knees that overextend when a foot is planted. Uses a Knee Angle parameter to determine extension errors.
- Noise Detector Finds any large change in the animation, either rotational or positional as determined by the standard deviation value. Can operate on specific curves as determined by the selection in the Property drop-down list, regardless of what’s currently visible in the Workbench.
- Property drop-down list
- Lets you choose the criterion that the Noise detector uses to evaluate the curves errors. Use Rotational (Rot) properties to analyze rotational errors; use Position (Pos) properties to analyze move transform errors. Note: This control is not available when using the Spike detector.
Options in this drop-down list include:
- Rot Speed Looks for noise in the speed of the rotational angle.
- Rot Accel Looks for noise in the acceleration of the rotational angle.
- Rot Jerk Looks for noise in the jerk of the rotational angle.
- Pos Speed Looks for noise in the speed of the position.
- Pos Accel Looks for noise in the acceleration of the position.
- Pos Jerk Looks for noise in the jerk of the position.
- Standard Deviation
- Lets you set the degree to which the animation can depart from its overall pattern. For example, in data that is somewhat noisy by design, the Noise detector can look for instances that are noisier. Lower deviation numbers mean higher sensitivity, and thus more errors found.
- [error results list]
- Displays all errors that the analyzer finds. Each entry lists the name of the body part, and the number of errors found.
Errors are also graphically highlighted with a vertical brown line in Curve View. Clicking an error entry in the list highlights that error in Curve View.
- Analyze
- Click to perform the analysis.
 Clear Results
- Deletes the results of the latest analysis.
 Load Analysis File
- Loads the results of a previous analysis.
 Save Analysis
- Saves the results of the latest analysis.