The Loops panel features are for working with edge loops, and include tools for creating loops within polygons and at a distance, automatically adjusting a new loop to an object’s shape, random paths, and more.
All of the Loops panel tools are available at the Edge level; other sub-object levels provide a subset or none. At the Polygon level, only Insert Loop and Remove Loop are available. The Vertex level provides Connect, Distance connect, Insert/Remove Loop, and Build End/Corner.
Interface

Loops panel at the Edge level on minimized ribbon

Loops panel on maximized ribbon, with expansion

Loops panel floating, with expansion
-
 Connect (Vertex level)
 - Creates new edges between pairs of selected vertices.

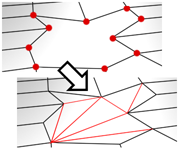
Connect does not let the new edges cross. Thus, for example, if you select all four vertices of a four-sided polygon and then click Connect, only two of the vertices will be connected. In this case, to connect all four vertices with new edges, use Cut.
-
 Connect (Edge/Border level)
 - Creates new edges between pairs of selected edges using the current Connect Edges settings. Connect is particularly useful for creating or refining edge loops. Note: You can connect only edges on the same polygon. Also, Connect will not let the new edges cross. For example, if you select all four edges of a four-sided polygon and then click Connect, only neighboring edges are connected, resulting in a diamond pattern.

Connecting two or more edges using the Settings dialog creates equally spaced edges. The number of edges is set in the dialog. When you click the Connect button, the current dialog settings are applied to the selection.
- Connect Settings (on Connect drop-down)
- Opens the Connect Edges caddy, which lets you preview the Connect results, specify the number of edge segments created by the operation, and set spacing and placement for the new edges. Tip: You can open the Connect Edges caddy quickly by
 +clicking the Connect button.
 -
 Distance Connect
 -
Creates edge loops between vertices and edges across distance and other topology.
Usage depends on the sub-object level:
- Vertex Select two end vertices and apply to connect them across the intervening mesh.
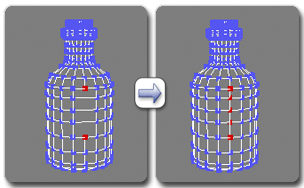
Left: Initial selection
Right: After applying Distance Connect
- Edge Select two parallel edges and apply to connect them across the intervening mesh.
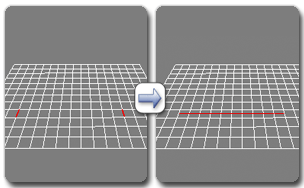
Left: Initial selection
Right: After applying Distance Connect
Note: At the Edge level, if a complete (closed) loop is possible (for instance, around a sphere), Distance Connect automatically creates one.
- Vertex Select two end vertices and apply to connect them across the intervening mesh.
-
 Flow Connect
 -
Connects selected edges across one or more edge rings and adjusts the new loop position to fit the shape of the surrounding mesh.
Select an edge ring and apply Flow Connect. For each selected edge, Flow Connect creates a loop through the ring and adjusts the new edges to follow the physical outline of the mesh.

Left top: Selected edge ring
Left bottom: Selected edge with Auto Ring on
Right: After applying Flow Connect, showing the corrected shape after creating the loop
Tip: To automatically select the ring before connecting, based on the edge selection, turn on Auto Ring first (see following). - Auto Ring (on Flow Connect drop-down)
-
When on and you use Flow Connect, creates a full edge loop automatically.
Usage: Turn on Auto Loop, select one or more edges, and apply Flow Connect. For each selected edge, Flow Connect creates a loop through its entire ring and adjusts the new edges to follow the physical outline of the mesh.
-
 Insert Loop
 -
Creates one or more edge loops based on the current sub-object selection and selects the results.
Usage depends on the sub-object level:
- Vertex Select one or more pairs of adjacent vertices and apply to insert edge loops between each pair of adjacent vertices.
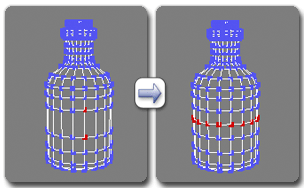
Using Insert Loop at the Vertex level
- Edge Two options are available:
- Normal Select one or more edges and apply to insert edge loops going through the edge ring that each selected edge is on.
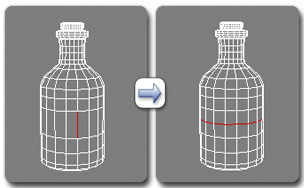
Using Insert Loop at the Edge level
 Opens the Connect Edges dialog so you can set the number of inserted edges and control Pinch and Slide settings interactively.
- Normal Select one or more edges and apply to insert edge loops going through the edge ring that each selected edge is on.
- Polygon Select one or more pairs of adjacent polygons and apply to insert edge loops going through the centers of each pair (parallel to the selection).
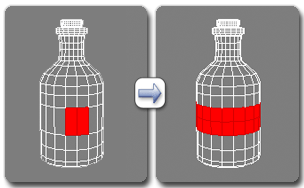
Using Insert Loop at the Polygon level
- Vertex Select one or more pairs of adjacent vertices and apply to insert edge loops between each pair of adjacent vertices.
-
 Remove Loop
 -
Removes loops at the current subobject level, and automatically deletes all leftover vertices.
Usage depends on the sub-object level:
- Vertex Select one or more pairs of adjacent vertices (to indicate the loop direction) and then click Remove Loop.
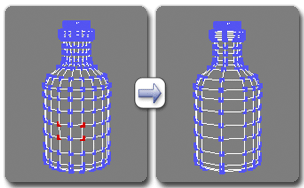
Using Remove Loop at the Vertex level
- Edge Select one or more edges, and then click Remove Loop. This removes all loops on which the edges reside.
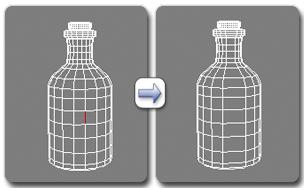
Using Remove Loop at the Edge level
- Polygon Select one or more pairs of adjacent polygons (to indicate the loop direction) and then click Remove Loop. Alternatively, removing a single polygon removes all edge loops on which the polygon resides.
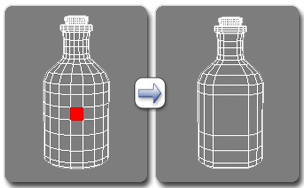
Using Remove Loop at the Polygon level
Note: Removing a polygon loop is equivalent to removing the boundary edge loops.
- Vertex Select one or more pairs of adjacent vertices (to indicate the loop direction) and then click Remove Loop.
-
 Set Flow
 -
Adjusts selected edges to fit the shape of the surrounding mesh.
Usage: Select one or more edges and apply. To automatically adjust each edge’s entire loop, first turn on Auto Loop.
Use the spinner to set the flow interactively.
Note: When the Select And Manipulate tool is active at the Edge sub-object level, the caddy appears in the viewport with a control for Set Flow: . For instructions for using the caddy, see The Caddy Interface.
 - Auto Loop (on Set Flow drop-down)
-
When on, using Set Flow automatically selects loops for the selected edge(s).
Usage: Select one or more edges, turn on Auto Loop, and then apply Set Flow. Each selected edge’s loop is automatically selected, and then Set Flow is applied to each loop.
- Add Set Flow Action to Caddy Manipulator (on Set Flow drop-down)
-
Toggles the availability of the Set Flow control on the the caddy Interface when Select And Manipulate is active.
-
 Build End
 -
Builds a quad ending to two parallel loops based on the vertex or edge selection.
Select two vertices at the ends of parallel loops ending at the same polygon or the edge connecting them and apply to build a quad ending to two parallel loops.
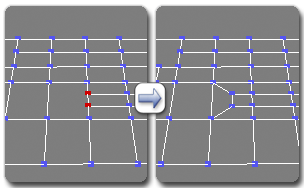
Using Build End at the Vertex level
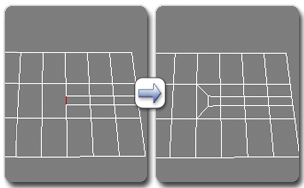
Using Build End at the Edge level
Note: Build End works only when exactly two parallel loops end at the same side of the same internal edge. -
 Build Corner
 -
Builds a quad corner based on the vertex or edge selection to make an edge-loop turn.
Usage depends on the sub-object level:
- Vertex Select vertices that terminate two loops that travel at right angles and end at adjacent sides of the same quad polygon and apply.
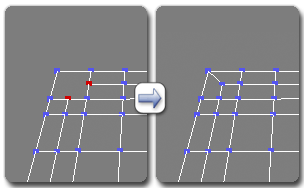
Using Build Corner at the Vertex level
- Edge Select edges that connect two adjacent sides of a quad polygon and apply. Typically, these are edges where edge loops turn 90-degree corners.
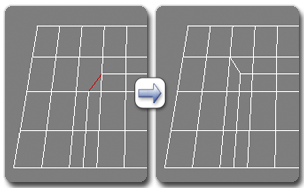
Using Build Corner at the Edge level
- Vertex Select vertices that terminate two loops that travel at right angles and end at adjacent sides of the same quad polygon and apply.
-
 Loop Tools
 -
Opens the Loop Tools dialog, with features for adjusting loops.
-
 Random Connect
 -
Connects selected edges, randomizing the positions of the created edges.
Select two or more contiguous edges to connect and then click Random Connect. This connects the edges, randomizing the positions of the created edges. The Random Jitter numeric setting (spinner) determines the extent of the randomization.
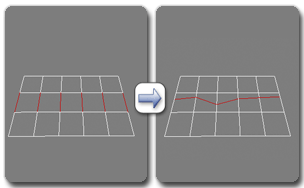
Using Random Connect at the Edge level
To make a full loop, first turn on Auto Loop (see following) or hold down
 as you click Random Connect. For this, only one selected edge is required.
 - Auto Loop (on Random Connect drop-down)
-
When on, applying Random Connect makes as full a loop as possible.
Turn on Auto Loop and then apply Random Connect to one or more selected edges. The random-connection function is applied to all edges on the selected edges’ rings.
- Set Flow Speed
-
The rate at which adjusting the Set Flow spinner changes the flow of the selected edges.