Automatic nesting is a major feature of the CAM-Duct software. This allows the user nest the parts in a job quickly and efficiently. The following topic illustrates some of the features and settings within Automatic Nesting.
- Once a job has been created and is ready to nest,
click Utilities
or select the Automatic Nesting icon from the Utility Bar. Automatic Nesting
 - The Automatic Nesting dialogue box will appear. This has several tabs available for configuration, which are explained below.
General Nesting The General Nesting tab offers the user several options.
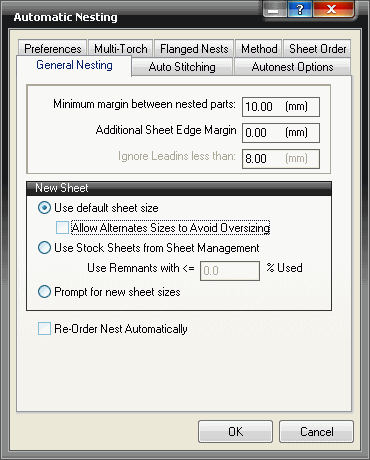
Minimum margin between nested parts This value entered here will set the minimum distance between developments as they are nested.
Additional Sheet Edge Margin This value gives an additional margin around the edge of the sheet i.e. if the bed had clamps for holding the sheet you may require a larger margin around the edge. This allowance is additional to the minimum margin. If you have a minimum margin of 10mm and an additional sheet edge margin of 5mm, the plate will have a 15mm border around the outside and parts will be placed 10mm apart at the closest point.
Ignore Lead-ins less then This option is ignored by automatic nesting and is applied only in manual nesting. It allows you to nest the lead-in of a part onto another part. The default value for this option would be the same as your minimum margin
New Sheet The New Sheet section of the General Nesting tab allows the user to choose the method in which sheets will be allocated during automatic nesting.
Use Default Sheet This option automatically adds another default size sheet from the material database.
Allow Alternate Size to Avoid Oversizing If this option is enabled, the software automatically selects the most appropriate sheet size available within the current material/gauge, in order to avoid oversizing parts whilst auto-nesting.
Use Stock Sheets from Sheet Management This option selects the required sheet from the available sheets from the sheet management module. Which sheet is selected is controlled by the Use Remnants with <= % setting. If the sheet has used less than or equal to the designated percentage used, it will be selected (depending on material and gauge). If the sheet management module is used for stock control, set the Use Remnants with <= % to 100%.
Prompt for new sizes This option allows the user to select a new sheet every time that one is required.
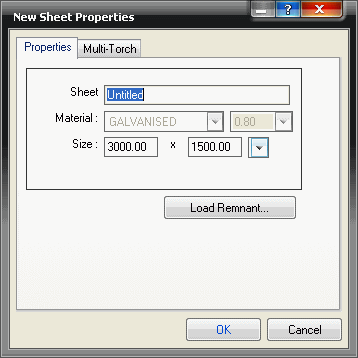
- If this option is selected, before nesting commences the following dialogue box will appear. This allows the user to select the sheet size for the nested sheets from a drop-down menu, or manually type in a specific sheet size.
- Click Ok and the sheet will be filled.
- If there are too many parts for one sheet, the same dialogue box will appear allowing the user to select another sheet. This procedure will continue until all of the parts have been nested.
- Load Remnant allows the user to select a saved remnant to nest the parts on, only in conjunction with sheet management.
Re-Order Nest Automatically Having this option ticked allows the dynamic alteration of NC code for different machines with different settings. For example you may be writing NC for two machines, which are setup differently, with this setting enabled when the NC is written the program reviews the nests and amends as required in order for the generated code to be suitable for cutting on the "other" machine.
Autonest Options The options in this tab determine the methods used by the software to actually nest the parts.

Preferences The Preferences tab allows users with more than one cutting machine to determine the preferred machine to nest to. This is necessary because the software can only nest a job in one way. A good example of this would be if a user had two cutting machines, one for Galvanised material the other for cutting Stainless Steel. When the user has entered the job, they would then decide which was the more appropriate machine to nest to. Depending on how the machine has been set up within installed machine, the nest can be affected in several ways.
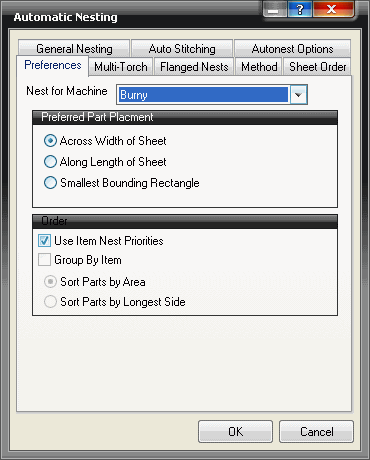
Nest for Machine This option allows the user to select, from the drop-down menu, the machine that will be preferred for nesting. If None is selected the default machine will be used.
Across Width of Sheet This option will attempt to fill the width of the sheet before the length. This is generally the preferred method as parts can be lifted off the machine quicker as there is less area to fill before the torch moves down the table.
Across Length of Sheet This option will fill the length before the width, essentially the opposite of the above option.
Smallest Bounding Rectangle This option will attempt to use the smallest possible area, irrespective of its position on the sheet.
User Item Nest Priorities This allows the use of the item priorities set in the "Organise" menu within the job contents screen. For more information on "Organising" Click here.
Multi-Torch The Multi-Torch option allows the user to set the amount of heads available on their cutting machine. This allows for fast cutting of identical parts. This is mostly used on thicker material and machines with an OXY-Fuel torch.

Method The Method tab will determine which nesting methods are applied. The options govern the general form of the nest.
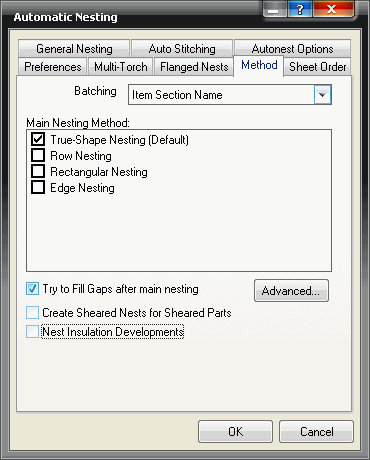
Batching The Batching allows the user to nest sections together or not. From the drop-down menu, select either None, Item Section Name or Item Page Number.
True - Shape Nesting (Default) Quick nesting is the most commonly used. It uses strips to nest the parts and this method is very accurate. It is the only type of nesting to utilise the settings on the Preferences tab and therefore is a necessity if part clearance is a factor. Quick nesting can be used to nest on remnant sheets.
Row Nesting Row nesting is a good method for one-off symmetrical items. It is not as effective at nesting asymmetrical items. Row nesting cannot be used to nest on remnant sheets.
Rectangular Nesting Rectangular nesting creates a minimum bounding rectangle around each part and no other part can encroach into this area. Therefore it is only a good method of nesting with rectangular shaped developments such as a multiple segment, segment bend sheet. The main advantage of this method is that it allows for zero margins between nested parts. This can be used to apply negative kerf values if required. This method cannot be used to nest on remnant sheets and the Try to Fill Gaps after main nesting switch will not apply.
Edge Nesting Edge nesting will start from all four corners of the sheet and simultaneously work towards the centre. This can be used if considerations such as preserving the maximum remnant sheet are important. However it cannot be used to actually nest on remnant sheets itself. The Try to Fill Gaps after main nesting switch does not apply to this method.
Try to fill gaps after main nesting This switch will run further algorithms after the primary one in order to increase nesting efficiency. It will only apply to certain nesting methods as outlined above.
Create Sheared Nests for Sheared Parts If parts are flagged as sheared, this switch will activate the sheared nesting function.
Nest Insulation Developments This option will nest insulation developments for machine cutting.
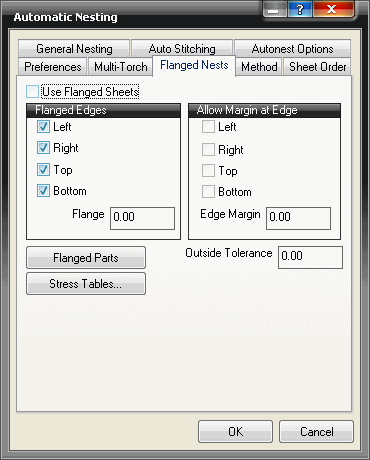
Flanged Nests The Flanged Nest option has been specifically created for certain users. If more information is required contact Autodesk.
Auto Stitching This option allows uses to automatically stitch nested parts to the criteria set.
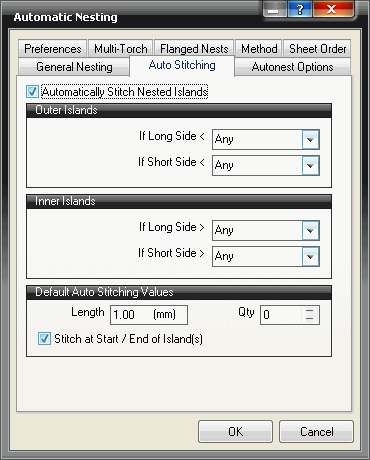
Automatically Stitch Nested Islands If this option is enabled the user is allowed to configured the following settings. If it is left un-ticked the following options will be unavailable.
Outer Islands - If Long Side < This option allows the user to enter a value. If the long side of the part is less than the value entered, the part will be stitched. Alternatively select Any and the part will be stitched irrespective of size.
Outer Islands - If Short Side < This works in the same way as the option above, but is applied to the short side of the part.
Inner Islands - If Long Side < This is the same as the same as Outer Islands - If Long Side < option, apart from the fact that is applied to the inner islands.
Inner Islands - If Short Side < This works in the same way as the option above, but is applied to the short side of the inner island.
Default Auto Stitching Values The options in this section set the length and quantity of the stitches that are to be applied.
Sheet Order The Sheet Order tab determines the order which the sheets will be displayed within the nests tab within Job Contents section. When the NC data is written later, these settings will have a bearing on how the NC numbers are allocated.
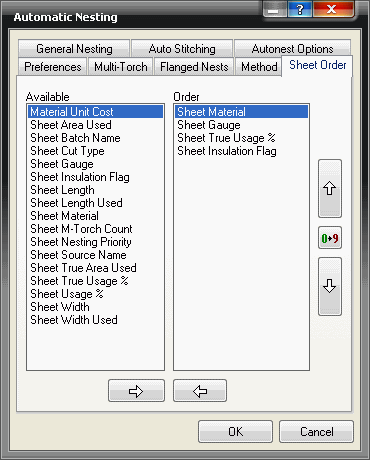
The image above determines that the sheets will sorted first by Material, then Gauge, then True Usage and finally by Sheet Insulation Flag.
- The order is determined by each fields position in the right hand pane. To alter order in which the sheets will be sorted, click on the Up or Down arrows on the right hand side.
- To add a new field to the right hand pane, locate the relevant field in the left hand pane and click it.
- Then click on the right pointing arrow to move it to the right hand pane. It can then be move up or down the sort order by using the up or down arrows as described above.
- The entire sort order can be reversed by using the
 icon.
icon.