Utilising the Spooling Slice Tool - CADmep
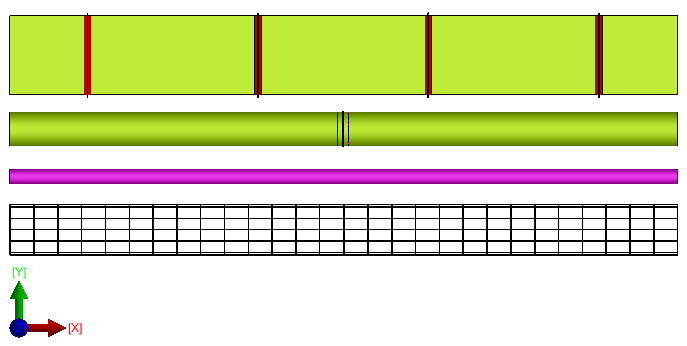
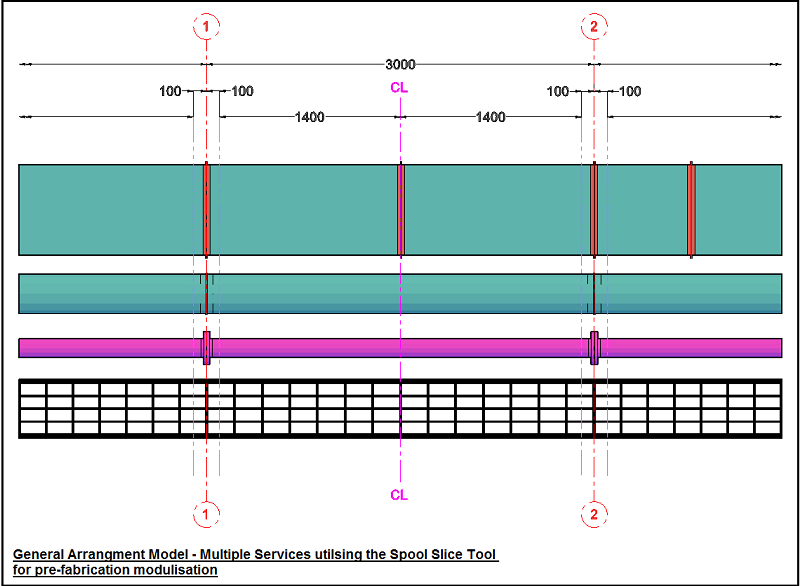
- Open the required model for pre-fabrication modules. Note : Users must manually co-ordinate / draw on the model the appropriate Cut-Lines as indicated as 1 & 2.

- Type within the command dialog SLICETOOL or alternatively SLT. The command bar will prompt : Slice Tool : Select cut lines : as indicated in the above illustration in step 1, select lines 1 & 2 accordingly. right click or Enter to finalise.
------------------------------------------------------------------------------------------------------------------------------------------------------------------------------------------------------------
Utilising the Spooling Slice Tool - Autodesk Fabrication Products
- Open the required model for pre-fabrication modules.
- Type within the command dialog SLICETOOL or alternatively SLT. The command bar will prompt : Select Start Point to Begin:
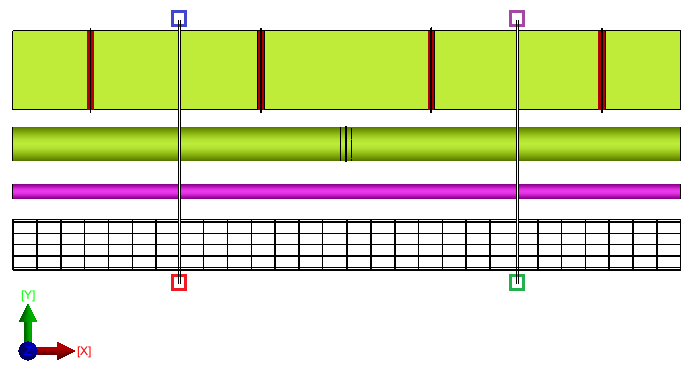
Red : Indicates 1st selection point,
Blue : Indicates 2nd selection point,
Green : Indicates 3rd selection point
Purple : Indicates 4th selection point
- Click on the 1st point to determined the start point for the 1st cut line within the model, set snap ortho to be ON, move adjacently over all the services and select the 2nd point. Right click to finalise the 1st cut line.
- With the Slice tool command still active. Select on the model the 3rd selection point, this will indicate the start point of Cut line 2. To finalise the cut line select point 4 to determine the end point of cut line 2. Right click to finalise the command, then Right click again.
------------------------------------------------------------------------------------------------------------------------------------------------------------------------------------------------------------
Utilising the Slice Tool Dialog
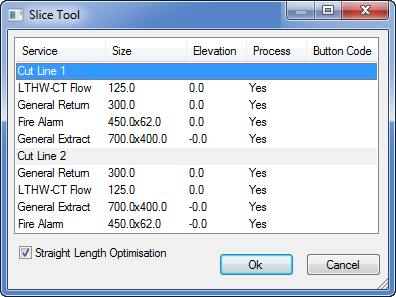
The Slice Tool dialog will appear. The Service, Size, Elevation is automatically generated for each Cut Line. The process column as default will be set to YES, if this option is set to NO this will disable the function on that particular service. For further information refer to Spooling Slice Tool - Toolbar/Commands.
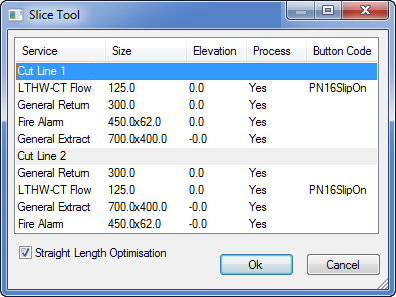
- To configure the connectivity for a Service cut line, Select the required Button code for example "LTHW-CT Flow". A drop down menu will appear : Select PN16SlipOn, repeat this procedure for Cut Line 2. For further information on set-up of Design Line Button Codes on items please refer to the Design Line Button Codes documentation.

- As illustrated below, leave the Button codes blank for the outstanding services the connectivity will be automatically generated by the Specification applied to the Service or locked connector on the item. For further information please refer to the Specifications & Services documentation.
- Select OK to finalise the command. As illustrated below all the Services have been re-configured and cut accordingly in relationship to Cut Line 1 & 2 taking into consideration the optimisation of each straight length for Duct, Spiral, Pipe, Basket.
Spool Slice Tool - Autodesk Fabrication Products
Spool Slice Tool
