Compositor View is an optional, secondary window within the State Sets interface. It displays a schematic view of the states that can output rendered images (that is, not including the Objects state). Functions include rewiring components, color correction, linking with external compositors such as Adobe After Effects, and more.

Compositor View closeup
You open Compositor View with or without render elements by choosing the corresponding command from the Compositor menu or the master state (State Sets) right-click menu. Its schematic shows all states as wired nodes, much like the Slate Material Editor.
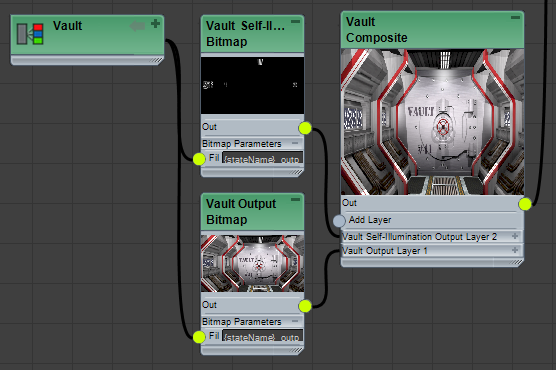
Each state is represented in Compositor View as at least two nodes: the state node itself, showing all recorded properties, and the output bitmap node, with a thumbnail. In addition, with the Compositor View (RE) command, any enabled render elements are also represented as bitmap nodes with thumbnails. All bitmap nodes are wired to a Compositor Output node that shows all bitmap outputs overlaid in a single image and contains compositing controls. This represents the data that State Sets will send to Photoshop or After Effects, either directly via the Compositor Link function, or indirectly by generating a PSD file.
In the Compositor View (RE) mode, a Composite node collects the output elements of a state into a single composite. You can think of this node as a "pre-composition" prior to the main Compositor Output node. Generating a Composite for each state reduces the number of layers that appear when you export data to After Effects.
By default, all nodes are wired, but you can rewire them if you like by dragging from one node's output connector to another's input connector (or vice versa). As you drag, each available connector is colored gray if a new connection is supported, or red if it is not. Wired connectors are colored green; these are also available for new connections.
- Elements are ordered in a convenient way, with lighting effects on top—reflections, shadows, specular elements—followed by full-image elements such as scene views; and at the bottom, data elements such as Object ID and Z Depth.
- The Blend Mode for elements is initialized to an appropriate setting: For example, Addition for self-illumination and reflection elements, Normal for full-frame passes, Multiply for lighting, and so on.
Navigating and Working in Compositor View
- To zoom, roll the mouse wheel. Upward zooms in at the mouse location; downward zooms out at the mouse location.
- To pan or scroll, drag with the middle mouse button or scroll the mouse wheel.
- You can also change the view by clicking or dragging in the navigator view: the shaded area in the top-right corner also known as the "radar." To toggle the navigator view, click the -/+ button in its top-right corner.
- To change the width, drag the divider between the Compositor View and the states list.
- To minimize Compositor View to a tab, click the pushpin button in the top-right corner. To maximize the view temporarily, mouse over the tab. To restore the view to full size, click the pushpin button again.
- To close Compositor View, click the X button in the top-right corner. Warning: Closing Compositor View effectively deletes any nodes added in Compositor View, such as Color Correct nodes. To minimize the view while retaining such nodes, click the pushpin button instead.
- To select a node, click it. To select multiple nodes, drag a selection or use Ctrl+click.
- To move selected nodes, drag them.
- To delete selected nodes, press Delete.
- To minimize and maximize nodes and their sub-panels or rollouts, click the -/+ button in the top-right corner.
- To resize a node, drag its bottom-right corner. If the node contains a thumbnail, you can drag horizontally, vertically, and diagonally, and the thumbnail scales while retaining correct proportions. If the node has no thumbnail, you can scale it horizontally only.
- To minimize a thumbnail to the node's title bar, double-click the image. Double-click the minimized thumbnail to restore it to the previous size.
- To wire two connectors together, drag between them. Typically you do this between the output connector on the right side of one node and the input connector on the left side of the other node.
- To delete a wire, either drag one end away from the connector and drop it in an empty area of the window, or right-click the wire and choose Remove Connection.
- To clean up the arrangement of nodes, use Auto-Layout Nodes from the Compositor menu or the main right-click menu.
- To expand or collapse a node or parameter group on a node, click the button in the top-right corner: + to expand or - to collapse.
The Compositor View interface consists of the Compositor menu and window, as well as various right-click menus and intra-node controls.
Compositor View right-click menus
- The main menu opens when you right-click an empty area of Compositor View.
- A node-specific menu opens when you right-click a node. In most cases this menu contains only two commands: Zoom Selection Extents and Refresh. Right-clicking a State node opens a larger menu.
 ) is on.