Few things are more aggravating when attempting to open a scene then encountering an Assertion Failed error, File Open Failed error, or perhaps no error at all. The file just does not load. This typically occurs when the file is corrupt.
A number of factors can cause file corruption, including the following:
- Some component built in another program has been imported or referenced with an XRef.
- The scene failed to save properly due to a power failure or system crash.
- A poorly coded plug-in corrupted an object in the scene.
Problems and Resolutions
Assertion Failed Errors
The assertion failed error occurs commonly when you try to load a corrupt file. The error gives you a line number and file name where the corruption occurred. You are then left with the options to retry or cancel.
Unfortunately, the line number and file often don't help because that isn't necessarily where the error is actually occurring. Most people click the Retry option a couple of times then give up, fearing they've lost many hours of work. Don't panic yet. There are a number of things you can try before you have to start rebuilding.
The first thing to try is keep clicking the Retry button. If there is a corruption to the vertices of an object, you might have to parse through each vertex until you bypass the object completely. For example, Autodesk Product Support once received a file that returned an Assertion Failed error referencing a tab.h file. The scene recently had an AutoCAD component imported that 3ds Max couldn't understand. However, after the support technician clicked the Retry button 88 times, the scene finally opened. After resaving the scene, it opened without incident.
Merging Corrupt Files
If normal attempts to open a scene fail, another thing you can try is merging the scene. If the file is not too corrupted, you would be able to access the Merge dialog which shows a list of the components in the scene. This is a good sign because, with a little effort, you can fix the file yourself. You now need to narrow down which object, or objects, are causing the load failure.
- Start 3ds Max.
- Choose Application menu
 Import
  Merge.
 - Browse to the folder containing the model, select the model and click the Open button.
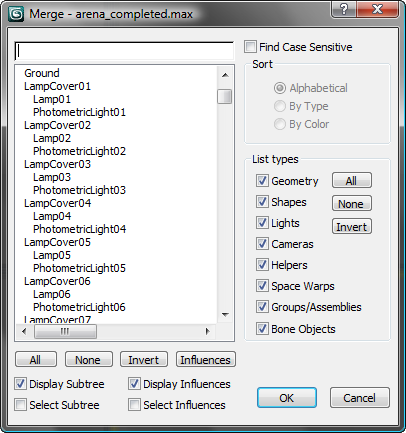
The Merge dialog is displayed, showing all the components in the scene.

You'll start by seeing if any of the objects or shapes in the scene are corrupt.
- In the List Types group, on the right, turn off everything except Geometry, Shapes, and Groups/Assemblies.
- Click the All button at the lower left, and then click OK.
If the objects appear in the viewports, you know the scene components are fine and you'll have to repeat these steps with other List Types turned on.
If the objects merge successfully, and you have to try merging in other objects, be sure to first save what you've just merged as a basis for rebuilding the scene.
- Reset 3ds Max.
You now have to narrow down exactly which object in the previous list is corrupt.
- Once again, choose File
 Merge and turn off everything except Geometry, Shapes, and Groups/Assemblies.
 - Select the first 10 objects in the list of components and click OK.
If those objects merge successfully, save the scene and repeat the Merge operation with the next set of 10 objects. Eventually, one of the sets of objects you try to merge will report the error message.
- Keep refining the number of objects you are merging until you have singled out the object that reports the error.
- Once you've found the corrupt object, reset 3ds Max and merge all the objects and components except for the object you've singled out.
- After everything is merged, save the scene and rebuild the object that was corrupt.
If you receive an error message, you know one of the objects is the offending item. Then, do as follows.
Granted, this can be a long process, but it's well worth it if you can salvage most of your previous work.
Remember Backup Files
By default, the 3ds Max auto backup feature is active, and writes a backup file every five minutes while you're editing the scene for a total of three files. Using backup files is especially helpful if your file became corrupt due to a system crash or power outage.
By default, the /autoback path depends on the operating system you are using:
- Windows 7 and Windows 8:
/users/<username>/my documents/3dsmax/autoback/
However, if you have set a project folder, the /autoback folder is in that project.
- Start 3ds Max and verify that you cannot load the scene.
- Open Windows Explorer and browse to the \autoback folder.
- Start by highlighting
autobackup01.max
and then copy the file (Edit
 Copy or Ctrl+C).
 - Browse to the
\scenes
folder, and paste the file.
If you want, you can rename the backup scene file.
- In 3ds Max, choose File
 Open and try loading the file you just copied from the
\autoback
folder.
 If it opens, save the scene and rebuild what you lost in the last five minutes.
If you'd like to adjust the Auto Backup settings, you'll find them on the Files panel of the Preference Settings dialog, available via the Preferences command on the Customize menu.