Usually, during the review stage of a project, different changes might be necessary both in the model and drawings. You can keep track of the changes in drawings automatically.
Due to the link between the drawings and the 3D model, the revision information is controlled directly from the model dwg. During the drawing update process, the changes are automatically listed in the revision table on the drawing.
The outdated drawings can be automatically updated to suit the model.
The revision table is automatically updated with the list of revision notes for all changes made in the model.
Use a revision table
All the prototypes already include revision tables but different ones can be added manually by specifying two diagonal points on a drawing. All the information about the revisions added here are saved in the drawing and will appear in the Document Manager .
- The revision table is automatically updated
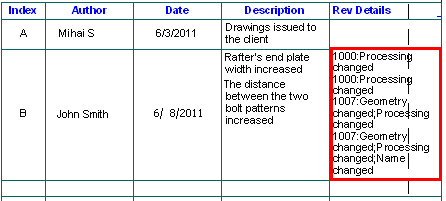
- The revision table provides important information for tracking the changes during the project:
|
Column |
Description |
|
Index |
A letter or a number identifying the revision level |
|
Author and Date |
Who and when has worked on the model |
|
Description |
The description of all changes made during a revision level |
|
Rev Details |
Some revision tables may contain the Rev Details column. Advance Steel will automatically complete this column with a generic description of the changes on the drawing. |
Example:
Keep history and backups
Automatic backups of files are created before a revision mark is given, to avoid several related revision mistakes. The updated detail dwgs are automatically saved with a revision letter in their name; all previous versions are stored in the backup folder.
The backup folder can be created automatically in the same folder as the original document or in another specified location.
Revision System on Drawings
If you choose the Update Revision option to update drawings the Revision is recorded on the drawing as follows:
- The Revision table will have a note added showing the information entered in the Revision mark dialog box.
- The main revision in the title block will be updated.
- Any previously existing revision clouds are deleted.
- Any dimensions or labels that change have a revision cloud drawn around them.
- The changed part or feature has a revision cloud drawn around it.
- The revision clouds have an index mark placed next to them.
The use of revision clouds is controlled by a number of options in Advance Steel Management Tools . The exact results you get will depend on these settings. The default options may vary according to the installation.
Add a revision table
This tool allows you to manually create a revision table by specifying two diagonal points on a drawing. All the information about the revisions added here are saved in the drawing and will appear in the Document Manager.
To access the command
Ribbon: Labels & Dimensions > Management: 
Command line: _AstM4CommDetRevisionTable
To add a revision table
- Open the detail drawing on which you want to add a revision table.
-
Labels & Dimensions
tab,
Management
panel: Click .
- Select the lower left corner of the table.
- Select the upper right corner of the table.
- In the Revision control dialog box make the necessary settings.
Add a revision in a revision table
This tool allows adding a new revision inside a revision table. It is similar to adding a new revision to a selected drawing from the Document Manager.
How to access the command
Ribbon: Labels & Dimension > Management: 
Document Manager window: Update revision
Command line: _AstM4CommDetailRevision
How to add a revision mark
- Open the detail for which you want to add a revision mark.
Remark
Save the drawing before adding the revision.
- On the Labels & Dimensions tab, Management panel: Click .
- In the Add revision mark dialog box, on the Revisions tab, click Add.
- In the Revision mark dialog box, enter the necessary information.
- Click OK to close the dialog box.
The new revision appears in the revision list.
- Click OK.
- The current file closes and the file with the updated revision table opens.