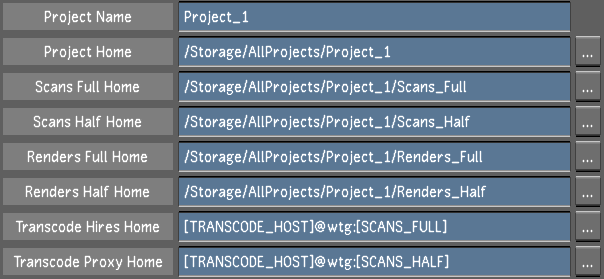
Use the Project settings to define:
- The Project Name
- The Project Home directory
- The Scans Home directory
- The Renders Home directory
- The Transcode Home directory
- The architecture
- The scan type
- The frame rate
- The proxy size
- The pixel ratio
- The Stereoscopy state
- The RED Timecode
For the project's directory structure, follow the guidelines described in Recommended Directory Structure for Projects. When entering a directory path, you can use the path browser. See Browsing for Paths.


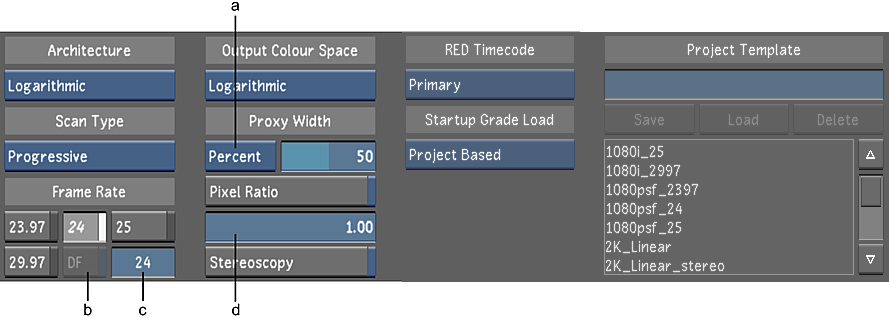
(a) Percent/Pixel option box (b) Drop Frame button (c) Frame Rate field (d) Pixel Ratio slider
- Project Name field
- Enter the name of the project.
- Project Home field
- Enter, or browse to, the location of the main project directory.
- Scans Full Home field
- Enter, or browse to, the location of the scanned footage directory.
- Scans Half Home field
- Enter, or browse to, the location of the proxy footage directory.
- Renders Full Home field
- Enter, or browse to, the location of the render directory for renders of (full resolution) footage.
- Renders Half Home field
- Enter, or browse to, the location of the render directory for renders of proxy footage.
- Architecture option box
- Toggle to set the default grading architecture and colour space while working in Lustre to logarithmic or linear.
- Scan Type option box
- Toggle to set the default scan type.
- Frame Rate buttons
- Enable the default frame rate for the project's timeline and editing tools.
- Drop Frame button
- Enable when your shot contains drop frames. For the majority, this button is greyed-out since most of the default frame rates do not support drop frames. This button becomes available when you select a frame rate that supports drop frames (e.g., you have selected 29.97 or you have entered a personal frame rate within the frame rate field).
- Frame Rate field
- Displays the selected default frame rate or you can enter your own frame rate within the field.
- Output Colour Space option box
- Toggle to set the default colour space architecture when rendering to logarithmic or linear.
- Percent/Pixel option box
- Toggle to set whether Lustre will determine the proxy width as a percentage of the original footage, or as a fixed number of pixels.
- Proxy Width slider
- Use to define the default proxy width. Whether it is a percentage or a number of pixels is defined by the Percent/Pixel option box.
- Pixel Ratio button
- Enable to configure the default aspect ratio.
- Pixel Ratio slider
- Sets the default aspect ratio. Available if Pixel Ratio is enabled.
- Stereoscopy button
- Enable to work on a stereoscopic project.
- RED Timecode option box
- Select which RED media timecode to transcode. Note that when conforming an EDL, overiding the timecode data of the clips with a different timecode track will prevent relinking in the Autodesk Visual Effects and Finishing applications. For more information about RED media and transcoding, see Transcode Options.
| Select: | To: |
|---|---|
| Primary | Select either the Time of Day or Edgecode timecode. Only select this option if you know which timecode has been set as the primary. |
| Time of Day | Establish a timecode field that is set by the internal clock from the RED camera. |
| Edgecode | Establish a timecode field that is set by the camera operator. |
- Startup Grade Load option box
- Select the grade loading behavior at startup. Options are:
- Never Load: Does not load a grade at startup.
- User Based: Loads the last grade used by the current user.
- Project Based: Loads the last grade used in the project.
- Latest Grade: Loads the most recent grade listed in the Grades List. This is useful when working in a collaborative environment, where a colorist may work with multiple grades and exit the application when not using the latest grade version that he/she created. When the application restarts, it will load the most recent grade in the Grades List.
- Project Template field
- Enter the name of a project template you wish to create in this field before clicking Save.
- Save button
- Click to save the project settings of the current project to the template named in the Project Template field. Use to create a new template or to update an existing template.
- Load button
- Click to load a project template after you select a template in the Template Name list.
- Delete button
- Click to delete a project template after you select a template in the Template Name list.
- Template Name list
- Select an existing project template from this list before loading or deleting the selected template. See Working with Templates.