Adding Timeline FX
To add Timeline FX to a clip:
- Select a clip from the timeline.
- Do one of the following:
- Click the FX button.
- Right-click on a segment in the timeline and choose Add Effect.
Note: Effects that are enabled have already been added to the current Timeline FX pipeline. - Select the effect you want to apply.
The effect appears in the Timeline FX pipeline and on the timeline segment.
Note: You may have to resize the video or audio track so that Timeline FX are visible on the timeline. - You can adjust the effect's settings using the quick menu underneath the Timeline FX pipeline. Click the Editor button if you want to enter the full editor of the effect. Once in a Timeline FX editor, you can choose which range to display on the timebar (Segment, Media, or Timeline) from the Playback Options box. The Playback Options box also has options to display audio waveforms and cue marks.
When adding Timeline FX to stereo clips on the timeline, in some cases (such as with the Colour Warper effect), you are not able to use the quick menu to adjust settings. In this case, simply click the Editor button to enter the full editor.
Reordering Timeline FX
- From the Timeline FX pipeline with multiple Timeline FX applied, select an effect icon (for example, a Flip effect that occurs after a 2D Transform effect).
- Click and drag the effect to its new location.
- Release the effect.
Copying Timeline FX
You can copy Timeline FX from the timeline to the Workspace, from the Workspace back to the timeline, or from one segment on the timeline to another. Additionally, you can copy multiple Timeline FX simultaneously, as long as the Timeline FX you want to copy are from the same segment. You can also copy to and from the Media Panel or the Desktop reels.
A copy can be made gesturally or using contextual menus. Contextual menu operations can simplify copying operations when segments are far apart or in a different timeline, or if you plan to do other editing operations between copying and pasting.)
When you copy Timeline FX of the same type over another Timeline FX, the copied effect overwrites the pre-existing one.
To copy Timeline FX to the workspace:
- Do one of the following:
- Select a Timeline FX in the Timeline FX pipeline.
- Select a Timeline FX in a segment on the timeline.
- Select a Timeline FX in the Media Panel.
- Select a Timeline FX in the Desktop reels.
- Do one of the following:
- Drag the Timeline FX to the workspace. If you want to copy multiple Timeline FX, Ctrl-click the ones you wish to copy and drag them to the workspace.
- In the Timeline FX pipeline, Media Panel or Desktop reels, right-click the Timeline FX, and select Copy. In the workspace, right-click and select Paste.
The Timeline FX appears in the workspace. It displays a thumbnail with the front view of the effect, and the shortened name of the effect(s) you copied.
To copy Timeline FX to the timeline:
- Do one of the following:
- Select a Timeline FX in the workspace.
- Select a Timeline FX in the Timeline FX pipeline.
- Select a Timeline FX in a segment on the timeline.
- Select a Timeline FX in the Media Panel.
- Select a Timeline FX in a Desktop reel.
- Do one of the following:
- Drag the Timeline FX to the Timeline FX pipeline.
- Drag the Timeline FX to a segment on the timeline.
The Timeline FX appears in the Timeline FX pipeline and in the timeline segment.
To copy Timeline FX from one segment in the timeline to another:
- Do one of the following:
- Select a Timeline FX in the Timeline FX pipeline.
- Select a Timeline FX in a segment on the timeline.
- Do one of the following:
- Drag the Timeline FX to a different segment on the timeline.
- Right-click the Timeline FX in the Timeline FX pipeline, and select Copy. In the the current timeline or another timeline, right-click a segment and select Paste.
To copy Timeline FX to the workspace:
- Do one of the following:
- Select a Timeline FX in the Timeline FX pipeline.
- Select a Timeline FX in a segment on the timeline.
- Select a Timeline FX in the Media Panel.
- Select a Timeline FX in a Desktop reel.
- Do one of the following:
- Drag the Timeline FX to the workspace. If you want to copy multiple Timeline FX, Ctrl-click the ones you wish to copy and drag them to the workspace.
- In the Timeline FX pipeline, Media Panel, right-click the Timeline FX, and select Copy. In the workspace, right-click and select Paste.
To copy Timeline FX to the Desktop reels:
- Do one of the following:
- Select a Timeline FX in the workspace.
- Select a Timeline FX in the Timeline FX pipeline.
- Select a Timeline FX in a segment on the timeline.
- Select a Timeline FX in the Media Panel.
- Select a Timeline FX in a Desktop reel.
- Do one of the following:
- Drag the Timeline FX to the Desktop reel. If you want to copy multiple Timeline FX, Ctrl-click the ones you wish to copy and drag them to the workspace.
- In the workspace, Timeline FX pipeline, or Media Panel, right-click the Timeline FX, and select Copy. Right-click a Desktop reel and select Paste.
Muting and Deleting Timeline FX
If you want to temporarily remove Timeline FX from a clip, you can mute it. You can quickly assess if a Timeline FX has been muted, because its LED is turned off.
To mute Timeline FX:
- On the timeline, select the segment with the Timeline FX you want to mute.
- In the Timeline FX pipeline, click the blue LED on the Timeline FX.
The LED darkens to indicate that the Timeline FX is turned off.
- To unmute an effect, click the LED on the Timeline FX in the Timeline FX pipeline. The LED will turn blue, to indicate an unmuted Timeline FX.
To delete Timeline FX:
- On the timeline, select the segment with the Timeline FX you want to delete.
- Do one of the following:
- From the Timeline FX pipeline or the timeline segment, drag the Timeline FX to the bottom of the screen.
- Right-click the Timeline FX and select Delete.
Modifying Multiple Timeline FX
You can modify Timeline FX from different clips at the same time by multi-selecting clip segments. Selecting multiple segments allows you to apply changes to effects in one segment, and have those changes applied to the same effects in the other segments.
To add multiple Timeline FX to a segment:
- Select a clip from the timeline.
- Click the FX ribbon.
- Ctrl-click the effects you want to apply to the segment.
- Do any of the following:
- Click a final effect button to add it to the selection.
- Click outside of the FX ribbon.
- The FX ribbon closes. The selected effects are applied to the segment.
To copy and paste multiple Timeline FX from the timeline:
- Do one of the following:
- Ctrl-click to select Timeline FX in the Timeline FX pipeline.
- Ctrl-click to select Timeline FX in the segment.
- Do one of the following:
- Ctrl-drag the selection to the Workspace.
- Ctrl-drag the selection to another segment in the timeline.
- Right-click the another segment and select Paste Effects.
To delete multiple effects:
- Do one of the following:
- Ctrl-click to select Timeline FX in the Timeline FX pipeline.
- Ctrl-click to select Timeline FX in the segment.
- Do one of the following:
- From the Timeline FX pipeline or the timeline segment, Ctrl-drag the selection to the bottom of the screen.
- Right-click the effects and select Delete.
To modify a Timeline FX on multiple segments:
- Ctrl-click to select multiple segments in the timeline.
- Do one of the following:
- Select the FX button. The FX ribbon appears and you can add one more effects.
- Mute, unmute or delete Timeline FX in the Timeline FX pipeline. The effect state is updated in selected segments.
- Right-click the segment and select Paste Effects to paste to all selected segments.
Sliding Timeline FX Keyframes
To slide Timeline FX within a clip:
- In the Timeline FX pipeline or in the timeline segment, select the Timeline FX that you want to slide.
- If the clip does not already contain animation keyframes, set keyframes on the clip to animate the FX.
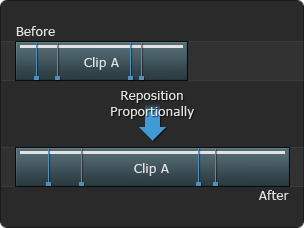
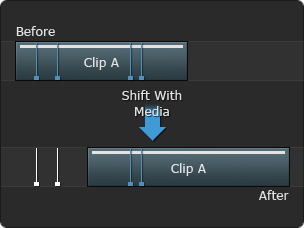
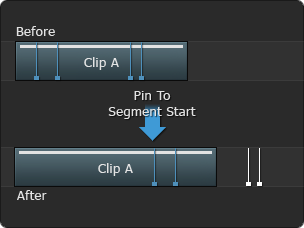
- Select how the animation channel is affected when you slide the animated effects by choosing an option from the Keyframe Move Modes box.
Select: To: Example Reposition Proportionally Resize the channel as you trim. The animation channel is scaled to fit into the timeline element. This option has no effect when you slip or slide. 
Shift With Media Link the keyframes to their original frame numbers. The animation channel moves to follow the original frames as you trim. 
Pin To Segment Start Unlink the keyframes from their original frame number. The animation channel remains with the timeline element as you trim. 
- From the Editorial Mode box, select Slide Keyframes, which allows you to slide all of the keyframes of a specific Timeline FX on a clip. Note: You can only slide keyframes from one Timeline FX at a time.