When you add an object in Action (such as a surface, GMask, Matchbox, Light or geometry), it appears in front of all other objects in the scene. These overlapping objects create a stack and an order of priority as one object is drawn in front of the other.
You can change the drawing order of these objects using the Priority Editor.
Accessing the Priority Editor
To access the Priority Editor, click the Priority button, or swipe the bar at the bottom of the Media or Object menu. You can also display a larger version of the Priority Editor as a selection from the View box.
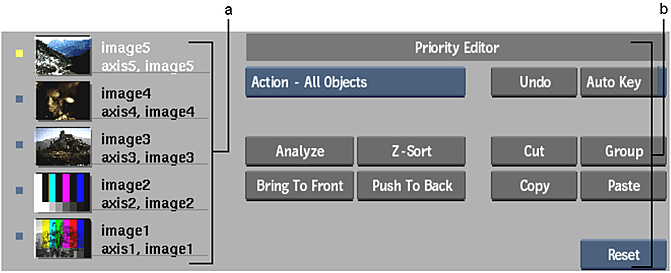
You can specify to view the Priority Editor for a type of object, such as Lights Only, or all objects. Each entry in the Priority Editor indicates the object's name, the order of the object in the stack, and the location of the object in its branch. There is also a proxy showing what the object looks like in Schematic view.

(a) Drawing order of objects in the scene (b) Priority Editor controls
Use the Priority Editor controls to analyse the scene for changes in rendering priority, to change the rendering priority, and to cut, copy, and paste priority information from one frame to another.
Changing the Drawing Order
The objects in the scene are shown according to z-depth, while still being drawn in the order of their priority: highest priority at the top of the list to the lowest priority at the bottom. The lowest level object is drawn first, the second to lowest level object is drawn next, and so on, until the top of the list.
To change the drawing order of objects:
- From the Priority Editor box, select which type of object to view in the list.
- In the Priority Editor list, select the object (or multiple objects).
The selected object name is highlighted in yellow, and the corresponding object is selected in the Action schematic.
- Do one of the following:
- Drag the object to the desired position in the stack.
- Click the Push To Back button to move the selected object one position lower in the stack, or click the Bring To Front button to move the selected object one position higher in the stack.
Note: If the Priority Auto Key button is enabled when you move an object in the stack, a keyframe is added to the timebar. - Click Preview to ensure that the drawing order is correct.
Occasionally, a matte may obscure another object if the drawing order is unordered. If this happens, move the object up and down in the stack until the drawing order is corrected, or click Z-Sort.