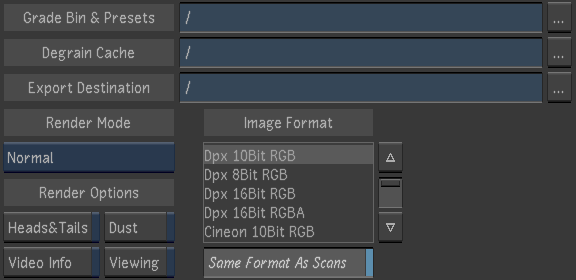
Use the Rendering settings to:
- The Grade Bin & Presets directory.
- The Degrain Cache directory.
- The Export Destination directory.
- The Render Mode.
- The Render Options.
- The Image (Output) format.
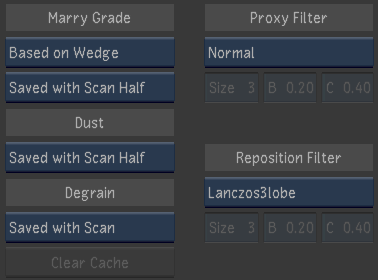
- The Marry grade settings.
- The Dust settings.
- The Degrain settings.
- The Proxy Generation filters.
- The Reposition filter.
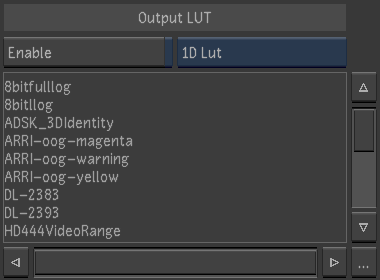
- The Output Lut.

- Project Grade Bin field
- Enter, or browse to, the location of the grade files for the current project.
- Degrain Cache field
- Enter, or browse to, the location of the user-defined cache location for degrained frames. When there is no access to the Scan directories, and the Degrain File Location option box in the Rendering menu is set to Saved with Scan, cached frames are saved in this location. See
Rendering Settings.
Note: Verify that the cache location supports the bandwidth you require for the project.
- Export Destination field
- Enter, or browse to, the location to export to.
- Render Mode
- Set the default render option.
Select: To have: Normal Each shot of a cut rendered to a separate directory, with a Unique ID, under the render path specified in the project. No Shot ID Each shot in the cut rendered to a separate directory under the render path specified in the project. One Sequence Shots rendered into one directory as a single sequence of renamed images. Src Grade Individually-graded shots rendered to their own UID (unique ID) folder in the Renders Home location. This option is mostly used in the Interoperability workflow. - Heads & Tails
- Enable to set the project's default to render shots with head and tail frames.
- Dust
- Enable to set the project's default to render shots with dust metadata.
- Video Info
- Enable to set the project's default to burn in the timecode into the render.
- Viewing
- Select to render viewing LUT; however, it renders 8-bit BMP files. Use this option when you want to render the image displayed in the monitor.
- Image Format list
- Select the default format of the media to be rendered from this list.
- Same Format As Scans
- Enable to render media in the same format as the source media.
This option is disabled if the colour transform selected in Render > Output converts from floating point to integer values. This is to avoid the potential confusion that could be caused if the input scans are OpenEXR, in which case the float conversion LUT (fclut) would be applied in the viewport as usual for floating-point inputs.

- Marry Grade Format option box
- Toggle to specify the default marry grade format. For more information about the marry grade formats, see
Saving and Loading Marry Grades.
Select: To: Based on Wedge Save marry grade files based on the wedge number, defined by the first and last frame in the shot’s frame range. Based on UID Save marry grade files based on their unique identifiers. - Marry Grade File Location option box
- Toggle to specify the location where marry grade files are saved. Marry grades are saved in resolution-specific directories.
Select: To save marry grade files to a resolution-specific directory: Saved with Scan Full Under the Scans Full Home directory. Saved with Scan Half Under the Scans Half Home directory. - Dust File Location option box
- Toggle to specify the location where Lustre saves dust files. Dust files are saved in resolution-specific directories.
Select: To save dust files to a resolution-specific directory: Saved with Scan Full Under the Scans Full Home directory. Saved with Scan Half Under the Scans Half Home directory. - Degrain File Location option box
- Toggle to specify the location for caching degrained frames.
Select: To save cached frames: Saved with Scan In the Scans directories. Saved in Degrain Cache In the user-defined Degrain Cache directory. - Clear Cache
- Click to delete all files in the degrain file cache. This button is disabled when the Degrain File Location option box is set to Saved with Scan.
- Proxy Filter
- Select the default filter to use when creating a proxy.
Select: To use as default: Normal An average filter if the resolution of the proxy is half, and to use a Sync filter if the resolution of the proxy is full. CatmullRom The CatmullRom proxy generation filter when creating proxies. Lanczos The Lanczos proxy generation filter when creating proxies. Sinc The Sinc proxy generation filter when creating proxies. Mitchell The Mitchell proxy generation filter when creating proxies. Use the sliders below to define the filter settings. - Reposition Filter
- Select the reposition filter to use by default when creating proxies.
Select: To use as default: Normal An Average filter if the resolution of the proxy is half, and to use a Sync filter if the resolution of the proxy is full. CatmullRom The CatmullRom reposition filter. Lanczos3lobe The Lanczos3lobe reposition filter. Mitchell The Mitchell reposition filter. Use the sliders below to define the filter settings. A Custom Filtering viewing option is available in the Setup / Grade menu. Custom Filtering uses the Reposition Filter, as defined here.Note:- Viewing Filtering only affects what is displayed in the viewer. It does not affect rendering. In Image/Reposition menu, you can define the Filtering method that will be used for rendering, from the Image / Reposition menu. This setting does not affect how media is displayed in the viewer.
- For Real-Time Deliverables, filtering can be enabled from the Image / Reposition menu and, in this case, the Viewing Filtering is bypassed by the Image / Reposition filtering, since RTD uses the graphics card for the SDI output.

- Enable button
- Apply the output LUT or colour transform when rendering.
- Output LUT Type option
- Choose 1D LUT, 3D LUT, or Colour Transform.
- Output LUT list
- Select a default output LUT or color transform to use when rendering from this list, or click the Browse (...) button at the lower right to select a file.