Navigation
- Positioner
- The “playhead” for playing the clip, displayed as a vertical yellow bar. The frame directly beneath the positioner is displayed in the Player or is the current location for an edit such as a dissolve or cut.
In the timecode area below the tracks, a lighter yellow box attached to the positioner indicates the length of the current frame, at the timeline zoom level. Click and drag this yellow box to move the positioner, so as not to accidentally move clips on the timeline.
- Focus point
- A horizontal yellow line on the positioner indicating the current track.
- Back button
- Click to move back one page in the timeline window.
- Horizontal scroll bar
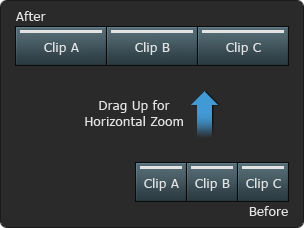
- To pan, drag left or right. To zoom the timeline, drag up or down.
 Horizontal Zoom
- Forward button
- Click to move forward one page in the timeline window.
- Current Timecode field
- Displays the timecode of the current timeline position. Editable. This field displays timecode or frame number depending on the selection in the Time Display Mode box located in User Interface preferences.
- Current Frame field
- Displays the frame number of the current timeline position. Editable. This field displays timecode or frame number depending on the selection in the Time Display Mode box located in User Interface preferences.
- - button
- Click to expand track height.
- + button
- Click to decrease track height.
- Vertical scroll bar
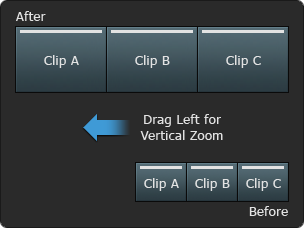
- To pan, drag up or down. To zoom the timeline, drag left or right.
 Vertical Zoom
- Timeline Search button
- Click to open the Find and Select in Timeline window to search the timeline using many different criteria.
- Timeline Layout combo box
- Select an option to display the timeline.
Select: To: Home Reset the view of the timeline. Reset Height Reset the height of the tracks in the timeline. Fit to Width Reset the horizontal scale of the timeline. Fit Selection Centre the timeline on the selected element.
Rendering
- Rendering combo box
- Select an option to render timeline effects. You can edit effects after rendering.
Select: To: Render Selection Render the selected elements. Render Render to topmost track in the timeline. Proxies Only Render proxies only, not the corresponding high-resolution images. An amber outline appears on the timeline segment to indicate the state of the rendering. Available if proxies are selected during the setup of a project. Other options appear to set the rendering mode for the selected option if you are using Burn or Background Reactor.
Tip: If you need to refresh (or force) a render on a selection, first select Flush Renders from the Media submenu in the Timeline Gear menu, then re-render the selection.
| Render Bar: | State: |
|---|---|

|
Unrendered. |

|
Rendered. |

|
Partially rendered. |

|
Proxy rendered. |

|
Proxy partially rendered. |

|
Sent to Burn or Background Reactor. |
Viewing
- Timeline View Mode box
- Select a viewing mode for working in the timeline.
Select: To Display: Timeline Video and audio tracks in a timeline format with a positioner at the location of the current frame (press Shift+F5 to toggle between a larger timeline view and the normal timeline view). Collapsed Only the current frame of each edit sequence. The edit sequence appears in the form of a stack. Shuttle through the sequence by dragging the cursor across the bottom of the frame. Head-Tail The first and last frames of each clip. Shuttle through the sequence by dragging the cursor across the bottom of any frame. Storyboard Only the first frame of each clip in the edit sequence. Shuttle through the sequence by dragging the cursor across the bottom of any frame. Frames Every frame in the edit sequence is displayed. Although you cannot edit in this mode, it is useful for viewing your entire edit. History A schematic or list representation of the majority of operations performed on a clip or timeline element. Clip List A list of objects and information about these objects that make up the timeline. Tip: In Collapsed or Storyboard view, you can drag sequences to reorder them. If you switch back to Timeline view, the new order of sequences is maintained.
Timeline Tasks
- Timeline Gear menu
- Select a task to perform on the timeline. Some of the options have sub-menus with more options.
Select: To: New Tracks and Versions Add new tracks or versions to the timeline. Edit Perform various element or timeline editing operations. Rename Rename the selected timeline element. Rename Track Rename the selected track. Media Options to flush renders, and to break the link between an element's metadata and media or high-resolution media. Select All Select all elements in the timeline. Deselect All Deselect all elements in the timeline. Container Work with containers on the timeline. Group Create an edit sync group for selected timeline elements. Go To Navigate to various areas of the sequence. Marks Work with In and Out, Cue, or Segment marks. Stereo Work with stereo tracks on the timeline. Cut Add a cut to the selected element at the positioner location. Cut All Tracks Add a cut to all tracks at the positioner location. Merge Tracks Merge timeline tracks into a single track. Swap Effects Copy timeline effects between clips. Lift Remove the selected element from the edit sequence, and leave a gap in its place. Ripple Delete Remove the selected element from the edit sequence, and close the gap. Close Gap Remove a gap and collapse the elements to fill the gap. Commit Options to manage your timeline to simplify or save space. See Timeline Media Management Options Hard Commit Commit an edit sequence to one continuous clip (also called a mixdown). Soft properties of the sequence such as transitions, head and tail frames, and timewarp data are removed. Render Manage render options for the timeline.
Other Options
- Timeline Options menu
- Select an option for working on the timeline.
There are a number of audio options in this menu:
Select: To: Scrub Audio Enable scrubbing audio while dragging the positioner. Show Gain Animation Display the animatable Segment Gain level. Show Timeline Audio Meters Display mini audio meters to the right of the timeline. Audio Meters are displayed only if the current clip or sequence has at least one audio track. Show Waveforms With Effects Display waveforms after an effect is applied to an audio segment. Show Waveforms Without Effects Display waveforms before an effect is applied to an audio segment. Hide Waveforms Not display waveforms. Increase Waveform Range Zoom in on the waveform. Decrease Waveform Range Zoom out on the waveform. Use the Rectangle Selection options to select how timeline elements are included in a selection when drawing a bounding box around them.Choose: To select: Inclusive All elements that are partially or entirely included in the bounding box. Partial Only the portions of the elements that fall within the bounding box. Audio is selected on a sub-frame basis if Sub-frame Positioner is selected in the Timeline section of the Preferences menu. Partial A/V Only the portions of the elements that fall within the bounding box. Audio is selected on a frame basis even if Sub-frame Positioner is selected in the Timeline section of the Preferences menu. Bounded Only elements that are fully in the bounding box. Enable Selection Includes Gaps to include empty gaps when performing a timeline selection.
Enable Selection Includes Locked Tracks to allow you select a Timeline segment even if is resides on a locked track.
Enable one or both snap options to include in the timeline snap criteria:- Snap To Positioner on Gestural Insert
- Snap Includes Marks
Enable Focus on Trim if you want the timeline positioner to snap to the transition while trimming, allowing you to view frames in the player.