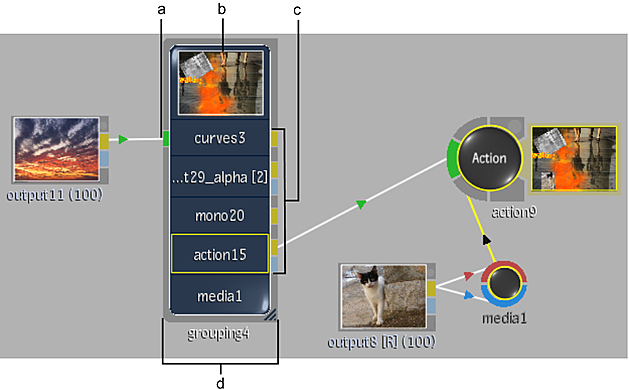
To group nodes:
-
Ctrl
-drag to select the nodes you want to group.
Selected nodes are outlined in white.
- Click Group, or right-click the selection, and select Group.
The selected nodes collapse into a Group node. The Group node lists the nodes contained in the group, as well as the non-hidden input tabs and output tabs.
Tip: You can also create a group inside a group.
(a) Input connection (b) Proxy window (c) Output connections (d) Group icon
- To rename the group, enter a name in the Node Name field.
- Click the group node to display group display and editing settings.
To display a proxy of an output in the proxy window in the group node:
- Do any of the following:
- Click the field in the Proxy list that corresponds to the node whose output you want to display.
- Press the Shift+up or down arrow as you navigate through the node’s Group List.
- If a node has multiple outputs, press Ctrl+Shift+up or down arrow as you navigate through the node’s Group List to display all the outputs of a node.
To change the size of the group icon:
- Drag the lower-right corner of the icon to make it wider or narrower.
Editing a Group
Use the Edit Group controls to edit the contents of a group.
To edit a group:
- Select the group you want to edit.
- In the Group settings, click Edit.
The nodes in the group appear in the schematic ungrouped, with other schematic nodes grayed out.
Tip: Instead of editing the group, you can access a single node's menu by selecting the node's name from the Node List box. Click the Return to Group button to return to the Group List menu. - Modify the nodes as required.
- Click Exit Group to return to the previous schematic. Note: Click Ungroup to expand the group of nodes to their pre-grouped positions in the schematic.