You can exclude or add specific ranges of colour to a sample by modifying the shape of the convex hull of the softness ellipsoid, tolerance ellipsoid, and patches. You do this by manipulating the vertices on the hull. The ellipsoid or patch box changes shape according to the new shape of the convex hull.
This can be an accurate way of modifying the sampled ranges since you can see the area of RGB colour space in which you are working and because you can plot specific parts of the image and add them to the hull. Also, scaling the ellipsoid using one vertex of the convex hull provides a more precise (localized) result than scaling using the arrow alone (using 0).
To change the shape of the convex hull, you can add and move vertices, or delete vertices from the convex hull entirely.
Before performing the following operations, set up the RGB viewer to best display the elements you are working with. Zoom in on the element, decide if you want to show the histogram, and hide elements that are in the way.
To reshape the convex hull of the tolerance or softness, the ellipsoid must be displayed. It must be set to Ellipsoid, Wireframe, or Cloud. Likewise, when reshaping patches, the patch box must be displayed. The box is displayed when the Display is set to Cloud, Box, or Box&Surf.
It is best to show the convex hull. Although it is not necessary to perform the operation—unless you are deleting vertices, you can see what you are doing more clearly. See previous sections in this chapter, such as Changing the Display of Key Elements.
To add vertices to the hull and move them:
- Select the key element by clicking it.
- Position the arrow of the selected element in the direction in which you want the ellipsoid or patch to grow or shrink. For example, point the arrow towards colours you want to include in your sample. Alternatively, plot a point to position the arrow. See Controlling Elements with the Directional Arrow.
- Press and hold V on the keyboard and click anywhere in the RGB viewer.
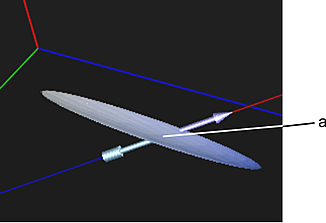
A vertex is added to the hull at the intersection of the arrow and the edge of the ellipsoid or patch.

(a) Vertex is added to the hull
Note: When using V in the RGB viewer, you can scale any convex hull (tolerance, softness or patches). If you use V in the image window, it will apply to softness only. - To add colours to the sample, drag the cursor to the right. This moves the vertex in the forward direction of the arrow.
To remove colours from the sample, drag the cursor to the left. This moves the vertex backward towards the centre of the element.
When you are satisfied with the result in the image window, release the cursor.
The hull is reshaped as you move the vertex. If you did not display the convex hull, it is temporarily displayed while you are moving the vertex. The direction of the arrow may change slightly as you move the vertex, but the direction it moves in is always the direction in which the arrow was initially pointing.
Note: You can release the V key and the cursor, then press them again to scale the same vertex. You retain control over the new vertex until you change the position of the arrow.
To remove a vertex from the convex hull:
- Display the convex hull of the key element, including the vertices. See Changing the Display of Key Elements. Note: You do not have to select a key element to delete a vertex from its convex hull.
- If necessary, zoom in on the element to distinguish the vertices more clearly.
- Press and hold the - sign on the keypad (not the one on the keyboard) and click on the vertex that you want to remove.