Characterizing an HIKCharacter Visually
Although you can successfully create a HumanIK characterization exclusively in your runtime code by calling functions provided by the HumanIK API, it is typically simpler to have an artist, animator or technical designer in your organization create the characterization in a visual design tool. This provides the artist with immediate feedback, allows them to test the characterization by applying IK or retargeting animations to the character, and allows the artist to adjust the characterization easily in response to the results of those tests. When the artist is satisfied with the characterization, he or she can export it to a file that you load into your game at runtime.
Options for visual characterization
Your artists can use any of the following visual tools to create a HumanIK characterization file.
MotionBuilder
MotionBuilder and HumanIK were developed from the same core technology, and continue to share many of the same requirements for mapping a skeleton to a built-in bio-mechanical model. Any working biped or quadruped characterization that you create in MotionBuilder should also work when used with the HumanIK API. However, in order to export your MotionBuilder characterizations to files that you can load using the HumanIK API, you must first build and install the HumanIK plug-in for your version of MotionBuilder.
Maya 2012 or later
As of the 2012 release, Maya includes tools that you can use to create a HumanIK characterization for your character skeleton, to animate your character using a HumanIK control rig, and to export your characterizations to binary files usable by the HumanIK SDK.
The HumanIK Characterization Tool
If you do not use a supported version of either MotionBuilder or Maya in your organization, you can still create HumanIK characterizations visually using the Characterization Tool supplied with the HumanIK SDK.
The Characterization Tool is available as:
- A plug-in for Maya 2011.
- A plug-in for Softimage 2011.
- A standalone version that creates characterizations from the contents of FBX files.
These versions of the Characterization Tool are included in the HumanIK packages for Windows platforms, in subdirectories within the tools directory. Each version has an accompanying documentation that explains its installation and usage. This documentation can also be opened from within the Characterization Tool interface itself.
Your artists can use whichever version fits most smoothly into your pipeline.
Step 1. Create and save the characterization in your visual tool
Briefly stated, the artist must:
- Set up the character's skeleton in its default T-stance, as shown under The Default T-Stance.
Note that quadruped characters have special requirements: if you are planning to use HumanIK for a quadruped character, read the important information under Using HumanIK for Quadrupeds.
- Create a mapping between the bones in the character and the Nodes understood by HumanIK.
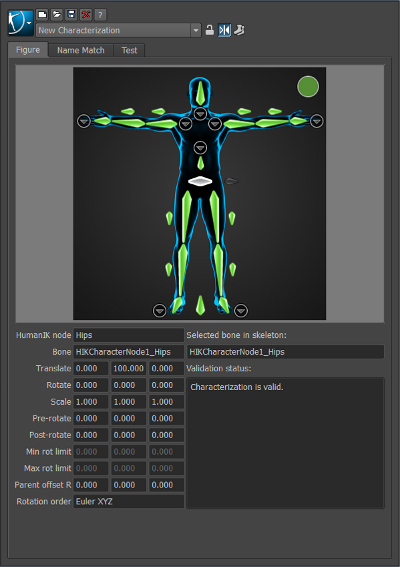
Depending on the tool you are using, and which release of that tool you have installed, this step may be done in slightly different ways; see the documentation for your tool. All tools use a visual interface similar to the following:
You must map the bones in your character's skeleton to the various Nodes shown in this figure view. Each Node's representation turns green when it has been successfully mapped to a bone.
The characterization tool automatically validates the geometry of your character's neutral stance, and reports any errors or warnings that it detects.
- Test your characterization.
- In MotionBuilder, or in Maya 2012 or later: You can create a new control rig for your character and test the results of moving your character's effectors to different places, changing their Reach and Pull values. You can also set up your new character as a target for animations recorded for a different character.
- In the Characterization Tool: In the Test tab of the Characterization Tool window, you can see the results of retargeting various animations onto your newly characterized skeleton (without modeling or skinning). Some basic sample clips are provided with the tool, and you can add your own animation clips.
- Save or export the new characterization to a file. You will use the data in this file
to create new, fully characterized HIKCharacter objects in your HumanIK initialization code. This is done in different but similar ways depending on the
tool you are using.
- In MotionBuilder: Open the HumanIK plug-in for your character in the Properties window, and click the Save HIK Character button. This saves the characterization in a binary .hik file.
- In Maya or in the Characterization Tool: The window in which you created your characterization, or its main drop-down menu,
offers a control that lets you save or export your character definition to a binary
.hikc file. The artist can choose to save this file in little-endian or big-endian byte
order, to suit the target platform used at runtime. If the endianness of this file
does not match the endianness of the platform used at runtime, HumanIK automatically swaps the byte order of the data.
This file may be accompanied by an XML file that indicates the name of the bone in the character’s skeleton that the artist or rigger has mapped to each HumanIK Node. You can use the information in this file when you write the code that translates animation data at runtime between your FK animation system and your HIKCharacterStates. See Inverse Kinematics Solving and Retargeting Solving.
Step 2. Load or create an HIKCharacter from the exported file
The process for using the data in the binary file created by the artist to create a HumanIK character at runtime in your game is slightly different depending on the type of file you created.
Once you have loaded the characterization as described below, your HIKCharacter is ready for use. Continue with the steps listed under Initialization to set up the other HumanIK objects required for your character.
.hik file (from MotionBuilder)
Call the HIKLoadCharacter() function to create a new HIKCharacter from the data contained in the .hik file. This function requires the following arguments:
- The path and file name of the .hik file that contains your character.
-
The license key issued to you by Autodesk, Inc., if you are using an evaluation version of HumanIK. If you have included the autodeskmwkey.h file in your source code file as suggested under Setting Up the HumanIK License Key, you can use the pre-defined value AutodeskCustomerString. If you are using a fully licensed version of HumanIK, you can pass a null value.
-
A pointer to a callback function that will be invoked to allocate memory for the HIKCharacter. You can specify the standard malloc function, or any custom memory allocation method that satisfies the same type definition as malloc. See also HumanIK Objects and Memory Management.
HIKCharacter * MyChar = HIKLoadCharacter(
                                   "C:\data\hero.hik",
                                   AutodeskCustomerString,
                                   &malloc);
Alternatively, you can instead use the process outlined in the next section to read the character data from the contents of the binary file.
.hikc file (from Maya or the Characterization Tool) or .hik file (from MotionBuilder)
- Load into memory the .hikc file created for the character, using whatever file management interface you use in your project.
- Create a new object of the HIKCharacterDefinition class. For example:
HIKCharacterDefinition MyDef;
- Call the HIKReadFromStream() function to create a new HIKCharacter from the data contained in the .hikc file. This function requires the following arguments:
- A pointer to the HIKCharacterDefinition object you created above. This object will be updated to indicate which Nodes are used by your new character, and which have Degrees of Freedom and parent offsets.
-
A pointer to the location in memory of the contents read from the exported file.
-
A pointer to a callback function that will be invoked to allocate memory for the HIKCharacter. You can specify the standard malloc function, or any custom memory allocation method that satisfies the same type definition as malloc. See also HumanIK Objects and Memory Management.
-
A pointer to a callback function that will be invoked to de-allocate memory. You can specify the standard free function, or any custom memory de-allocation method that satisfies the same type definition as free. See also HumanIK Objects and Memory Management.
-
The license key issued to you by Autodesk, Inc., if you are using an evaluation version of HumanIK. If you have included the autodeskmwkey.h file in your source code file as suggested under Setting Up the HumanIK License Key, you can use the pre-defined value AutodeskCustomerString. If you are using a fully licensed version of HumanIK, you can pass a null value.
HIKCharacter * MyChar = HIKReadFromStream(
                                   def,
                                   stream,
                                   streamSize,
                                   &malloc,
                                   &free,
                                   AutodeskCustomerString,
                                   );
- Close the file stream you opened in step 1.
 Except where otherwise noted, this work is licensed under a Creative Commons Attribution-NonCommercial-ShareAlike 3.0 Unported License. Please see the Autodesk Creative Commons FAQ for more information.