Mapping Joints to HumanIK Nodes and Effectors
The HumanIK inverse kinematics and retargeting solvers compute stances for HIKCharacters based on their movement capabilities, which are defined in part by the construction of their skeletons. In bipeds and quadrupeds, characters’ Nodes are expected to be connected in certain typical arrangements: for example, the right shoulder is a parent Node of the right elbow, which in turn is a parent Node of the right wrist. The HumanIK bio-mechanical model is equipped with knowledge about the ways these Nodes are able to move; when the solvers need to move one or more Nodes to meet the requirements of an HIKEffectorSetState or a source animation, they use this built-in knowledge to construct new poses.
However, in order for this process to control one of your own characters, you need to map each of the joints in your character’s skeleton to one of the Nodes understood by HumanIK. Each of these Nodes has a unique descriptive ID, listed in the HIKNodeId enumeration. The following sections give guidelines for understanding the naming conventions of this enumeration, and for choosing appropriate Nodes for your character’s joints.
Required Nodes and common Nodes
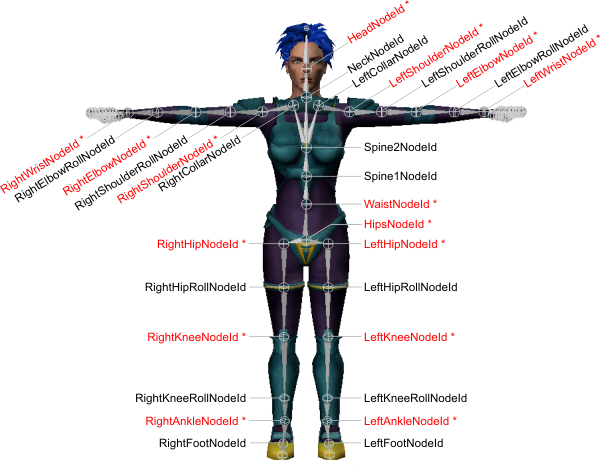
The following image shows the unique IDs of the most commonly used Nodes.
Required Nodes
HumanIK requires a specific minimal set of Nodes to be present in every character it controls. These required nodes are indicated in the image above by red type and asterisks.
- The HipsNodeId should be mapped to the bone that is the parent of your character’s spine and leg chains.
- The LeftHipNodeId and RightHipNodeId should be mapped to the first bones in your character’s upper legs.
- The LeftKneeNodeId and RightKneeNodeId should be mapped to the first bones in your character’s lower legs.
- The LeftAnkleNodeId and RightAnkleNodeId should be mapped to the first bones that extend from your character’s ankles into its feet.
- The WaistNodeId, which represents the base of the spine, should be mapped to the first bone in the spine that is above the bone you map to the HipsNodeId Node.
- The LeftShoulderNodeId and RightShoulderNodeId should be mapped to the first bones in your character’s upper arms.
- The LeftElbowNodeId and RightElbowNodeId should be mapped to the first bones in your character’s forearms.
- The LeftWristNodeId and RightWristNodeId should be mapped to the first bones that extend from your character’s wrists into its hands.
- The HeadNodeId should be mapped to the last full bone in your character’s spine: i.e. not the tip of the head, but the last full bone in the neck chain. This is typically the bone that controls the skinning of the head.
Spine and neck
HumanIK supports up to nine additional spine Nodes (Spine1NodeId to Spine9NodeId), and up to ten neck Nodes (NeckNodeId, plus Neck1NodeId to Neck9NodeId). These Nodes are numbered from bottom up, with lower numbers closest to the hips and higher numbers closer to the head.
- The first bone in your character’s spine should be mapped to the required WaistNodeId Node (see Mapping Joints to HumanIK Nodes and Effectors above).
- Each succeeding bone in your character’s spine should be mapped to the next available spine Node (Spine1NodeId, Spine2NodeId, Spine3NodeId, etc.), up until the point at which your character’s collar or shoulder bones are connected to the spine. HumanIK always assumes that the arms are connected to the last Node characterized in the spine.
- The first bone in your character’s spinal column that is not mapped to a spine Node should be mapped to the NeckNodeId.
- Each succeeding bone that lies between the bones you have mapped to the NeckNodeId and to the HeadNodeId should be mapped to the next available neck Node (Neck1NodeId, Neck2NodeId, Neck3NodeId, etc.).
You may not skip a number when defining spine or neck Nodes. For example, you cannot map a bone to Spine3NodeId without also mapping Spine1NodeId and Spine2NodeId.
Hands and feet
Hands and feet are almost exactly equivalent in HumanIK; each foot and each hand can contain the same types of joints, only their parenting relationships are slightly different. You define each of your character’s feet and hands independently, which allows for a great deal of complexity within each character. For example, a pirate character could have one peg-leg with no joints at all below the ankle, one booted foot with a single joint at the base of the toes but without fully articulated toes, one fully articulated hand, and one injured hand missing some fingers.
Fingers and toes
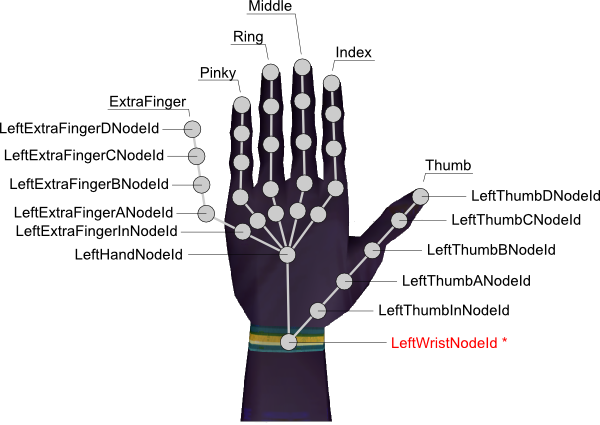
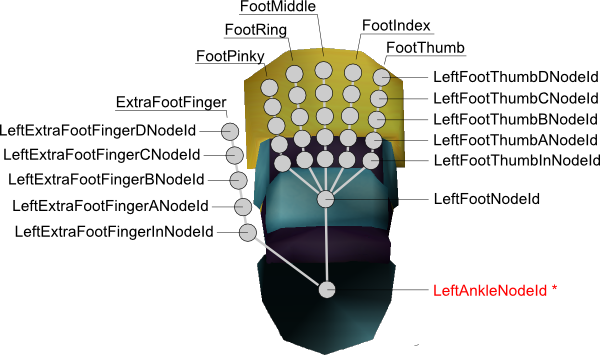
HumanIK allows you to characterize up to six fingers for each hand and each foot: the five fingers of the human skeleton (referred to as the thumb, index, middle, ring, and pinky), plus an extra sixth finger or toe.
Each finger and each toe is a joint chain that can contain several HumanIK Nodes. The images above show all the Nodes that can be characterized for all fingers and toes. Only the Nodes in the thumb and extra fingers are named in full above; however, the joints in the remaining fingers and toes follow the same naming conventions. See the HIKNodeId enumeration for a complete list.
- Each finger and each toe can have up to four main joints, identified as A, B, C and D as indicated in the image above. You may not skip a letter when defining these finger or toe Nodes. For example, you cannot have the LeftIndexCNodeId Node without having both the LeftIndexANodeId and LeftIndexBNodeId Nodes.
- For special effects, each finger and each toe also offers an additional extra in-hand joint at the base of the finger or toe (for example, LeftPinkyInNodeId in the hand image above). These Nodes are entirely optional, and may be omitted.
The joint chains that represent the fingers and toes are connected to the rest of the character’s skeleton as follows:
- The thumbs on the hands are always connected directly to the wrist Node.
- The extra toes on the feet are always connected directly to the ankle Node.
- All other fingers and toes are connected to the optional hand Node or foot Node, if it is characterized (i.e. LeftHandNodeId and LeftFootNodeId in the images above). When the optional hand or foot Node is not characterized, these fingers and toes attach directly to the wrist or ankle Node instead (i.e. LeftWristNodeId and LeftAnkleNodeId in the images above).
When you characterize fingers and toes for your character, it is generally recommended to map the tip of each of your character’s fingers or toes to a Node. This is particularly true when retargeting animations between characters with different numbers of fingers or finger joints. This is because the Effector for each digit determines the placement of the last characterized Node in that joint chain. If the last characterized Node is at the tip of the finger, you can therefore use the Effector to control the placement of your character’s fingertips. See also Effector Placement.
Hand and foot Node
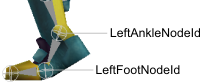
The optional hand and foot Nodes, LeftHandNodeId, RightHandNodeId, LeftFootNodeId, and RightFootNodeId respectively, can provide joints at the base of your character’s fingers and toes. This Node is used most often in situations where the full articulation of each toe or finger is not required, but where bending the hand or foot increases realism. For example, in the case of a human character with a closed shoe, the foot Node allows the foot to bend at the base of the toes, as shown below, even though no Nodes are defined for the individual toes.
Special Nodes
In addition to the Nodes discussed above, HumanIK supports the following Nodes for special effects.
Collar and extra collar Nodes
Your character’s skeleton can contain additional collar bones on the left and right sides of the body, defined by the LeftCollarExtraNodeId and RightCollarExtraNodeId Nodes. These additional collar bones can help to simulate the movements of a human’s shoulder as the arm raises.
The extra collar bone Nodes, if enabled, are between the collar bone Nodes and the shoulder Nodes—i.e. LeftCollarExtraNodeId lies between LeftCollarNodeId and LeftShoulderNodeId, and RightCollarExtraNodeId lies between RightCollarNodeId and RightShoulderNodeId.
By default, HumanIK spreads collar rotations evenly between the collar Node and the extra collar Node. For instance, when the character raises its left arm, half of the rotation is applied to the LeftCollarNodeId and half to the LeftCollarExtraNodeId. However, you can control the ratio of the blending between the collar Node and the extra collar Node by setting the value of the HIKExtraCollarRatioId property. See General Properties.
Roll Nodes
HumanIK supports the use of roll Nodes for your character’s shoulders, elbows, hips and knees. Each of these roll Nodes is typically located approximately half-way between its associated parent and the next Node in the skeleton. For instance, the left shoulder’s roll Node is half-way between the left shoulder and left elbow, and the left elbow’s roll Node is half-way between the elbow and the wrist. Whenever a HumanIK solver applies roll rotation to a Node that has an associated roll Node, a percentage of that roll rotation can be applied to the roll Node instead. This process is referred to as roll extraction.
Roll extraction simulates the way biped and quadruped arms and legs actually rotate around their axes. It can greatly enhance the realism of the animations created for skinned characters by controlling skin deformations from more appropriate positions further along the limb.
By default, roll extraction is not activated for any roll Nodes. To enable roll extraction, you must activate a character property for each roll Node, and set the value of that property to indicate the percentage of the roll rotation that should be applied to the roll Node instead of the parent Node.
For details, see Using Roll Extraction.
Reference Node
The reference Node, ReferenceNodeId, is intended as an optional repository for the overall translation, rotation and scale of your character. Consider it an abstract parent to your character’s hips.
In most cases, you do not need to use the reference Node. It is intended primarily for the following situations:
- When you are performing a retargeting with the HIKForceActorSpaceId property on. In this case, modifying the state of the reference Node in your target character’s HIKCharacterState is the only way to change the translation, rotation and scaling of the target character. This modification is typically done before the call to the retargeting solver, using either the HIKSetNodeStatefv() or HIKSetNodeStateTQSfv() function.
- When your model’s hips have a parent that defines the translation, rotation and scaling of the character, it may be convenient to use the reference Node to synchronize data from that parent into HumanIK.
Hips translation
The hips translation Node, HipsTranslationId, is used as an independent repository for the translation of your character’s hips. If you have enabled this Node for your character, and the HumanIK solver needs to offset the translation of your character’s Hips, the resulting translation is stored back in the hips translation Node rather than the HipsNodeId Node.
By default, the rotation of the hips is still stored in the HipsNodeId Node, even when the HipsTranslationId Node is enabled. However, you can configure HumanIK to store the rotation of the hips in the HipsTranslationId Node by setting the value of the HIKHipsTranslationModeId property for your character to 1. In this case, neither translation nor rotation is applied to the HipsNodeId Node.
You can also use the HipsTranslationId Node to retarget the trajectory of a source character to a target character. For details, see Retargeting Animation Trajectories.
Topics in this section
 Except where otherwise noted, this work is licensed under a Creative Commons Attribution-NonCommercial-ShareAlike 3.0 Unported License. Please see the Autodesk Creative Commons FAQ for more information.