Sketch a traffic study area to analyze traffic flow through intersections, display color-coded traffic analysis results, and generate traffic simulation animations to play in your model
- Open the model of interest and navigate to the area to study.
- Click


 .
.
Traffic simulation mode starts and design roads are highlighted. If the roads in the study area are not design roads, right-click to enter Edit mode. Select each planning road in turn, right-click, and click Convert to Design Road.
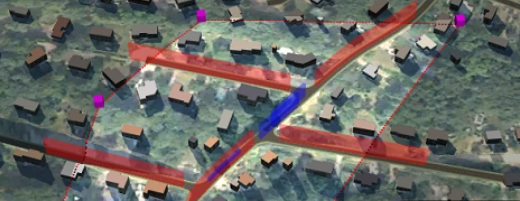
- Click points in your design to draw a traffic study area.
As you draw the traffic study area, demand zones are added where the study area crosses design roads. Demand zones are destinations or origins for trips.
- Double-click to complete the traffic study area.
An asset card for the traffic study area is displayed.
- Click Run Simulation in the traffic study area asset card to run the simulation and create an animation file.
This can take some time. When the analysis is complete, the Animation Player lists the animation with a status of Ready.
- On the Traffic Study Area asset card, set Result Volumes to Per Lane, Per Approach, or Off.
Color-coded queue lengths based on demand are added to the traffic study area. The color represents the delay time. Queues are shown as red if the delay exceeds a threshold.
- Use the Animation Player to run traffic animations.
You can adjust the speed of the animation as needed using the speed buttons in the Animation Player.Note: It's easier to see traffic animation if you set Result Volumes to Off.
To adjust demand, signal timing, and other parameters, use the Traffic Analyst Panel. For more information, see To configure advanced traffic analysis.