The items in this menu are also available from the toolbar.
UV Lattice Tool
Manipulates the layout of UVs as a group by letting you create a lattice around the UVs for deformation purposes.
Lattice Settings
- Columns
-
Specifies the number of columns for the current lattice manipulator. The minimum number of columns is 2 and maximum number is 8.
- Rows
-
Specifies the number of rows for the current lattice manipulator. The minimum number of rows is 2 and the maximum number is 8.
- Falloff
-
Specifies the lattice manipulator's level of influence or falloff value.
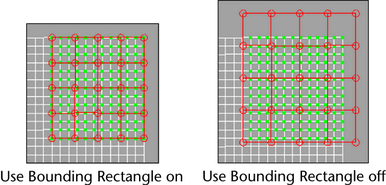
- Use Bounding Rectangle
-
When on, the current lattice manipulator cannot extend past the outer edge or boundary of the target geometry.

Snap Settings
The lattice snap settings are relative to each UV affected by the lattice. Pixel Snap (Image > Pixel Snap) needs to be on in the UV Editor for the UV Lattice Tool Snap Settings to have any effect.
- Placement
- Select where control points snap to.
- Snap Corner
-
When on, the UV lattice deformer’s control points snap to the corners of each UV.
- Snap Center
-
When on, the UV lattice deformer’s control points snap to the centers of each UV.
UV Smudge Tool
Moves the position of selected UVs and their neighboring UVs to a diminishing extent that is user defined.
- Effect type
-
Select the way the UVs follow the brush tool.
- Fixed
-
Moves the selected UVs in the direction of the UV Smudge Tool brush’s movements. UVs appear to follow or move with the brush. This setting moves UVs similar to the way the Soft Modification Tool moves vertices.
- Smudge
-
Drags or smudges UVs in the direction of the UV Smudge Tool brush’s movements.

- Falloff Type
-
Select the way that the UV movement falls off as the brush moves.
- Exponential
-
Moves UVs based on the distance they are from the UV Smudge Tool brush. A UV moves exponentially more the closer it is to the brush.
- Linear
-
Moves UVs based on the distance they are from the UV Smudge Tool brush. A UV moves linearly more the closer it is to the brush.
- Constant
-
Moves all UVs the same amount in the direction of the UV Smudge Tool brush’s movements.
- Smudge Size
-
Sets the size of the UV Smudge Tool brush.
In the UV Editor’s view, you can also press b + drag to resize the Smudge Tool brush.
- Pressure
-
Sets the magnitude of the smudge and specifies how much the UV Smudge Tool brush affects the selected UVs.
This is only available when the selected Effect Type is Smudge.
- Middle Mouse Initiates
-
When on, middle-drag to smudge the layout of your UVs. When off, drag to smudge the layout of your UVs.
Move UV Shell Tool
Lets you select and reposition a UV shell in the 2D view of the UV Editor by selecting a single UV on the shell. You can automatically prevent the repositioned UV shell from overlapping other UV shells. See also UV Editor overview.
- Prevent overlap
-
The Prevent overlap setting restricts a UV shell from being accidentally moved to a position where it would overlap existing UV shells in the UV Editor view. It is on by default. For example, if you select and move a UV shell and reposition it to an area that is already occupied by an existing UV shell, the selected shell will do one of the following:
- Snap back to its previous location (when the overlap is large).
- Snap to the closest location possible based on the direction you dragged the UV shell (when the overlap is small).
- Shell spacing
-
Specifies the distance the repositioned UV shell will be separated from other existing UV shells as a percentage of the map size when Prevent overlap is turned on.
- Placement iterations
-
Specifies the number of times the tool checks between the start and end positions when translating one or more UV shells in order to optimally achieve the Shell spacing distance without snapping back to the original location. A higher number produces the closest result possible, but takes longer to complete the move. The number of selected UV shells also affects the time to complete the move. The default setting is 16.
Smooth UV Tool
Lets you interactively unfold or relax UVs. Select a group of UVs, and then drag the Unfold or Relax controls to the right. For more information, see Optimize UVs or Unfold a UV mesh.
- Pin Borders
-
When on, the border UVs of the selected UV set will not move when the Unfold or Relax controls are moved.
- Space
-
Allows you to adjust whether you Unfold or Relax the UVs in UV Space or World space.
Tweak UV Tool
Lets you reposition UVs in the UV Editor without using a manipulator. See Tweak UVs.
- Tool Snapping
- Specifies the size of the snapping area around the
Tweak UV Tool manipulator. By default, the manipulator snaps to the nearest UV. Increase the
Tool Snapping value for a greater snapping effect. The default value is 10.
Tip: You can also adjust Tool Snapping by double-clicking the Tweak UV Tool
 icon in the
UV Editor toolbar.
Unfold UV Tool
For more information, see Unfold UV and Optimize UV Tools.
Optimize UV Tool
For more information, see Unfold UV and Optimize UV Tools.
Cut UV Tool
For more information, see Cut UV Tool.
Sew UV Tool
For more information, see Sew UV Tool.
Grab UV Tool
For more information, see Grab UV Tool.
Pinch UV Tool
For more information, see Pinch UV Tool.
Smear UV Tool
For more information, see Smear UV Tool.
Pin UV Tool
For more information, see Pin UV Tool.