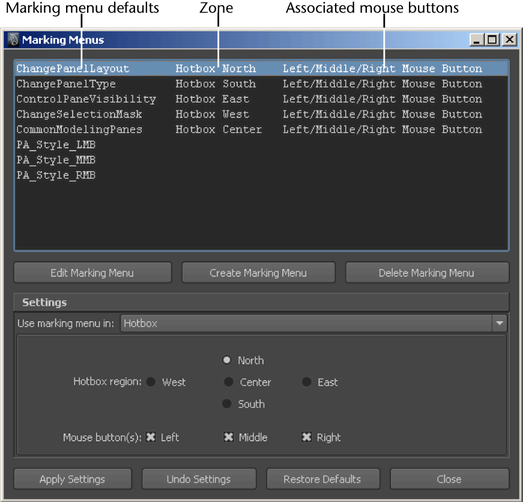
To open the Marking Menu Editor, select Windows > Settings/Preferences > Marking Menu Editor.
Use this editor to edit the available marking menus. Once you define a marking menu, you must assign it to a hotkey or add it to the hotbox before you can use it.

Create Marking Menu/Edit Marking Menu
In this dialog box, you can set the menu name and test your marking menu. To edit items within a marking menu, right-click on a marking menu icon and select Edit Menu Item.
Marking menu item editor
This editor appears when you edit a marking menu item.
- Label
-
Enter the name of the marking menu item.
- Icon Filename
-
Enter the name of the icon file.
- Command(s)
-
Enter the MEL script used as the command for the menu item. You can middle-drag the MEL script from the bottom panel of the Script Editor.
- Check Box
-
Displays a check box beside the marking menu item.
- Radio Button
-
Displays a radio button beside the marking menu item.
- Neither
-
Displays nothing beside the marking menu item.
- Option Box
-
Turn Option Box on to display the option box
 beside the menu item so you can change a tool’s options from the marking menu. Note: If the tool or action does not have an options window, use MEL code to create the box. Once the box is created, write MEL code to invoke the option window. For more information on MEL commands, see Run MEL commands.
 - Option Box Command(s)
-
Enter the MEL script to use as the command for the menu item’s option box.
Settings
- Use Marking Menu in
-
Specify whether the marking menu is linked to the Hotbox or a hotkey.
- Hotbox Region
-
If you selected Hotbox for Use Marking Menu in, select the Hotbox zone the marking menu occupies: North, South, East, West, or Center.
- Mouse Button(s)
-
Select the left, middle, or right mouse button used to display the marking menu. You can select one, two, or three mouse buttons.
Assign menu to hotkey in the Hotkey Editor
If you want to assign the marking menu to a hotkey, you will configure the hotkey in the Hotkey Editor. To open the Hotkey Editor, select Windows > Settings/Preferences > Hotkey Editor.