Quick Rig tool
The Quick Rig tool is a time-saving shortcut to accomplish what is typically an expert-level task. This tool simplifies the process of creating a fully-rigged character so that anyone with a character mesh can create a basic animated character. Use the Step-by-Step rigging method to be guided through the process and tweak your rig with custom options.
Shape Authoring with the Shape Editor
The new Shape Editor replaces the Blend Shape Editor as the place to create, edit, and manage shapes. New features include soloing, grouping, mirroring, flipping, duplicating, and importing and exporting shapes.
For even more control you can create combination target shapes, add in-between target shapes, and create pre-skinning or post-skinning corrective shapes.
There are several short workflow videos to support this new Shape Authoring workflow.
To open the
Shape Editor, from the
Sculpting shelf, click
 , or select
Windows > Animation Editors > Shape Editor from the main menu bar.
, or select
Windows > Animation Editors > Shape Editor from the main menu bar.
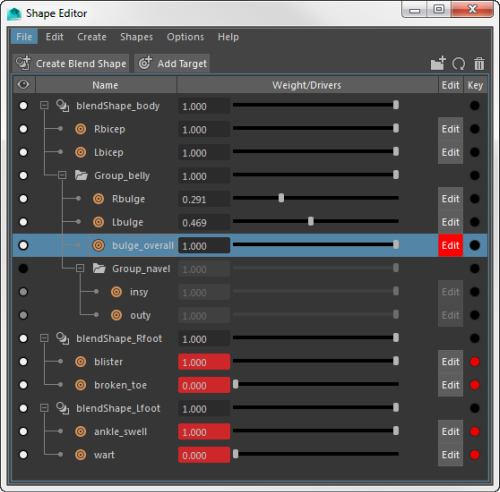
- New target shapes can now also be Tangent Space and Transform Space based. See Add Blend Shape Target Options. UV mapping is no longer required for tangent-space post-deformation target shapes.
- You can now edit a target shape when its weight value is 0. This is more consistent with how the Transform tools work. See Set weights for target shapes.
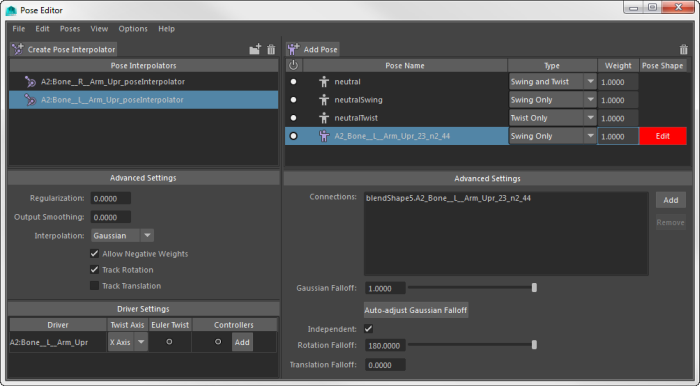
The Pose Editor and pose space deformations (PSD)
The new Pose Editor is where you can create pose space deformations for skinned characters and save them as corrective shapes. It provides a pose interpolation system that reads joint transformations in order to drive blend shape weights. See Create pose space deformations for general workflow information and a video.
To open the
Pose Editor, from the Sculpting shelf, click
 , or select
from the main menu bar.
, or select
from the main menu bar.
See Pose Editor for more information.
Character Controls renamed
The Character Controls window has been renamed the HumanIK window.
HIK updates
Roll Bone improvements
A new HumanIK roll bone system lets you create more realistic character animations and skin deformations. When creating a new skeleton using the HumanIK window (Window > Animation Editors > HumanIK), new fields in the Skeleton tab let you add a maximum of five new roll bones per limb, giving you greater control over the rotation of your character's upper arms, lower arms, upper legs, and lower legs. If you want to define an existing skeleton with roll bones, you can use the Definition tab to map a maximum of five roll bones. All roll bones are parented to the same limb bone, and the rotation per roll bone is determined by the number of roll bones per limb. See Define roll bone behavior and Edit an existing HumanIk skeleton definition.
Save skeleton definitions
The new Path field in the Save Skeleton Definition window lets you specify a location to save your HumanIK naming templates.
Control clips in the Game Exporter
Animators can now control the timing of clips in the
Game Exporter (File > Game Exporter) quickly and efficiently. Click
 in the
Animation tab to frame the
Time Slider's playback range on a clip, and then Ctrl + LMB-drag the
Start or
End frames to adjust the playback range, and see the animation automatically update in the viewport. Right-click the
Start and
End frames to
Increment or
Decrement the current values, or set them to the current time in the
Time Slider. See
Export animation clips with Game Exporter.
in the
Animation tab to frame the
Time Slider's playback range on a clip, and then Ctrl + LMB-drag the
Start or
End frames to adjust the playback range, and see the animation automatically update in the viewport. Right-click the
Start and
End frames to
Increment or
Decrement the current values, or set them to the current time in the
Time Slider. See
Export animation clips with Game Exporter.
Animation controllers
- Identify which models are meant to control animation
- Define custom pickwalking hierarchies
- Enable 1-click select drag of controllers
- Associate skin regions to controllers for direct surface manipulation
- Enable in-view controller attribute editing
Tag objects as Controllers with the new Controller options in the Control menu. You can turn on/off Controller prepopulation with a new Include Controllers in Evaluation Graph setting in the Animation (Settings) preferences.
Controller command
A related controller command provides support for creating these controller nodes and the required DG connections. This way you do not need to manually create and connect nodes. See the Technical Documentation for information on controller commands.