Override the material applied to the objects in a collection in one of two ways: create a material override to override the shading group, or a shader override to override the surface shader.

Create a material override to override the shading group
- Ensure that the shape node of the objects are part of the collection.
You can do this by selecting the shape nodes and clicking Add in the Property Editor, or by including them using an expression.
- Right-click the collection and select Create Material Override.
- Click the map button
 beside the
Override Material attribute in the
Property Editor and select the new material that you want to assign to the objects in the collection.
To override the object's shading group with an existing material, middle-drag and drop from the Hypershade Browser panel to the Override Material attribute.
The Override Material attribute in the Property Editor indicates *SG; for example, blinn2SG, indicating that the override is connected to a shading group.
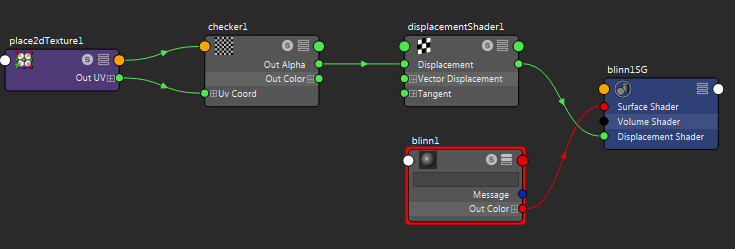
Connection between your original shading material to a displacement shader is not preserved since the shading group node has been replaced. You can create a shader override instead to preserve this connection.
A common use case is when you want to apply an ambient occlusion shader to create an ambient occlusion pass. In this example, if you were to create a material override and replace blinn1SG, you would lose the connection to your displacementShader and you would need to reconnect your displacementShader to your new shading group as a result.

Instead, you can create a shader override to replace only the blinn1 shader with an ambient occlusion shader. This way, the connection to displacementShader is preserved. The aiAmbientOcclusion shader from the 3rd party renderer Arnold is used in this example, courtesy of Solid Angle.

Create a shader override to override the surface shader
- Ensure that the shape node of the objects are part of the collection.
You can do this by selecting the shape nodes and clicking Add in the Property Editor, or by including them using an expression.
- Right-click the collection and select Create Shader Override.
- Click the map button
 beside the
Override Shader attribute in the
Property Editor and select the new surface shader that you want to assign to the objects in the collection.
To override the object's surface shader with an existing shader, middle-drag and drop from the Hypershade to the Override Shader attribute.
Shader overrides are not collection specific. The shader override will be applied to all objects (and instances of objects) that are in the same layer and that have the same material assigned initially, even if these objects belong to a different collection.
 ; click this to refresh your layer and see the updated result. The same applies to material overrides.