Forbidding, Avoiding, and Preferring NavTags
If you use NavTags to tag areas of your terrain with custom data, you can determine which of these NavTags are considered valid walkable terrain for each of your characters, even when those characters are using the same Database (and therefore the same set of NavData). You can also customize the extent to which different bots prefer or avoid traversing different NavTags.
For example, the following image shows three possible paths across a street:
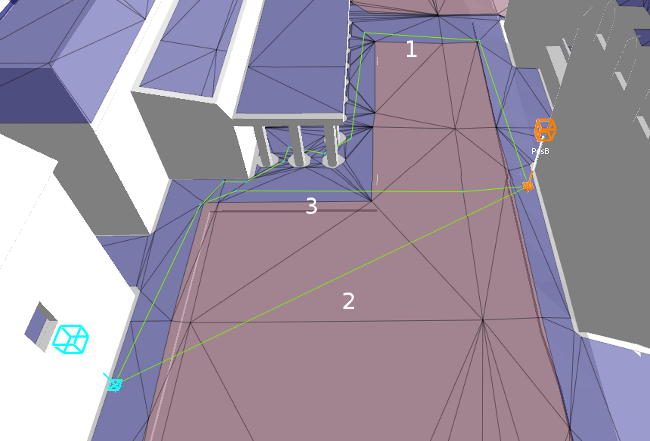
- In path number 1, travel across the purple NavTag is forbidden. This forces the path to cross the street at the crosswalk.
- In path number 2, the purple NavTag is considered navigable, and has the same cost as traveling through the untagged area. This allows a direct path from the start to the destination.
- In path number 3, the purple NavTag is considered navigable, but the cost of traversing it is twice as high as the untagged blue areas. This encourages the final path to minimize travel through the zone. Instead of crossing the widest part of the street, the path finds a narrower crossing that still represents a shortcut when compared to using the crosswalk.
Step 1. Tagging the terrain
For details on how to apply NavTags to your terrain, either during your data generation phase or dynamically over the course of your game, see Tagging with Custom Data.
Step 2. Writing a TraverseLogic
To forbid, prefer, or avoid NavTags in your own paths, you need to write a custom TraverseLogic class. This class is used for the following:
- During path calculation, to prevent the static path computed by the path finding query from crossing your forbidden NavTags.
- During path following, to prevent the bot from following shortcuts or splines across the forbidden NavTags, or from entering the forbidden NavTags to avoid other moving bots and obstacles.
You can also use this same TraverseLogic class to test NavTags any time you run other kinds of queries against the NavMesh. For example, if you run a RayCastQuery to detect whether or not any obstacles exist along a straight-line path between two points, you can set up your query with an instance of your class that it will use to determine which different NavTags are considered passable.
Following are the three TraverseLogic interfaces. Their default implementation has three different levels of complexity, and you can choose the one that meets your requirements.
- SimpleTraverseLogic – This is the simplest interface with no customization of the cost. It can only forbid or allow some NavTags, and has two mandatory functions: SimpleTraverseLogic::CanTraverseNavTag() and SimpleTraverseLogic:: GetHeuristicFromDistanceToDest().
- TraverseLogicWithCostMultiplerPerNavTag – This interface can forbid some NavTags and customize the cost according to the NavTag. It has two mandatory functions: TraverseLogicWithCostMultiplerPerNavTag::CanTraverseNavTag() and TraverseLogicWithCostMultiplerPerNavTag::GetHeuristicFromDistanceToDest().
- TraverseLogicWithCostPerTriangle – This interface can assign different costs to triangles in the same NavTag. It must be done carefully because the result depends on the tessellation of the NavMesh. If the tessellation is not dense enough, the behavior becomes erratic. It has three mandatory functions: TraverseLogicWithCostPerTriangle::CanTraverseNavTriangle(), TraverseLogicWithCostPerTriangle::CanTraverseNavGraphEdge(), and TraverseLogicWithCostPerTriangle::GetHeuristicFromDistanceToDest().
When one of the TraverseLogic is passed as a template parameter to a NavigationProfile or query, the corresponding code is automatically generated. See Step 3. Setting up the TraverseLogic.
Computing and storing the cost multiplier of triangles
In TraverseLogicWithCostPerTriangle, the cost multiplier of a triangle is requested many times during a single PathFinderQuery. To avoid performance issues because of poor implementation, a TriangleCostMap class is used for computing and storing the cost multiplier of some triangles, which can be accessed by the queries. You need to write your own TriangleCostMap class that derives from ITriangleCostMap. It has only one pure virtual Recompute() function.
The ITriangleCostMap must be bound to a database through the BindToDatabase() function before it is used. The database can call the Recompute() function internally when something changes in the triangulation of the data such as, the dynamic NavMesh. It can be called by the client to update its cost multipliers, but this must not be done frequently. You can call these helper functions: ITriangleCostMap::InitAndBrowseAllTrianglesInBox3f() and ITriangleCostMap::InitAndPropagateInTrianglesFromPosInVolume() in Recompute() to automatically initialize and set the cost multiplier of triangles. See itrianglecostmap.h for more information.
You can write your own way of setting cost to triangles, but you must make sure that the InitCostMapForBox3f() function is called before calling the SetCostMultiplier() function on triangles to change the cost multiplier (the default cost multiplier is 1.f).
You must not change the cost of triangles while some bots are path finding on the triangles. It is recommended to cancel the asynchronous path computation of the bots that use TriangleCostMap. You must not update the TriangleCostMap frequently, otherwise the bots might not get enough time between two updates to find a path. The following code example shows what can be done in the Recompute() function to cancel the path computations:
for (KyUInt32 i = 0; i < gameWorld->GetBots().GetCount(); ++i)
    {
        GameBot* gamebot = gameWorld->GetBots()[i];
        Kaim::Bot* navBot = gamebot->GetBot();
        if (navBot->IsComputingNewPath())
            navBot->CancelAsyncPathComputation();
    }
You can decide whether the bots that are already following a path need to relaunch a path computation to keep following a path that is coherent with the updated TriangleCostMap.
See also the DefaultTraverseLogic class, which is used by default when you do not set up your own TraverseLogic. If you derive your custom class directly from DefaultTraverseLogic or SimpleTraverseLogic, you only need to implement the override methods to achieve the behavior you want.
Controlling NavTag transitions
By default, the DefaultTraverseLogic or SimpleTraverseLogic classes prevent all movement through forbidden NavTags.
In some particular cases, however, you may want to forbid navigation across a NavTag in only one direction, or only from certain other NavTags. In this approach, you permit movement across the area covered by the NavTag, but you forbid movement across the NavTag boundary.
- Derive your class directly from SimpleTraverseLogic, and provide Kaim::LogicDoUseCanEnterNavTag as a template parameter. For example:
class MyTraverseLogicClass : public Kaim::SimpleTraverseLogic<Kaim::LogicDoUseCanEnterNavTag>
{
    ...
};
Alternatively, if you are writing your own TraverseLogic class from scratch rather than deriving from one of the existing classes, include the following line in your class:
- Set up your implementation of the CanTraverse() method to permit movement across the NavTag.
- Set up your implementation of the CanEnterNavTag() method to determine whether or not the transition to the NavTag from the previous NavTag should be allowed.
For best performance, you should only set up your TraverseLogic to check NavTag transitions if you have a specific gameplay use case.
User data
All of the methods in the TraverseLogic interface are static; they are therefore not tied to any particular object or state. This saves on runtime memory by avoiding the need to create any class instances at runtime for your bots and queries to use.
However, in order for your TraverseLogic to make good decisions about whether or not NavTags need to be forbidden, or what cost multipliers ought to be assigned to different NavTags in different circumstances, you may need to use some kind of data tied to a particular instance of an object. For this reason, the TraverseLogic methods all accept a void pointer. Each class that is templated to use a TraverseLogic—most notably the Bot class, and query classes such as the AStarQuery and RayCastQuery—offer accessors that you can use to set and retrieve the user data that the Bot or Query passes whenever it needs to call a method in the TraverseLogic interface. For example:
Step 3. Setting up the TraverseLogic
- Write your own class that derives from the NavigationProfile class, and pass the name of your TraverseLogic class as a template parameter for
NavigationProfile. You do not have to override any of the virtual methods in the NavigationProfile class if you do not need to; for example:
class MyNavigationProfile : public Kaim::NavigationProfile<MyTraverseLogicClass>
{
};
- Set up your World and Bots to use your new NavigationProfile. For details, see Customizing Path Following.
To set up a Query that you will process yourself:
- Simply pass the name of your TraverseLogic class as a template parameter when you
instantiate the query. For example:
Kaim::RayCastQuery<MyTraverseLogicClass> query;
Limitations
- When validating paths after changes in the surrounding NavData, the navigability of new NavTags is taken into account, but the cost multiplier is not. If you spawn a new NavTag in an area crossed by an existing path, and that NavTag is considered forbidden by the CanTraverse() or CanEnterNavTag() method, the path will be marked as invalid at the NavTag transition. However, if the new NavTag is considered passable, the path is not marked as invalid, even if the cost multiplier that would be assigned to that NavTag by the GetCostMultiplier() method is high.
- Your TraverseLogic is not used by the reactive dynamic avoidance system. Therefore, it is possible that your Bots may cross slightly into forbidden NavTags when avoiding other dynamically moving characters and obstacles.
How costs are calculated
The cost of each path segment is calculated individually by a RayCanGoQuery that is run internally by the AStarQuery or by the path following system to test that the way is clear of obstacles. Each time the line segment tested by the RayCanGoQuery crosses a NavTag boundary, the query projects that boundary point vertically on to the line segment. It then multiplies the distance of each sub-segment along its line segment by the cost multiplier assigned to the corresponding NavTag.
For example, in the following scenario, the line segment tested by the RayCanGoQuery crosses several different NavTags as it propagates through the triangles of the NavMesh:
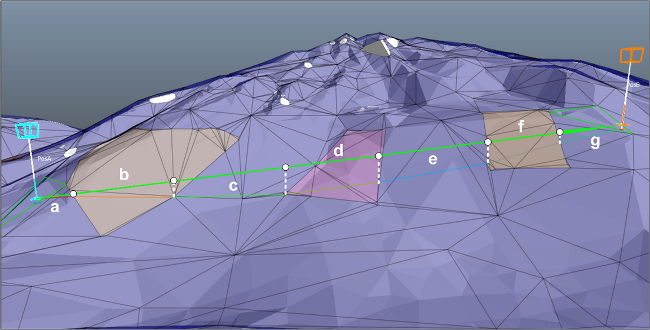
The total cost is computed as follows:
                        ( Distance(a) * CostMultiplier(blue) )
                    +   ( Distance(b) * CostMultiplier(grey) )
                    +   ( Distance(c) * CostMultiplier(blue) )
                    + ( Distance(d) * CostMultiplier(purple) )
                    +   ( Distance(e) * CostMultiplier(blue) )
                    +   ( Distance(f) * CostMultiplier(grey) )
                    +   ( Distance(g) * CostMultiplier(blue) )
When determining the cost for a complete path, each segment of the path is tested in this way, and the total cost is the sum of the costs of all segments.
Note that for performance reasons this method of measuring costs does not use the exact distance that is actually covered by the path through the triangles of the NavMesh, nor the exact distance that a character would move while following that path. However, the approximation should be close enough to permit you to find a set of cost multipliers that will produce the effect you need for your gameplay.
If you run a RayCanGoQuery directly in your own code, you can configure it to compute the cost of the line that it tests. Call its RayCanGoQuery::SetComputeCostMode() method and pass QUERY_COMPUTE_COST_ALONG_3DAXIS, and make sure to set up the query with the TraverseLogic that it should use to determine the navigability and cost multipliers for your NavTags. After you run the query, you can retrieve the cost by calling RayCanGoQuery::GetComputedCost().
Tutorial example
For a working code example that demonstrates the use of a custom TraverseLogic class to influence the path generated by the A* query and as a predicate to forbid specific NavTags during path following, see the Tutorial_NavTag.cpp file.
 Except where otherwise noted, this work is licensed under a Creative Commons Attribution-NonCommercial-ShareAlike 3.0 Unported License. Please see the Autodesk Creative Commons FAQ for more information.