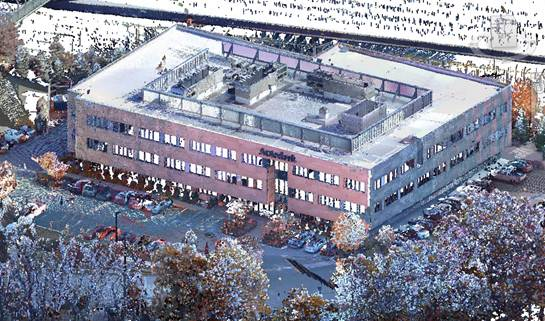
You can use point clouds to provide the existing condition of a building or site. Use this information as the a starting point for the Revit model.
In projects involving existing buildings, the need to capture the existing condition of a building is often a critical project task. Laser scanners can be used to capture 3D points with high accuracy from the surface of an existing physical object, such as a region of a building, and save this data as a point cloud. Typically, multiple locations of a building are individually scanned and registered together, resulting in a highly accurate 3D point cloud of a region or of the entire building.
The amount of data produced by this specialized laser scanner is typically huge (hundreds of millions to billions of points), so a Revit model links a point cloud as a reference rather than embedding the file. Multiple point clouds can be linked and multiple instances of each link can be created.

- generally behaves like a model object within Revit.
- displays in various modeling views, such as 3D, plans, and sections.
- is cut by plans, sections, and section boxes, allowing you to easily isolate sections of the cloud.
- can be selected, moved, rotated, copied, deleted, mirrored, and so on.
- can be snapped to, either through inferred planar snaps, or direct snaps to points in the point cloud.
Controlling visibility: Control the visibility of the point cloud on the Point Clouds tab of the Visibility/Graphics Overrides dialog. You can switch the visibility of the point cloud on or off and control the Color Mode for the points display.
- Planar Snapping—Revit only detects planes that are perpendicular to the current work plane (in plan, section, and 3D) and only in a small vicinity of the cursor. However, after the work plane is detected, it is used as a global reference until the view is zoomed in or out.
- Direct Point Snapping—Snapping directly to the point cloud is a low priority in the snapping order. This means that planar snaps, if detected, will always be initially displayed. If you would like to disregard the planar snaps and use the direct snaps, press the Tab key to cycle through the available snaps.
Managing linked point clouds: The Manage Links dialog includes a Point Clouds tab that lists the status of all point cloud links (types) and provides standard Reload/Unload/Remove functionality similar to other kinds of links.
Using point clouds in a worksharing environment: To improve performance and reduce network traffic, the recommended workflow for users who need to work with the same point cloud files is to copy the files locally. Because file systems may differ between local machines, there is a Point Cloud Root Path specified on the File Locations tab of the Options dialog. The path that is saved within the workshared Revit project is relative to this path. So, as long as the relative path to the local copies of the point cloud files is the same for each user, the link will remain valid when you synchronize with Central. The relative path is displayed as the Saved Path in the Manage Links dialog.