Matte/Shadow Objects and Camera Maps
Introduction
Often one wants to include synthetic1 objects into an existing
photographic background plate filled with real world objects,
for example, adding a yet-to-be-constructed building into an
empty lot, adding a virtual car onto a road, or having a virtual
character walk through a scene and realistically interact with
objects in the real world scene.
Two main shaders exists to facilitate this, mip_cameramap,
which "projects" an image from the camera onto geometry, and
mip_matteshadow which takes care of generating hold-out
mattes, as well as allowing the real world objects in the
photographic plate both cast and receive shadows, as well as
receive reflections and indirect light.
mip_cameramap
This shader is used to look up a color texture based on the surface
points on-screen pixel coordinate. The shader is similar in function to
mib_lookup_background from the base library,
but with the following important differences:
- The coordinate being looked up is the true "back transformation"
of the shading point into raster space, rather than just the
current rendered pixels raster position.
This means that the background is correctly seen in reflections
and refractions.
- It can perform a "per pixel" match, avoiding blurring of the
background due to interpolation.
declare shader "mip_cameramap" (
        color texture "map",
        scalar  "multiplier"               default 1.0,
        scalar  "degamma"                  default 1.0,
        boolean "per_pixel_match"          default off,
        boolean "transparent_alpha"        default off,
        boolean "offscreen_is_environment" default on,
        color   "offscreen_color"
    )
    version 4
    apply material, texture, environment
end declare
The map parameter is a color texture to be looked up,
and multiplier a multiplier for that map.
If necessary, the shader can apply an inverse gamma correction to
the texture by the degamma parameter. If gamma is handled
by other shaders in the chain, or if the global mental ray gamma
is used, use a value of 1.0, which means "unchanged".
When per_pixel_match is off, the texture is simply stretched
to fill the scene exactly. When per_pixel_match is on, the
lower left pixel of the map is exactly matched to the lower left rendered
pixel. If the pixel size of the map and the pixel size of the rendering
is different a warning is printed, but the image is still rendered
although the image will be cropped/padded as needed.
Sometimes one wants the shader applied as a background, but still want
to extract information from the alpha channel.
If transparent_alpha is on, the alpha values is always zero.
If it is off, the alpha value from the texture is used.
The shader performs a true "reverse transform" of the shading
point into raster space. While this by necessity results in an on-screen
location for eye rays, this is not so for reflections, refractions etc.
These rays may hit a point on the object which is off screen. If
the offscreen_is_environment is on, these rays will return
the environment. If it is off, the offscreen_color is
returned. In either case, this color is not affected by neither
the multiplier nor gamma.
mip_matteshadow
This shader is used to create "matte objects", i.e. objects who
is used to "represent" existing real world objects in an existing
photographic plate, for the purposes of...
- ...blocking another synthetic object from the cameras view
(to allow the synthetic objects to go behind the real world object).
- ...allowing synthetic objects to cast shadows and occlusion on
and receive shadows from the real world objects.
- ...adding reflections of synthetic objects onto real world objects.
- ...allow the interplay of indirect light between synthetic and real
world objects.
In all above cases the mip_matteshadow is applied to an object
representing the real world object, and the synthetic object is
using a traditional material.
The shader can also function as a "shadows only" shader, i.e. a shader
which only shows how much in shadow a point is compared to the incoming
light, but ignoring the actual amount of incoming light itself (only the
occluded percentage of it).
declare shader
        struct {
            color "result",
            color "shadows_raw",
            color "ao_raw",
            color "refl_raw",
            color "indirect_raw",
            color "illumination_raw"
        } "mip_matteshadow" (
        color   "background"        default 0 0 0 0,
        # Shadows
        boolean "catch_shadows"     default on,
        color   "shadows"           default 0 0 0 1,
        color   "ambient"           default 0.2 0.2 0.2,
        boolean "no_self_shadow"    default on,
        boolean "use_dot_nl"        default on,
        scalar  "colored_shadows"   default 1.0,
        # AO
        boolean "ao_on"             default on,
        color   "ao_dark"           default 0.0 0.0 0.0,
        integer "ao_samples"        default 16,
        scalar  "ao_distance"       default 0.0,
        # Reflections
        boolean "catch_reflections" default off,
        color   "refl_color"        default 0.2 0.2 0.2 0.2,
        color   "refl_subtractive"  default 0.2 0.2 0.2 0.2,
        integer "refl_samples"      default 0,
        scalar  "refl_glossiness"   default 10.0,
        scalar  "refl_max_dist"     default 0.0,
        scalar  "refl_falloff"      default 2.0,
        # Indirect
        boolean "catch_indirect"    default off,
        color   "indirect",
        # System
        boolean "multiple_outputs"  default off,
        # Additional illumination
        boolean "catch_illuminators" default off,
        array light "illuminators",
        # Extra input
        color   "additional_color"  default 0 0 0,
        # Light linking
        integer     "mode",
        array light "lights"
    )
    version 6
    apply material, texture
end declare
NOTE: This section will only briefly lists the parameters
and the section "usage tips" on page matteuseagetips gives an in
depth explanation of different use cases.
The shader has multiple outputs (it returns a struct). However, by default
(for compatibility reasons) it only fills in the first item of the struct,
the compound "result". Only if the parameter multiple_outputs is
enabled are the separate results written to the other outputs.
The background parameter is the background color. If neither of the
catch_... options are on, this result is simply returned, including
its alpha, and the shader does nothing. Otherwise it is the base color upon
which all the other operations occur. When using external compositing this is
generally transparent black (0 0 0 0), otherwise one would use the real
world background plate mapped with the mip_cameramap shader.
The catch_shadows option enables other objects to cast shadows
on this object.
The shadows parameter is the color of the shadows. When shadows
are detected, a blend between background and shadows
depending on how much "in shadow" the point is.
The ambient parameter sets a "base light level". It raises the
lowest "in shadow" level. For example, if this is 0.2 0.2 0.2 the darkest
shadow produced will be an 20 percent blend of background to a 80
percent blend of shadow (unless ambient occlusion is enabled).
Turning on the no_self_shadow option (and also using an
instance of the shader as shadow shader) causes any object using
mip_matteshadow not to receive shadows on any
other such object.
The use_dot_nl option defines if the angle to the light is
considered when calculating the incoming amount or not.
If color_shadows is 0.0, all shadows are cast in gray scale.
If it is 1.0, the shadows have full color. For example, if the surface
is lit by one red and one green light, the red light will have a green
shadow, and the green light will have a red shadow.
If ao_on is enabled, a built in Ambient Occlusion
(henceforth simply called "AO") is applied based on the color in
the ambient parameter. The AO respects the
no_self_shadow switch and will not cause AO from objects
with the same material instance as itself.
The ao_dark parameter decides how dark shadows the AO
will cause. The default black is generally adequate, but a lighter
color will cause a less pronounced shading effect.
ao_samples number of AO rays are shot. One can limit the reach
of the AO rays with the ao_distance parameter. If it is zero,
the rays reach infinitely far. Short rays increase performance dramatically
but localizes the AO effect.
The catch_reflections turns on reflections.
The refl_color is the multiplier for reflections. Note that
the alpha value of this color is important in that the reflections will
influence the alpha by this amount. In some cases the reflections may
need to be subtractive, in which case refl_subtractive is
used - see page matteuseagetips for details.
The refl_samples parameters sets the number of glossy
reflection samples. If it is zero, mirror reflections are used.
Otherwise the refl_glossiness sets the ward glossiness
for reflections.
Reflections are seen at most refl_max_dist and the shape
of the falloff is refl_falloff, very similar like the
base library's shader mib_glossy_reflection.
If the option catch_indirect is enabled, indirect light is
gathered and scaled by the indirect color (which one generally
sets to the same as the background color, thereby treating the
background color as a reflectance value for the indirect light).
The multiple_outputs causes the shader to output more than
a single value in the returned struct.
If the catch_illuminators switch is on, the lights listed
as illuminators are tested and allowed to actually light
the scene. This is a simple Lambertian illumination treating the
background parameter as the diffuse color2.
The additional_color is a color input simply added to the
result, for easy shader graph construction. It can be used for anything3.
Finally, mode sets the light inclusion/exclusion mode and
lights is the light list used for casting shadows, just like in
many other shaders.
The shader also has multiple outputs. For compatibility, the shader
does not actually write any values to anything but the main output if the
multiple_outputs parameter is not on. But if this parameter is
enabled, the shader outputs the following values:
- result - the compound result.
- shadows_raw - the raw full-color shadow pass on white
background, suitable for compositing on top of a background in "multiply" mode.
- ao_raw - the raw ambient occlusion.
- refl_raw - the raw reflections
- indirect_raw - the indirect light arriving
- illumination_raw - light gathered from any lights in the
illuminators list.
All outputs are as "raw" as possible to be maximally useful as layers in post production,
e.g. the reflections have not been multiplied with the reflection color, etc.
mip_matteshadow_mtl
This is a material phenomena that embeds mip_matteshadow, and
applies it as surface, shadow and photon shader for a material. It has the same
parameters as mip_matteshadow itself, plus a scalar opacity.
The opacity does not apply to the shadows or photons, but only to the visible
surface shading itself. By using the opacity, one can use painted masks
for irregular edges. For example, use a simple tapered cylinder to roughly
match a forearm, and use a camera-projected mask (applied with the help of
mip_cameramap) for the actual contours of the arm. This also
allows matching motion blur that may be present in the background plate
with the help of masks.
Usage Tips
The shaders in this section are concerned with combining a real
world photographic plate with synthetic objects. For the sake of
our examples, we are basing them on the following photograph
of a kitchen counter, with an old beat up plastic salt shaker,
a spice jar, a piece of paper, and some other things on it:
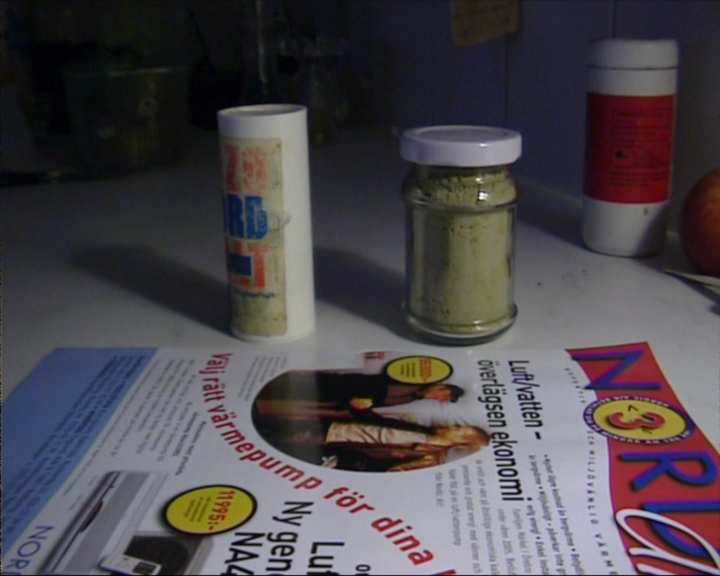
This is our background photograph. This is not a rendering... yet.
Camera Mapping Explained
What is the difference between mip_cameramap and the
mib_lookup_background from the base library?
The main difference is
that the former only uses the current raster position (i.e. x and y
coordinate of the pixel currently being rendered) whereas the
latter actually calculates the image space position of the shaded
point.
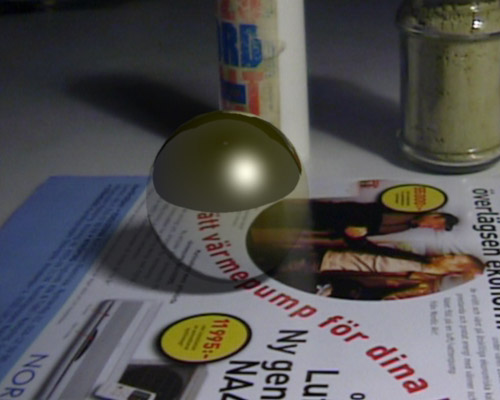
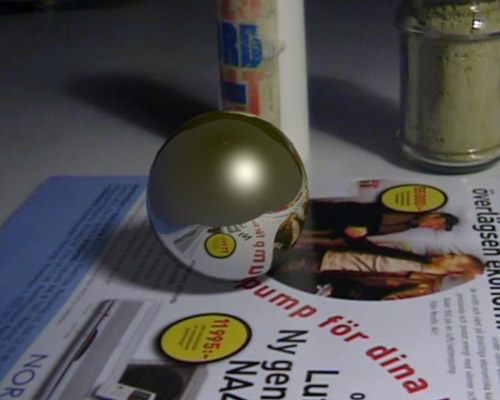
Why does that matter? Lets try an example. See the following example
of reflective sphere on top of a background photograph mapped to a
flat plane using the two different shaders:
mib_lookup_background
mip_cameramap
Notice how the left image, which uses mib_lookup_background
looks incorrect. It looks transparent rather than reflective. What
is the cause of this?
Imagine we are rendering pixel coordinate 200,200 which lies on the
sphere. An eye ray is sent that hits the sphere. This hit point is
indeed on the 200,200 pixel coordinate. But the ray continues
as a reflection ray to hit the ground plane.
This new point (on the ground plane) is not the same as the pixel being
rendered, it is somewhere else in the model.
Yet mib_lookup_background only concerns itself with the current
pixel (200,200) and will return the color at that point from the map.
Conversely, mip_cameramap actually converts this new
point to a new set of raster coordinates (e.g. 129,145) and will
look up the map at that new position, creating the correct
appearance in the reflection.
However, there is a snag; what happens if the reflected point lies
outside the screen? What if the calculated raster coordinate is
(-45, 39)? The answer is that mip_cameramap either returns the
specified color, or, if offscreen_is_environment is on,
returns the environment color for that ray direction.
Matte Objects and Catching Shadows
In this section we will use mip_matteshadow to create
stand-in objects (also known as "matte objects") for real world
geometry. For the example we only concern ourself with the old
plastic salt shaker on the left of the image, and the kitchen
counter itself. The following simple 3D model has been constructed:
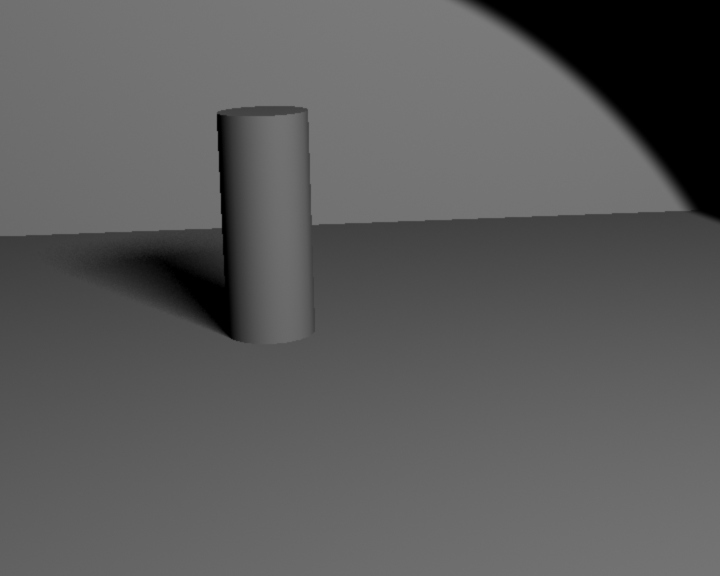
The simple 3D model of our background
If we are not using mip_matteshadow and for example
simply attempt to map our background to a standard Lambertian surface
we get the following result:
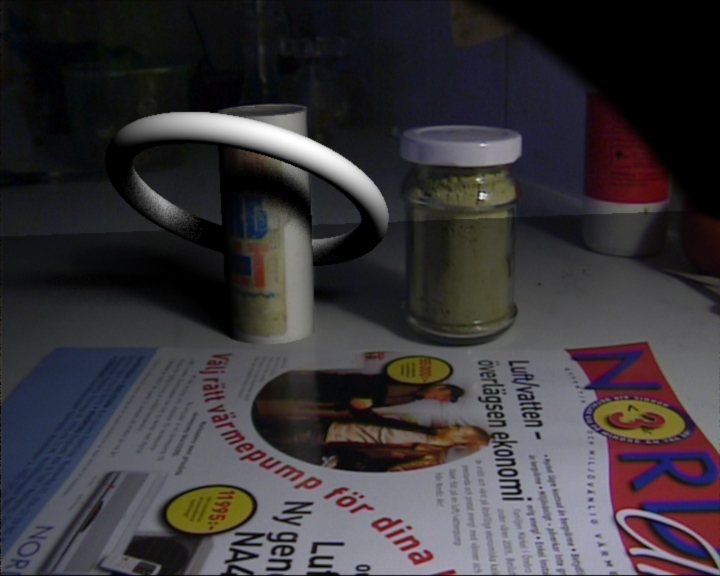
Mapping the background onto a Lambert shader
Clearly unsatisfactory, since Lambertian shading is applied on
top of shading already present in the real world image. What
we need is to separate shadows from the shading.
This can be done using use mip_matteshadow. Lets show
the result by applying the shader with a white background and
black shadows:
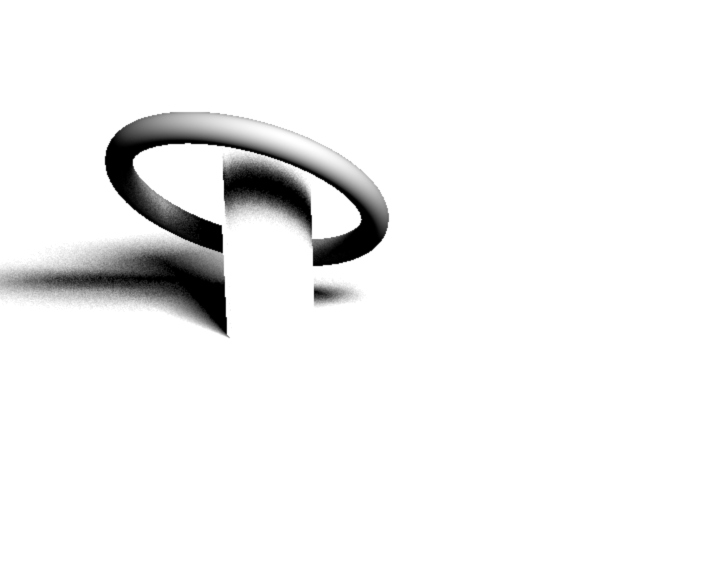
Raw shadow information
This image contains the raw shadow information, and is otherwise
white. This mode of operation is very useful for external compositing
usage, where a completely separate shadow pass can be
generated by making the synthetic objects invisible to the camera
(the torus in our case) and using mip_shadowmatte with
white background and black shadows.
NOTE: This usage supports colored shadows!
With a red and green light present, the green light will show
red shadows and vice versa.
There is one problem with the above image: It contains a shadow
of the salt shaker. But our real-world picture already contains
a shadow of the salt shaker. This is solved by the following steps:
- Applying mip_matteshadow as the
shadow shader for the material.
- Turning its no_self_shadow option on.
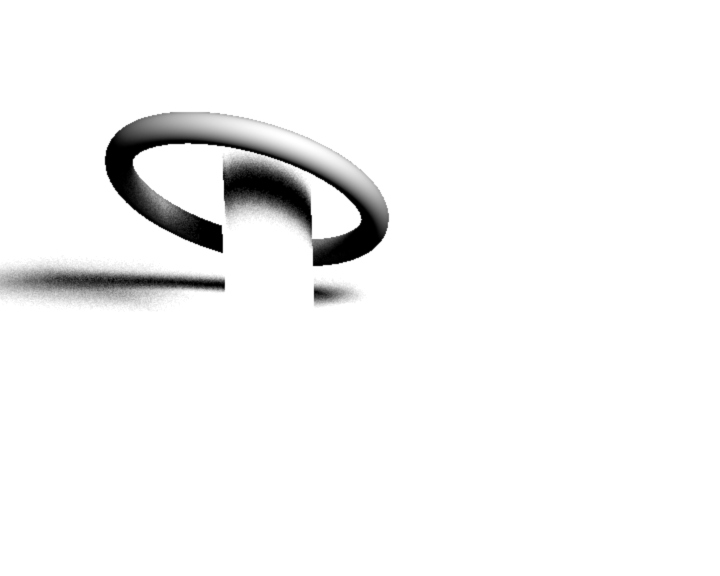
The mip_matteshadow material does not shadow itself
When the shader is used as the materials shadow shader and
the no_self_shadow is on, no object with
mip_matteshadow will shadow another object with
mip_matteshadow, but will still cast shadows on
other objects, and other objects will cast shadows upon it.
Notice however that the shadows are very dark and the torus
shadow thrown onto the salt shaker has a harsh left
edge. To solve this, one can set the ambient color
to a low value and turn on use_dot_nl which will
make the shadows "fade out" as they become perpendicular
to the light, avoiding the harsh edge:
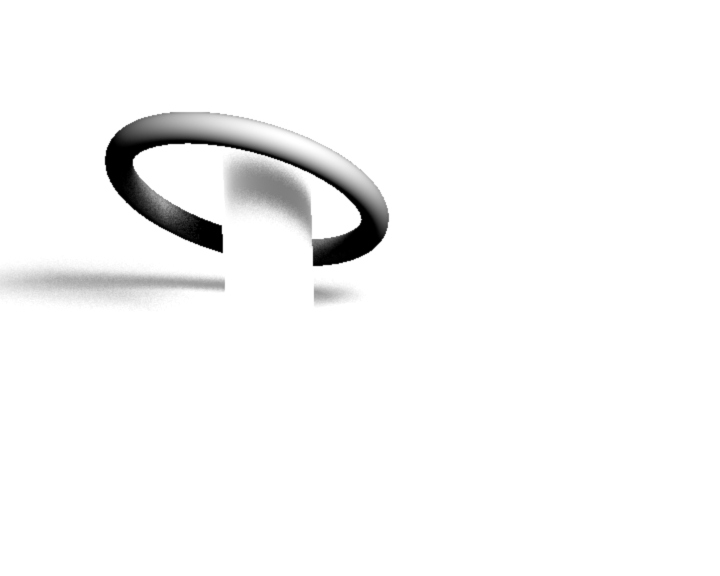
Lighter shadow and use_dot_nl on
At this point we can replace the white color with our background
using mip_cameramap:
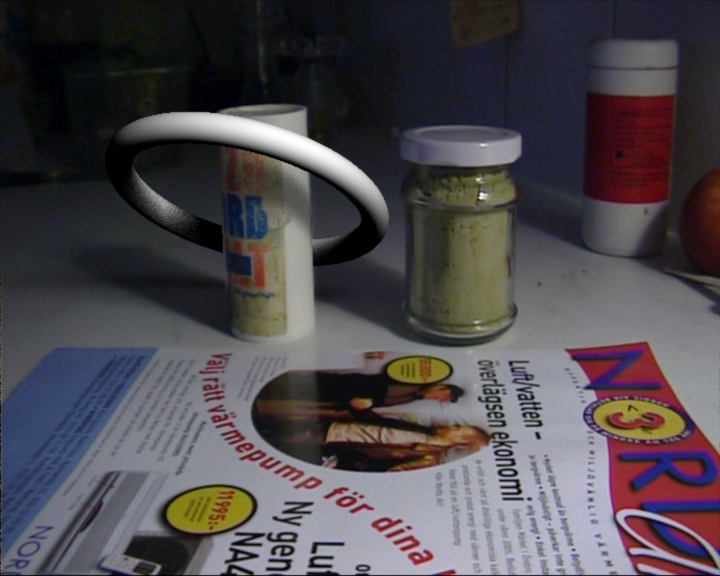
Background used instead of white
Advanced Catching of Shadows
Shadows can be handled in several ways with mip_matteshadow.
We already mentioned the method above of creating a shadow pass
using a white background and black shadows setting.
We also showed the method of using a picture for background
and black for shadows.
There are two other options, however:
One is to use a picture of the lit scene for background
and another picture of the scene in shadow for the shadow
parameter.

The scene fully lit
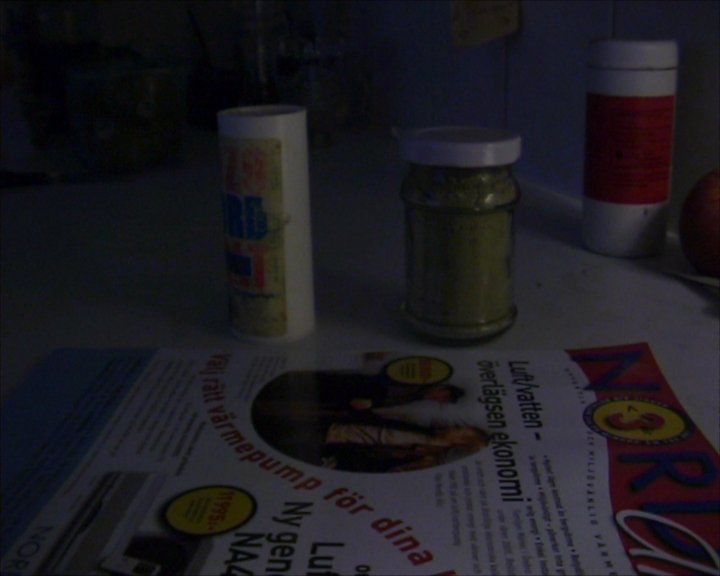
The scene in shadow
This technique is especially useful since it solves any
self-shadowing issues perfectly, it is even advised to have
no_self_shadow off in this mode. Here is the result:
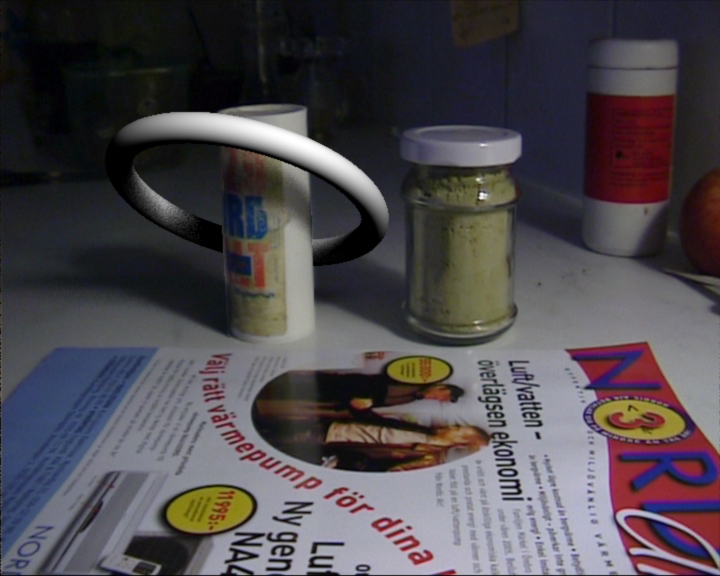
Shadows come from unlit version of photo
This gives amazing detail and automatically gives the "correct"
color and strength of shadows without any tuning being necessary.
A final way is to handle shadows completely in external compositing.
This is accomplished by setting background to 0 0 0 0
(i.e. transparent black, alpha is zero) and shadow to 0 0 0 1
(i.e. opaque black, alpha is one).
This will create a rendering as follows:
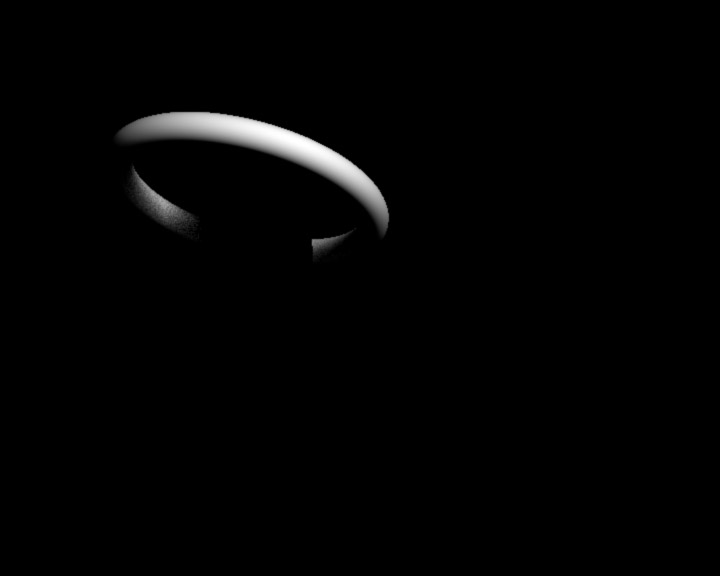
The color channels
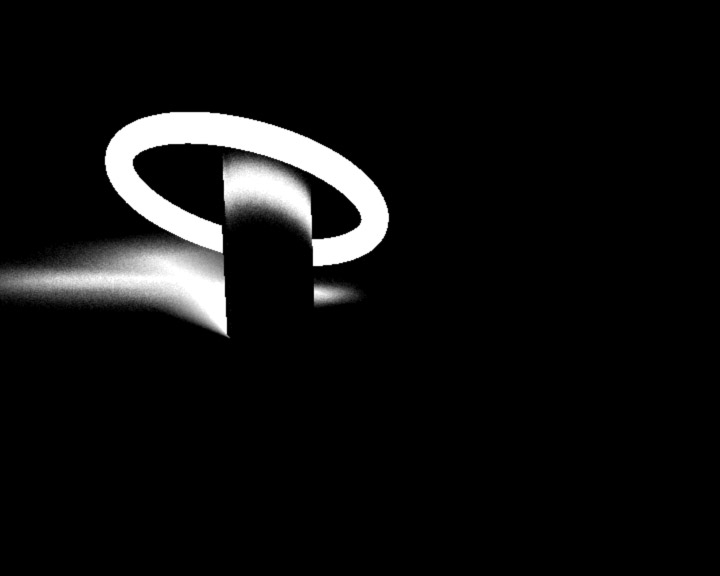
The alpha channel
This image can be composited on top of the background externally since
the shadow information is present in the alpha channel.
Reflections
Since we are using mip_cameramap reflections and refractions
of the background objects work correctly:
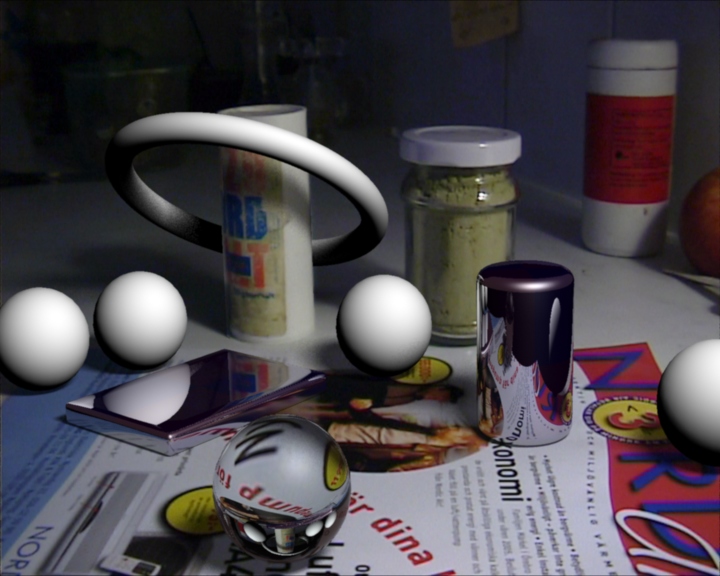
Reflection and refraction
Note how even the reflection of the salt shaker is correct.
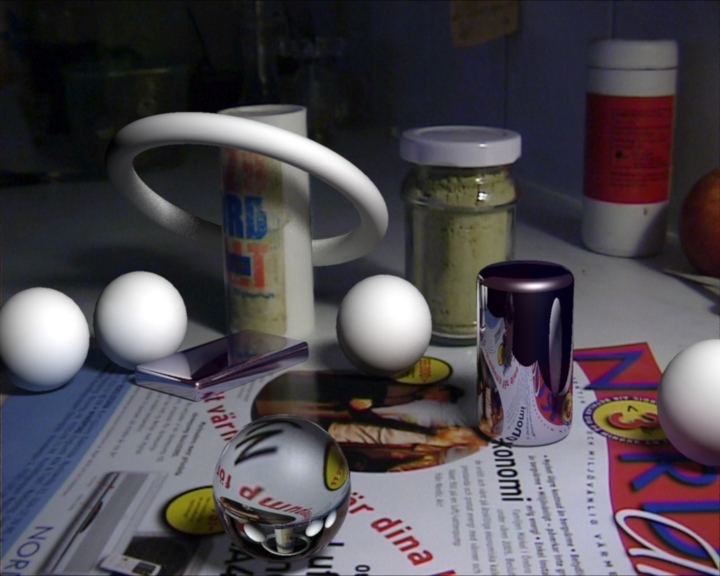
Note that this also means final gathering will pick up the background
as indirect illumination correctly:
Final gathering lights up our objects
The shader can also show (glossy) reflections of other objects:
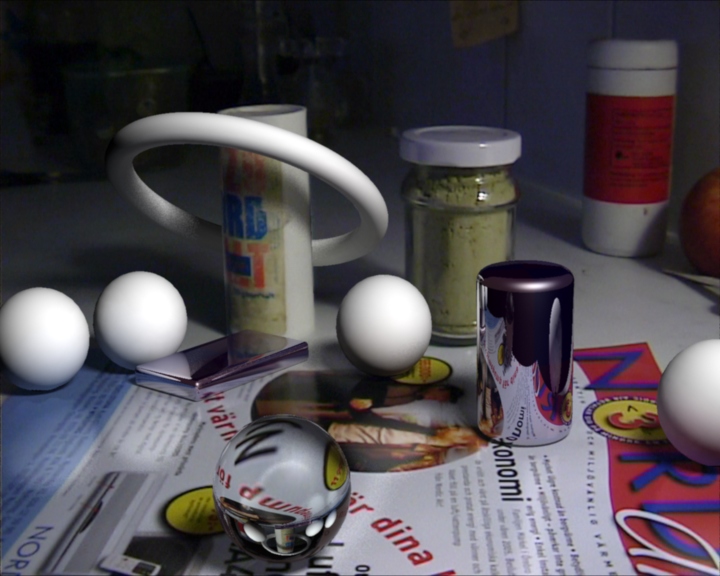
Glossy paper reflects our objects
Please note how the reflection only involves the actual synthetic
objects added, the shader already assumes that the real world
photo contains reflections for the other real world objects, i.e.
a mip_matteshadow object never reflects another, nor
does it reflect the environment.
One subtle detail is still missing, though. Notice how the
cylinder is reflecting the paper, but nothing else. This is
because the mip_matteshadow does not know what to
do about rays that hit the ground plane somewhere "off
screen".
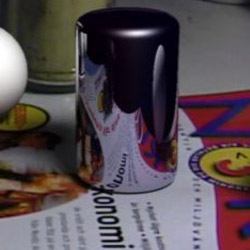
No reflections
This is solved by using the offscreen_is_environment
parameter of mip_cameramap, and then utilize
an environment map (for example mip_mirrorball) to
supply an environment map:
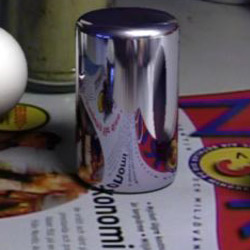
Much better
The shader can also receive indirect light such as final
gathering and (if also applied as photon shader) photons.
To demonstrate this we enable catch_indirect and turn
our white objects luminous red and made sure our glass sphere
generates caustics:
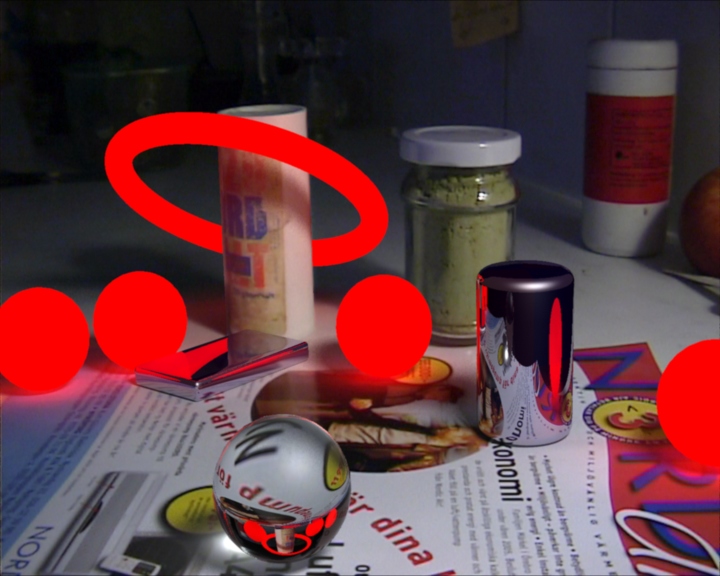
Receiving indirect light
As above, the shader makes sure no indirect light is bounced
from one matte object to another, and no indirect light is received
from the environment (since both these effects are assumed to be
present in the original real-world photo).
A final special case for reflection is when the background photo
already contains massive amounts of reflections. Here is
a new background photo on top of a highly reflective surface:
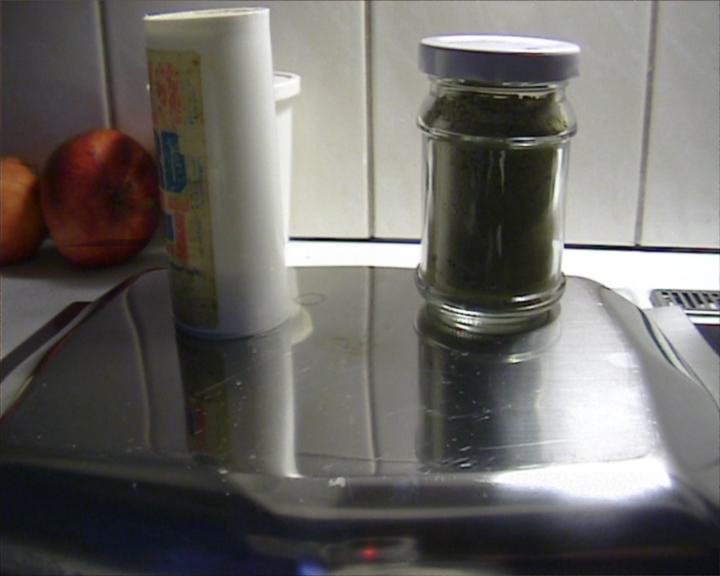
Photograph of our salt shaker on a very reflective surface
If we add our synthetic objects to this scene and use the same settings
we used for the glossy paper, we get the following rather odd looking
results:
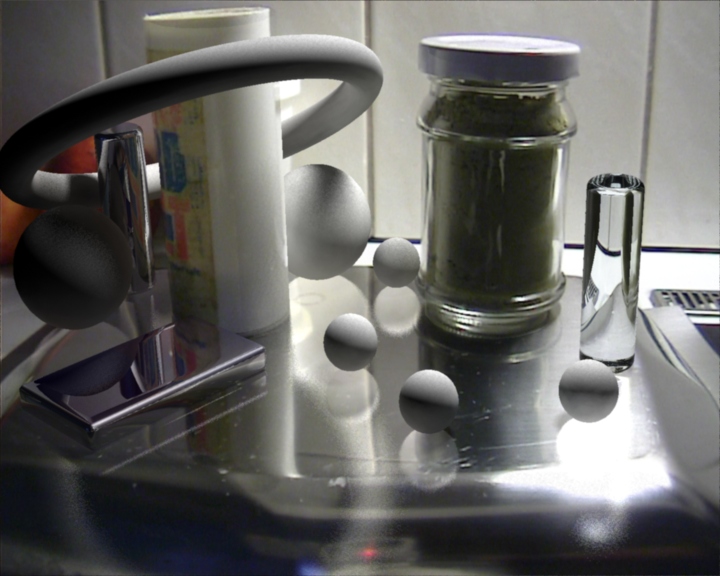
Additive reflections - doesn't look right
But this looks very incorrect! One can see the reflection of the
background through the added reflections, and the added reflections
appear much too bright.
To fix this one uses the refl_subtract to set the amount of
attenuation of the background caused by the reflection. Naturally this
can be a painted map to match reflective areas in the image, i.e. a
water puddle in front of a house etc.
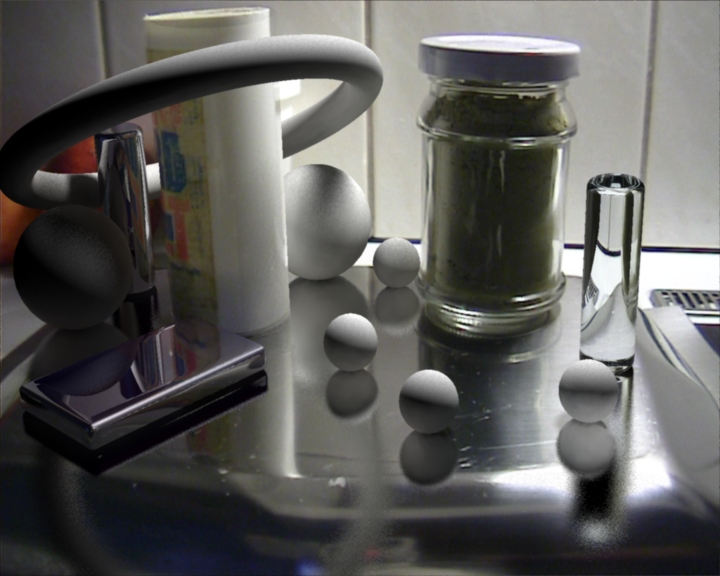
Subtractive reflections - that's much better!
The correct result. The synthetic reflections override the
existing reflections and replace them! Also note that even
reflections of objects
behind a real world object inside a real world reflection
works correctly (the white ball
behind the salt shaker is behind it even in the reflection).
Finally, all objects pick up indirect illumination based on the
background plate itself. Only one rectangular area light source exists
in the rendering.
Reflections and Alpha
When preparing for external compositing and using transparent black
for background and opaque black for shadows it is
important that reflections also get an alpha channel.
The alpha component of the refl_color parameter defines
how much the reflection is present in the alpha channel.
Likewise the alpha component of the indirect parameter
defines how much indirect light is seen in the alpha channel.
Neither of those have any function if the alpha of the background
is 1.0, i.e. when using a background photo.
Best-of-Both-Worlds Mode
If one need the synthetic objects to reflect the real objects but
still want the flexibility of external compositing for shadows (i.e.
one does not want to add in the background already when rendering)
one can create a hybrid approach.
This is accomplished with the help of the mip_rayswitch
shader. Use the shader to switch between using a transparent
black (0 0 0 0) background for eye rays and using the camera mapped
photo for other rays (e.g. reflection, refraction and final gathering).
Conclusion and Workflow Tips
Here is a simple step-by-step workflow to render synthetic objects into a
background plate. It assumes one has
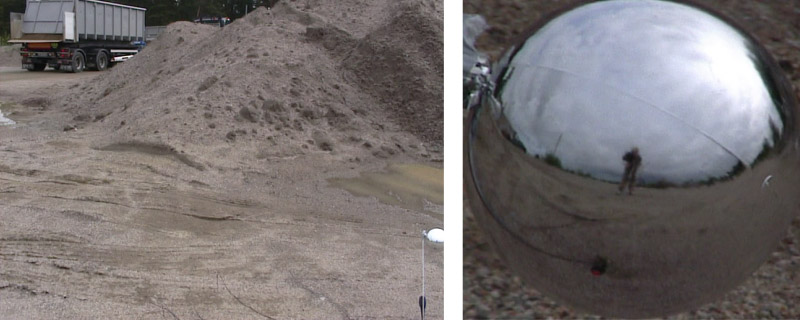
Prerequisite stuff
- A background plate
- A mirror ball photo taken from the same camera angle
4
Then perform as follows:
- Put mip_rayswitch_environment in the mental ray camera
environment.
- In its background slot, use a mip_cameramap
with the background plate in its map slot.
- In its environment slot, use mip_mirrorball with
the mirror ball photo in its map slot.
- Create a ground plane, and use mip_matteshadow as the
surface, shadow and photon shader on that ground plane.
- Use the same instance of mip_cameramap in its
background parameter.
- Add lights to mimic the "real world" lighting, or use
final gathering based on the environment, or a combination thereof
to achieve the proper shading.
- Tune any ambient occlusion by setting the ambient parameter
of mip_matteshadow and adjusting the ao_distance.
- If the "ground" should catch general indirect lighting, enable
catch_indirect and connect the map in background
to indirect as well.
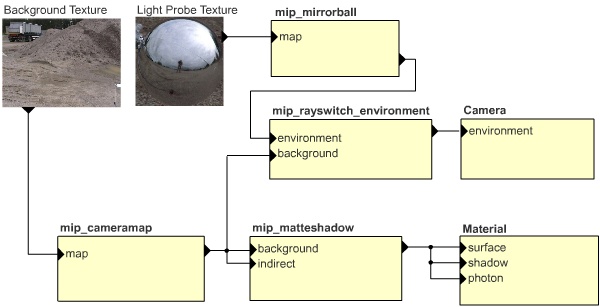
The shade tree
Add any CG objects with physically plausible shaders (such as the
mia_material from the Architectural library). Render. Smile.
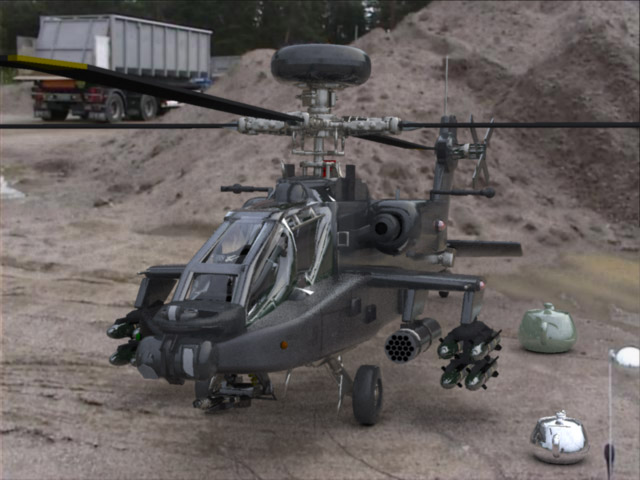
Render. Smile.
Footnotes
- 1
-
When we use the term "synthetic" we mean additional objects
to be inserted in the scene, and "real world" for objects
that are already there.
- 2
-
The difference between lights and illuminators is that
the lights are only used to cause shadows on the background,
whereas the illuminators are used to throw actual light
on it. This means that the lights array should contain lights
which are already present in the background plate, and the
illuminators array contains any additional lights introduced
by a CG element, for example the headlights of a CG car.
- 3
-
For example to add a specular
highlight to an illuminator by plugging in a mib_illum_phong
with it's diffuse color set to black.
- 4
- One can often get away with a low dynamic range mirror ball
photo if one keeps it slightly underexposed.


