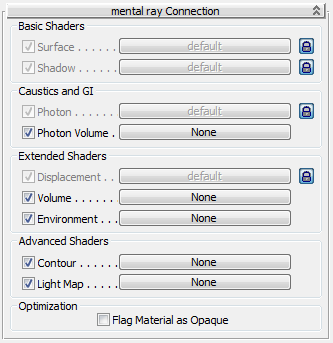
The mental ray Connection rollout is available for all types of materials except the Multi/Sub-Object material and most of the mental ray materials themselves (for which it would be redundant). With this rollout you can add mental ray shading to conventional 3ds Max materials. These effects are visible only when you use the mental ray renderer.
Interface

For each kind of shader on this rollout, there is a toggle and a button.
- The toggle controls whether the assigned shader is active or not.
If no shader is assigned, the toggle has no effect.
- The button lets you assign a shader to the component type. Clicking it displays the Material/Map Browser: Assigning a shader is just like assigning a map to a component of a standard material.
While a shader is assigned, its name appears on the button.
-
 In addition to the toggle and button, some of the shader types have a lock button to the right. When button is on, the component is inherited from the base material, and you can't assign a shader. For example, by default the Surface component is locked, and the surface is shaded using the settings of the 3ds Max material (basic parameters, maps, and so on). Turn off this button to replace the base material's settings with a mental ray shader. Note: Using a shader for the Surface component can result in a material whose appearance in mental ray renderings is completely different from the appearance it has in the sample slot, viewports, and scanline renderings.
Basic Shaders group
- Surface
- Shades the surface of objects that have this material. Default=Locked to parent material.
In addition to any of the usual 3ds Max materials, the surface component can be assigned the following mental ray materials or shaders:
Note: Unlike a standard 3ds Max material, if you assign the Surface component a bitmap with tiling turned off, the original surface color does not “show through.” In renderings, you see only the untiled map, and none of the rest of the object. - Shadow
- Assigns a shadow shader. Default=Locked to parent material.
The shadow component can be assigned the following shaders:
Caustics and GI group
- Photon
- Assigns a photon shader. Photon shaders affect how object surfaces respond to photons; that is, they control how the surfaces behave when generating caustics and global illumination. Default=locked to parent material.
The photon component can be assigned the following shaders:
- Photon Volume
- Assigns a photon volume shader. Photon volume shaders affect how an object's volume responds to photons; that is, they control how the volume behaves when generating caustics and global illumination.
The photon volume component can be assigned the following shaders:
Extended Shaders group
- Displacement
- Assigns a displacement shader. Default=locked to parent material.
The displacement component can be assigned the following shaders:
- Volume
- Assigns a volume shader.
The volume component can be assigned the following shaders:
- Environment
- Assigns an environment shader. The environment shader provides an environment local to the material. It is visible if the material is reflective or transparent.
The environment component can be assigned the following shaders:
Shader Material to Shader Shader List
Advanced Shaders group
- Contour
- Assigns a contour shader.
The contour component can be assigned the following shaders:
- Light Map
- Assigns a light map shader. Note: No light map shaders are provided with 3ds Max. This option is for users who have access to light map shaders via other shader libraries or custom shader code.
Optimization group
- Flag Material as Opaque
- When on, indicates that the material is fully opaque. This tells the mental ray renderer that it doesn't need to process transparency for this material, or to use the shadow shader. This can improve rendering time. Default=off.