This special-purpose material is automatically applied to any point-cloud object you add to the scene. Controls include overall color intensity, ambient occlusion, and receiving shadows.
Point-cloud objects do not, by default, respond to scene lighting. You must enable point-cloud objects to respond to scene lighting.
Procedure
To use the Autodesk Point Cloud material in Slate Material Editor:
- Make sure the active renderer is NVIDIA mental ray.
- Add a point-cloud object to your scene.
- Press the M key to open the Slate Material Editor.
- Scroll the Material/Map Browser on the left side of the editor to the Scene Materials section, near the bottom.
One of the items in this section is the Autodesk Point Cloud material.
- Drag the Autodesk Point Cloud material from the browser into the View window, then double-click the node.
The node appears in the View window. Linked to it is the Gradient Ramp map that is a default component of this material. This map comes into play when you set the object's Color Channel to Elevation Ramp or Intensity Ramp.
- Double-click either node to edit its settings on the right side of the Editor window.
Interface
Color Intensity rollout

- Multiplier
- Specifies the overall brightness of the point-cloud object. Lower values produce a darker surface, while higher values produce a brighter surface. Default=1.0.
Note: The results of this setting appear in rendered output only, not in the viewports.

Adjusting the Multiplier value
1: Multiplier=0.1
2: Multiplier=1.0 (the default)
3: Multiplier=10.0
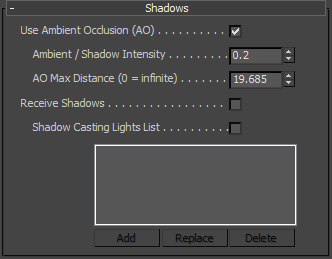
Shadows rollout

- Use Ambient Occlusion (AO)
- When on, causes shadowing to appear in small crevices where real-world light would not reach.
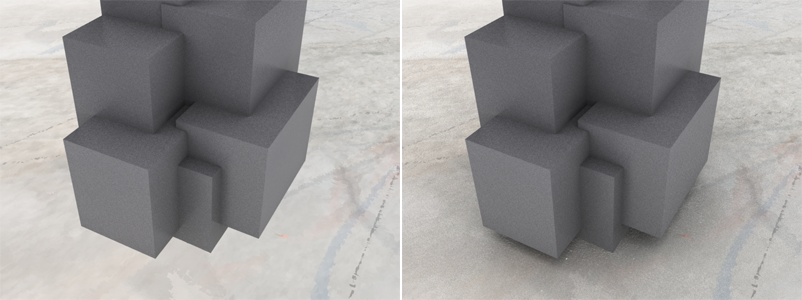
In the following illustration, a 3D object was placed atop a flat point-cloud object and rendered with ambient occlusion off, then on. The resulting shadowing under the 3D object makes it appear to be much more a part of the scene.

Left: Use Ambient Occlusion off
.Right: Use Ambient Occlusion on
- Ambient / Shadow Intensity
- The amount of environmental light in the scene, which in a practical sense is how dark the shadows are. Default=0.2.
The units value for this setting depends on the lighting unit. If you use the mr photographic exposure control, and set Physical Scale to Physical Units (cd/m 2 ), this value will be in physical values, and might need to be in the hundreds (or thousands for an outdoor shot lit by mental ray Sun & Sky). However, if you don’t use the exposure control, or set it Physical Scale to Unitless, this parameter is in a "traditional" unit space where 0 is black and 1 is white.
Note: This "ambient" light is affected by ambient occlusion, so it is darkened by the occlusion at contact points and in areas hidden under objects. - AO Max Distance
- The extent of the shadowing caused by ambient occlusion. When set to 0, the shadowing extends throughout the entire scene.
- Receive Shadows
- When on, objects between the point-cloud object and any shadow-casting lights cast shadows on the point-cloud object. To permit only certain lights to cast shadows on the point-cloud object, use the Shadow Casting Lights List controls (see following).
- Shadow Casting Lights List
- When on and Receive Shadows is also on, only lights in the list can cast shadows on the point-cloud object. When off, and Receive Shadows is on, all shadow-casting lights in the scene can cast shadows on the point-cloud object.
The list includes these controls:
- Add To cause a light to cast shadows on the point-cloud object, click Add and then select the light. Repeat for each light to add to the list.
- Replace To replace a light in the list with another in the scene, first highlight the light to replace in the list, then click Replace and select the replacement light.
- Delete To prevent a light from casting shadows on the point-cloud object, highlight its name in the list and then click Delete.