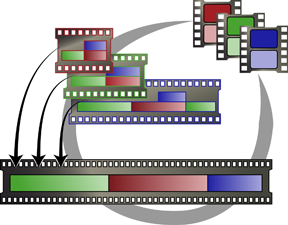
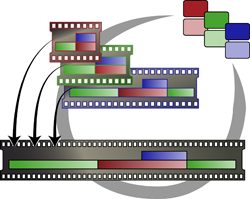
Connected Conform is a set of tools created to help you conform sequences that share similar sources and similar contents, either mono or stereoscopic. Aimed at helping you deliver multiple deliverables, it offers you two new types of specialized sequences, the Sources Sequence and the Shots Sequence. The former helps conforming multiple sequences in a single operation, the latter helps consolidate with shot distribution and processing.
Connected Conform is there to help you when you have multiple deliverables that share structure and source media but:
- Are of varying length.
- Require different finishing tasks such as visual effects or titling.
- Use the same media, but in different locations, or of different durations, or even uses different sections of said media.
The Connected Conform tools allow you to:
- Conform a group of imported sequences in a single operation.
- Consolidate media ingest and linking by tying together related metadata of the segments.
- Manage and distribute shots to be worked on from a central location.
- Integrate the worked on shots with the imported sequences for final delivery.
All this can be accomplished using the Connected Conform tools which include:
- Sources Sequence, a specialized sequence to conform multiple sequences in a single operation.
- Shots Sequence, a specialized sequence to help with shot distribution and processing
- Connected Segments, a concept to share information between related segments across different sequences.
- Reel Group and the Sequences reel, which provides a central location for the Connected Conform workflow.
Connected Conform Workflow Overview
What follows is an example of a Connected Conform workflow. Also provided, links to online videos.
| Step 1: Connecting Sequences | |
|---|---|
| Online tutorial: Connected Conform Workflow - Conforming & The Sources Sequence | |
 |
Do one of the following
|
| Step 2: Connecting Segments | |
|---|---|
| Online Tutorial: Connected Conform Workflow - Metadata & The Shots Sequence | |
 |
Lock a track to exclude its segments from being included in the Shots Sequence. Applied Batch FX gets carried over to the Shots Sequence, but might prevent shots from connecting between sequences. Note: If you defined a limited amount of handles but need more content from the original source media file:
|
| Step 3: Apply VFX and Distribute Shots | |
|---|---|
| Online Tutorial: Connected Conform Workflow - Using Batch FX and Batch | |
 |
Work in context of the timeline:
Work on individual shots, in the context of Batch:
Note: This example assumes that there is only one artist working on the sequences. But you could well distribute the shots (Batch Groups) using the Shared Libraries. Or without creating Batch Groups, you could use the Shot Publish approach to distribute the shots. Both approaches create a Version track and use placeholder segments.
|
Creating Batch Groups
Once you have created a Shots Sequence, you can, from Conform, create Batch Groups. One batch group is created for each different Shot Name within the selected segments. Each batch group can be seen as a discrete unit of work encapsulated.
Creating a Batch Group:
- Select the segments for you need to composite in Batch.
The Batch Group can be created from any sequence within a Sequences reel, including from the Shots Sequence.
- Assign a Shot name to the segments, using the Events list in Conform View, or the contextual menu.
Segments without a shot name do not create a Batch group.
- Create the Batch Group. Do one of the following:
- In Conform View, click Create Batch Group.
- In Timeline View, right-click the timeline and select Create Batch Group.
One Batch group is created for each unique Shot name, in the location defined by the Batch Group Destination box. Each segment of the shot becomes a clip node inside Batch, stored in a Schematic Reel.
When you use Create Batch Group in Conform, that Batch group's Render node uses the following settings:
- Its attributes, such resolution, source timecode, or tape name, are taken from the back plate. The node is also connected to the back plate.
- Its In/Out marks are from the original timeline segment.
- Its name is set to the Shot Name, or by the Default Render Node Name preference.
When you create a Batch group, a related segment is created on a new Version track in every sequence connected to Shots Sequence by the connected segments. By using Replace Media, this related segment can be replaced with the result of the Batch group, with every connected sequence automatically inheriting the replacement.
Once the work is done in Batch:
- Render the result.
The rendered clip, with the original clip's metadata, can be found in the Batch Renders reel.
- Open the Timeline view.
- In the Shots Sequence, on the new Version track created previously, select the related segment to be updated.
- Select the rendered clip from the Batch Renders reel.
- Select Replace Media from the Secondary Edit box. The new media is now available across all connected sequences.
Selecting where Batch Groups are created:
- Use the Create Batch Group Destination box to decide where the Batch Groups are created.
- You can choose to create Batch Groups in a new library, a new shared library, or as a series of batch group of reels.
- Pick Destination allows you to select a destination when you create the Batch groups.
Operations To Avoid When in Connected Conform
When working in the context of Connected Conform, avoid the following:
- Applying a Gap FX
- Any created Gap FX is local to the sequence where it is created; a Gap FX is not connected between connected sequences.
- Applying a Batch FX to vertically composited segments
- The flattening of the vertical structure require by a Batch FX disables segment connections since it destroys the spatial information for the concerned segments. Use instead the Create Batch Group workflow, where such information is preserved.
Note: Applying a Batch FX to an individual segment is a supported operation in the context of Connected Conform.
Connecting Sources
Use Source Segment Connection to set Connected Segment from a source to other instances of this source within the same Reel Group. For example, perform your colour corrections from the Sources Sequence Once done, propagate the changes to every instance of the source you worked on, to every sequence in the Sequence Reel.
- In the Sources Sequence, right-click the segment with the source media that you need to connect and select Create Source Segment Connection.
This connects together every segment, in the Sequences reel, that uses the same source media.
- Use the Sources Sequence as a working sequence.
- Use Sync Connected Segments from the contextual menu to propagate the effects to you deliverables' sequences.
The scope of Create Source Segment Connection can be set from the contextual menu's Source Segment Connection Options:
- Sequences Only: Enable this option to connect only segments located in the Sequences Reel. Disable this option to extend the scope of the connection to the whole Reel Group, including the Sources reel.
- Overwrite Existing Connections: Enable this option if connections already exist but you want to overwrite them with new ones. For example, you duplicated multiple times a segment referencing the same source, but now you need these connections to share the same source segment.
- Sync Up: Enable this option to synchronize the segments as soon as the connection is created. This automatic sync only happens when the connection is first created: after this, you need to manually synchronize the segments.
Adding a sequence to sequences already connected through Source Connection:
- Verify that the sources for the already imported sequences are all saved in the Sources reel.
If the sources are not available in the Sources reel,
- Add a sequence to the Sequences reel.
- Disable the Save Sources option.
- Link to the sources located in the Sources reel. This automatically adds Source Segment Connections to the new sequence, complete with the link icon.
For this operation to work properly, you must make sure that Save Sources was enabled and that the sources were all imported to the Sources reel the first time you created the Sources Sequence. And when you import and relink the new sequence, the Save Sources option must be disabled. Because Flame assigns a different ID to a source every time it is imported, and because the Source Connection relies on that ID to create the connection,